
Boating › OUPV License › Lifesaving and Survival
Lifesaving and Survival
Examined in Q170, Q356, Q360.
What the Coast Guard lists under this subject
Lifesaving
Survival at Sea
Lifesaving Appliance Operation
Abandon Ship Procedures
Verbatim from the National Maritime Center's published examination topics.
§ 180.10 Applicability to vessels on an international voyage.
The regulation, word for word — 46 CFR 180, § 180.10
A vessel on an international voyage subject to the International Convention for the Safety of Life at Sea, 1974, (SOLAS) must meet the requirements in subchapter W of this chapter for passenger vessels in the same service, instead of the requirements of this part.
Amendment history: [CGD 85-080, 62 FR 51357, Sept. 30, 1997]
§ 180.15 Applicability to existing vessels.
The regulation, word for word — 46 CFR 180, § 180.15
An existing vessel must comply with the requirements of this part except as otherwise specified by this section.
(a) A vessel that meets the following requirements shall be considered in compliance with the subdivision requirements contained in §§ 180.202, 180.204, 180.205, 180.206, 180.207 and 180.208:
(1) The vessel was constructed before March 11, 2001.
(2) The vessel is of not more than 19.8 meters (65 feet) in length and carries not more than 49 passengers;
(3) The vessel meets the standards for collision bulkheads in § 179.310 of this chapter; and
(4) The vessel meets the standards for one-compartment subdivision in §§ 179.220 and 179.320 of this chapter, at least in way of the engine room and lazarette.
(b) Each inflatable liferaft, inflatable buoyant apparatus, life float, and buoyant apparatus on the vessel on March 11, 1996, may be used to meet the requirements of this part for these survival craft as long as the survival craft is continued in use on the vessel, and is in good and serviceable condition.
(c) An existing vessel need not comply with § 180.78(a)(4).
(d) An existing vessel must comply with § 180.210 or may comply with the regulations for rescue boats that were in effect for the vessel prior to March 11, 1996.
Amendment history: [CGD 85-080, 61 FR 975, Jan. 10, 1996; 61 FR 24464, May 15, 1996, as amended by USCG-2012-0832, 77 FR 59789, Oct. 1, 2012]
§ 180.25 Additional requirements.
The regulation, word for word — 46 CFR 180, § 180.25
(a) Each item of lifesaving equipment carried on board a vessel but not required under this part, must be approved by the Commandant.
(b) The cognizant Officer in Charge, Marine Inspection (OCMI) may require a vessel to carry specialized or additional lifesaving equipment if:
(1) The OCMI determines the conditions of the voyage render the requirements of this part inadequate; or
(2) The vessel is operated in Arctic, Antarctic, or other severe conditions not covered under this part.
§ 180.64 Emergency Position Indicating Radiobeacons (EPIRB).
The regulation, word for word — 46 CFR 180, § 180.64
Each vessel that operates on the high seas, or that operates beyond three miles from the coastline of the Great Lakes, must have on board a FCC Type Accepted Category 1, 406 MHz EPIRB, installed to automatically float free and activate.
§ 180.68 Distress flares and smoke signals.
The regulation, word for word — 46 CFR 180, § 180.68
(a) Oceans, coastwise, limited coastwise, and Great Lakes routes. A vessel on an oceans, coastwise, limited coastwise, or Great Lakes route must carry—
(1) Six hand red flare distress signals approved in accordance with § 160.021 in subchapter Q of this chapter, or other standard specified by the Commandant, including, but not limited to, approval series 160.121; and
(2) Six hand orange smoke distress signals approved in accordance with § 160.037 in subchapter Q of this chapter, or other standard specified by the Commandant.
(b) Lakes, bays, and sounds, and rivers routes. A vessel on a lakes, bays, and sounds, or rivers route must carry:
(1) Three hand red flare distress signals approved in accordance with § 160.021 in subchapter Q of this chapter, or other standard specified by the Commandant; and
(2) Three hand orange smoke distress signals approved in accordance with § 160.037 in subchapter Q of this chapter, or other standard specified by the Commandant.
(c) Substitutions. (1) A rocket parachute flare approved in accordance with § 160.036 in subchapter Q of this chapter, or other standard specified by the Commandant may be substituted for any of the hand red flare distress signals required under paragraph (a) or (b) of this section.
(2) One of the following may be substituted for any of the hand orange smoke distress signals required under paragraph (a) or (b) of this section:
(i) A rocket parachute flare approved in accordance with § 160.036 in subchapter Q of this chapter, or other standard specified by the Commandant.
(ii) A hand red flare distress signal approved in accordance with § 160.021 in subchapter Q of this chapter, or other standard specified by the Commandant, including, but not limited to, approval series 160.121.
(iii) A floating orange smoke distress signal approved in accordance with § 160.022 in subchapter Q of this chapter, or other standard specified by the Commandant, including, but not limited to, approval series 160.122.
(d) Exemption for vessels on short runs. A vessel operating on short runs limited to approximately 30 minutes away from the dock is not required to carry distress flares and smoke signals under this section.
(e) Stowage. Each flare carried to meet this section must be stowed in one of the following:
(1) A portable watertight container marked as required by § 185.614 of this chapter, carried at the operating station; or
(2) A pyrotechnic locker secured above the freeboard deck, away from heat, in the vicinity of the operating station.
Amendment history: [CGD 85-080, 61 FR 975, Jan. 10, 1996; 61 FR 20557, May 7, 1996, as amended at 62 FR 51357, Sept. 30, 1997; USCG-2015-0867, 80 FR 62470, Oct. 16, 2015]
§ 180.70 Ring life buoys.
The regulation, word for word — 46 CFR 180, § 180.70
(a) A vessel must have one or more ring life buoys as follows:
(1) A vessel of not more than 7.9 meters (26 feet) in length must carry a minimum of one life buoy of not less than 510 millimeters (20 inches) in diameter;
(2) A vessel of more than 7.9 meters (26 feet) in length, but not more than 19.8 meters (65 feet), must carry a minimum of one life buoy of not less than 610 millimeters (24 inches) in diameter; and
(3) A vessel of more than 19.8 meters (65 feet) in length must carry a minimum of three life buoys of not less than 610 millimeters (24 inches) in diameter.
(b) Each ring life buoy on a vessel must:
(1) Be approved in accordance with § 160.050 in subchapter Q of this chapter, or other standard specified by the Commandant, including, but not limited to, approval series 160.150;
(2) Be readily accessible;
(3) Be stowed in a way that it can be rapidly cast loose;
(4) Not be permanently secured in any way; and
(5) If on a vessel on an oceans or coastwise route, be orange in color.
(c) At least one ring life buoy must be fitted with a lifeline. If more than one ring life buoy is carried, at least one must not have a lifeline attached. Each lifeline on a ring life buoy must:
(1) Be buoyant;
(2) Be of at least 18.3 meters (60 feet) in length;
(3) Be non-kinking;
(4) Have a diameter of at least 7.9 millimeters ( 5/16 inch);
(5) Have a breaking strength of at least 5 kilonewtons (1,124 pounds); and
(6) Be of a dark color if synthetic, or of a type certified to be resistant to deterioration from ultraviolet light.
(d) A vessel must carry one floating waterlight, unless it is limited to daytime operation, in which case no floating waterlight is required.
(1) Each floating waterlight must be approved in accordance with § 161.010 in subchapter Q of this chapter, or other standard specified by the Commandant, including, but not limited to, approval series 160.110.
(2) Each ring life buoy with a floating waterlight must have a lanyard of at least 910 millimeters (3 feet) in length, but not more than 1,830 millimeters (6 feet), securing the waterlight around the body of the ring life buoy.
(3) Each floating waterlight installed after March 11, 1997, on a vessel carrying only one ring buoy, must be attached to the lanyard with a corrosion-resistant clip. The clip must have a strength of at least 22.7 kilograms (50 pounds), and allow the waterlight to be quickly disconnected from the ring life buoy.
Amendment history: [CGD 85-080, 61 FR 975, Jan. 10, 1996; 61 FR 20557, May 7, 1996, as amended by CGD 97-057, 62 FR 51050, Sept. 30, 1997; 62 FR 51357, Sept. 30, 1997; USCG-2015-0867, 80 FR 62470, Oct. 16, 2015]
§ 180.71 Lifejackets.
The regulation, word for word — 46 CFR 180, § 180.71
(a) An adult life jacket must be provided for each person carried on board a vessel.
(b) In addition, a number of child size life jackets equal to at least 10% of the number of persons permitted on board must be provided, or such greater number as necessary to provide a life jacket for each person being carried that is smaller than the lower size limit of the adult life jackets provided to meet this section, except that:
(1) Child-size life jackets are not required if the vessel's Certificate of Inspection is endorsed for the carriage of adults only; or
(2) When all “extended size” life preservers (those with a lower size limit for persons of 1,195 millimeters (47 inches) in height or weighing 20.4 kilograms (45 pounds)) are carried on board, a minimum of only 5% additional child size devices need be carried.
(c) Each lifejacket must be approved under approval series in subparts 160.002, 160.005, 160.055, 160.115, 160.176, or 160.255 in part 160 of this chapter, or other standard specified by the Commandant. An inflatable lifejacket approved under approval series in subpart 160.255 of part 160 of this chapter must include a full back-up inflation chamber.
(d) Each life jacket carried on board the vessel must be marked in accordance with § 185.604 of this chapter.
Amendment history: [CGD 85-080, 61 FR 975, Jan. 10, 1996; 61 FR 24464, May 15, 1996, as amended by CGD 97-057, 62 FR 51050, Sept. 30, 1997; 62 FR 51357, Sept. 30, 1997; USCG-2015-0867, 80 FR 62470, Oct. 16, 2015; USCG-2022-0120, 89 FR 97401, Dec. 6, 2024]
§ 180.72 Personal flotation devices carried in addition to lifejackets.
The regulation, word for word — 46 CFR 180, § 180.72
(a) Equipment carried under this section is not acceptable in lieu of any portion of the required number of approved lifejackets and must not be substituted for the approved lifejackets required to be worn during drills and emergencies.
(b) Wearable marine buoyant devices approved in accordance with § 160.064, 160.076, 160.264, or 160.276 in subchapter Q of this chapter, or other standard specified by the Commandant, may be carried as additional equipment.
(c) Buoyant work vests approved in accordance with § 160.053 in subchapter Q of this chapter, or other standard specified by the Commandant, may be carried as additional equipment for use of persons working near or over the water.
(d) A commercial hybrid approved under former approval series 160.077 prior to January 6, 2025 may be carried as additional equipment for use by persons working near or over the water if it is in good and serviceable condition, used in accordance with the conditions marked on the PFD and in the owner's manual, and of the same or similar design and has the same method of operation as each other hybrid PFD carried on board.
Amendment history: [CGD 85-080, 61 FR 975, Jan. 10, 1996, as amended by USCG-2022-0120, 89 FR 97401, Dec. 6, 2024]
§ 180.75 Life jacket lights.
The regulation, word for word — 46 CFR 180, § 180.75
(a) Each life jacket carried on a vessel on oceans, coastwise, or Great Lakes route, must have a life jacket light approved in accordance with § 161.012 in subchapter Q of this chapter, or other standard specified by the Commandant, including, but not limited to, approval series 160.112. Each life jacket light must be securely attached to the front shoulder area of the life jacket.
(b) Notwithstanding the requirements of paragraph (a) of this section, life jacket lights are not required for life jackets on:
(1) Ferries; and
(2) Vessels with Certificates of Inspection endorsed only for routes that do not extend more than 20 miles from a harbor of safe refuge.
Amendment history: [CGD 85-080, 61 FR 975, Jan. 10, 1996, as amended by USCG-2015-0867, 80 FR 62470, Oct. 16, 2015]
§ 180.78 Stowage of life jackets.
The regulation, word for word — 46 CFR 180, § 180.78
(a) General. Unless otherwise stated in this section, life jackets must be stored in convenient places distributed throughout accommodation spaces.
(1) Each stowage container for life jackets must not be capable of being locked. If practicable, the container must be designed to allow the life jackets to float free.
(2) Each life jacket kept in a stowage container must be readily available.
(3) Each life jacket stowed overhead must be supported in a manner that allows quick release for distribution.
(4) If life jackets are stowed more than 2,130 millimeters (7 feet) above the deck, a means for quick release must be provided and must be capable of operation by a person standing on the deck.
(5) Each child size life jacket must be stowed in a location that is appropriately marked and separated from adult life jackets so the child size life jackets are not mistaken for adult life jackets.
(b) Additional personal flotation devices. The stowage locations of the personal flotation devices carried in addition to life jackets under § 180.72, must be separate from the life jackets, and such as not to be easily confused with that of the life jackets.
§ 180.130 Stowage of survival craft.
The regulation, word for word — 46 CFR 180, § 180.130
(a) Each survival craft must be:
(1) Secured to the vessel by a painter with a float-free link permanently attached to the vessel except that a float-free link is not required if the vessel operates only on waters not as deep as the length of the painter;
(2) Stowed so that when the vessel sinks the survival craft floats free and, if inflatable, inflates automatically;
(3) Stowed in a position that is readily accessible to crew members for launching, or else provided with a remotely operated device that releases the survival craft into launching position or into the water;
(4) Stowed in a way that permits manual release from its securing arrangements;
(5) Ready for immediate use so that crew members can carry out preparations for embarkation and launching in less than 5 minutes;
(6) Provided with means to prevent shifting;
(7) Stowed in a way that neither the survival craft nor its stowage arrangements will interfere with the embarkation and operation of any other survival craft at any other launching station;
(8) Stowed in a way that any protective covers will not interfere with launching and embarkation;
(9) Fully equipped as required under this part; and
(10) Stowed, as far as practicable, in a position sheltered from breaking seas and protected from damage by fire.
(b) A hydrostatic release unit when used in a float-free arrangement must be approved under approval series 160.062 or 160.162 or other standard specified by the Commandant.
(c) A mechanical, manually operated device to assist in launching a survival craft must be provided if:
(1) The survival craft weights more than 90.7 kilograms (200 pounds); and
(2) The survival craft requires lifting more than 300 vertical millimeters (one vertical foot) to be launched.
Amendment history: [CGD 85-080, 61 FR 975, Jan. 10, 1996, as amended at 62 FR 51357, Sept. 30, 1997; 62 FR 64306, Dec. 5, 1997]
§ 180.137 Stowage of life floats and buoyant apparatus.
The regulation, word for word — 46 CFR 180, § 180.137
(a) In addition to meeting § 180.130, each life float and buoyant apparatus must be stowed as required under this section,
(b) The float-free link required by § 180.130(a)(1) must be:
(1) Certified to meet § 160.073 in subchapter Q of this chapter, or other standard specified by the Commandant;
(2) Of proper strength for the size of the life float or buoyant apparatus as indicated on its identification tag; and
(3) Secured to the painter at one end and to the vessel on the other end.
(c) The means used to attach the float-free link to the vessel must:
(1) Have a breaking strength of at least the breaking strength of the painter;
(2) If synthetic, be of a dark color or of a type certified to be resistant to deterioration from ultraviolet light; and
(3) If metal, be corrosion resistant.
(d) If the life float or buoyant apparatus does not have a painter attachment fitting, a means for attaching the painter must be provided by a wire or line that:
(1) Encircles the body of the device;
(2) Will not slip off;
(3) Has a breaking strength that is at least the strength of the painter; and
(4) If synthetic, is of a dark color or is of a type certified to be resistant to deterioration from ultraviolet light.
(e) If the vessel carries more than one life float or buoyant apparatus in a group with each group secured by a single painter:
(1) The combined weight of each group of life floats and buoyant apparatus must not exceed 181 kilograms (400 pounds);
(2) Each group of life floats and buoyant apparatus is considered a single survival craft for the purposes of § 180.130(c);
(3) Each life float and buoyant apparatus must be individually attached to the painter by a line meeting § 180.175(f)(3) (ii), (iii), and (iv) and long enough that each life float or buoyant apparatus can float without contacting any other life float or buoyant apparatus in the group; and
(4) The strength of the float-free link under paragraph (b)(2) of this section and the strength of the painter under § 180.175(f)(3)(ii) must be determined by the combined capacity of the group of life floats and buoyant apparatus.
(f) Life floats and buoyant apparatus must not be stowed in tiers more than 1,220 millimeters (4 feet) high. When stowed in tiers, the separate units must be kept apart by spacers.
Amendment history: [CGD 85-080, 61 FR 975, Jan. 10, 1996; 61 FR 20557, May 7, 1996, as amended by USCG-2013-0671, 78 FR 60164, Sept. 30, 2013]
§ 180.150 Survival craft embarkation arrangements.
The regulation, word for word — 46 CFR 180, § 180.150
(a) A launching appliance described in paragraph (c) of this section, or a marine evacuation system approved under approval series 160.175, must be provided for each inflatable liferaft and inflatable buoyant apparatus when either—
(1) The embarkation station for the survival craft is on a deck more than 4.5 meters (15 feet) above the waterline; or
(2) The inflatable liferaft and inflatable buoyant apparatus is boarded prior to being placed in the water.
(b) An embarkation ladder, approved in accordance with § 160.017 in subchapter Q of this chapter, or other standard specified by the Commandant, must be at each embarkation station if the distance from the deck on which an embarkation station is located to the vessel's lightest operating waterline is more than 3,050 millimeters (10 feet).
(c) Each launching appliance for a davit-launched liferaft must include an automatic disengaging apparatus approved under 46 CFR part 160, subpart 160.170 and be either—
(1) A davit approved under 46 CFR part 160, subpart 160.132 for use with a liferaft, with a winch approved under 46 CFR part 160, subpart 160.115 for use with a liferaft; or
(2) A launching appliance approved on or before November 10, 2011 under approval series 160.163.
Amendment history: [CGD 85-080, 61 FR 975, Jan. 10, 1996, as amended by CGD 97-057, 62 FR 51050, Sept. 30, 1997; 62 FR 51357, Sept. 30, 1997; USCG-2010-0048, 76 FR 63015, Oct. 11, 2011; 76 FR 70062, Nov. 10, 2011]
§ 180.175 Survival craft equipment.
The regulation, word for word — 46 CFR 180, § 180.175
(a) General. Each item of survival craft equipment must be of good quality, and efficient for the purpose it is intended to serve. Unless otherwise stated in this section, each item of equipment carried, whether required under this section or not, must be secured by lashings, stored in lockers, compartments, brackets, or have equivalent mounting or storage arrangements that do not:
(1) Reduce survival craft capacity;
(2) Reduce space available to the occupants;
(3) Interfere with launching, recovery, or rescue operations; or
(4) Adversely affect seaworthiness of the survival craft.
(b) Inflatable liferafts. Each inflatable liferaft must have one of the following equipment packs as shown by the markings on its container:
(1) Safety of Life at Sea (SOLAS) B Pack; or
(2) SOLAS A Pack.
(c) Inflatable buoyant apparatus. Each inflatable buoyant apparatus must be equipped in accordance with the manufacturer's approved servicing manual.
(d) Life floats. Each life float must be fitted with a lifeline, pendants, two paddles, a painter, and a light.
(e) Buoyant apparatus. Each buoyant apparatus must be fitted with a lifeline, pendants, a painter, and a light.
(f) Equipment specifications for life floats and buoyant apparatus. The equipment required for lifefloats and buoyant apparatus must meet the following specifications:
(1) Lifeline and pendants. The lifeline and pendants must be as furnished by the manufacturer with the approved life float or buoyant apparatus. Replacement lifelines and pendants must meet the requirements in Subpart 160.010 of this chapter.
(2) Paddle. Each paddle must be of at least 1,220 millimeters (4 feet) in length, lashed to the life float to which it belongs and buoyant.
(3) Painter. The painter must:
(i) Be of at least 30.5 meters (100 feet) in length, but not less than 3 times the distance between the deck where the life float or buoyant apparatus it serves is stowed and the lowest load waterline of the vessel;
(ii) Have a breaking strength of at least 680 kilograms (1,500 pounds), except that if the capacity of the life float or buoyant apparatus is 50 persons or more, the breaking strength must be at least 1,360 kilograms (3,000 pounds);
(iii) Be of a dark color if synthetic, or of a type certified to be resistant to deterioration from ultraviolet light; and
(iv) Be stowed in such a way that it runs out freely when the life float or buoyant apparatus floats away from a sinking vessel.
(4) Light. The light must be a floating waterlight approved under approval series 161.010 or other standard specified by the Commandant. The floating waterlight must be attached around the body of the life float or buoyant apparatus by a 10 mm (3/8 inch) lanyard, resistant to deterioration from ultraviolet light, and at least 5.5 meters (18 feet) in length.
(g) Other survival craft. If survival craft other than inflatable liferafts, life floats, inflatable buoyant apparatus, and buoyant apparatus are carried on the vessel, such as lifeboats or rigid liferafts, they must be installed, arranged, and equipped as required under subchapter H (Passenger Vessels) of this chapter for passenger vessels on the same route.
Amendment history: [CGD 85-080, 61 FR 975, Jan. 10, 1996, as amended at 62 FR 51357, Sept. 30, 1997]
§ 180.200 Survival craft—general.
The regulation, word for word — 46 CFR 180, § 180.200
(a) Each survival craft required on a vessel by this part must meet one of the following:
(1) For an inflatable liferaft—Approved under approval series 160.151 or other standard specified by the Commandant, with the applicable equipment pack, as determined by the cognizant OCMI. Each inflatable liferaft required on a vessel by this part must have a capacity of 6 persons or more. Inflatable liferafts may be substituted for inflatable buoyant apparatus or life floats required under this section;
(2) For a life float—Approved under approval series 160.027 or other standard specified by the Commandant. Buoyant apparatus may be used to meet requirements for life floats if the buoyant apparatus was installed on board the vessel on or before March 11, 1996, and if the buoyant apparatus remains in good and serviceable condition;
(3) For an inflatable buoyant apparatus—Approved under approval series 160.010 or other standard specified by the Commandant. Inflatable buoyant apparatus may be substituted for life floats required under this section.
(4) For a buoyant apparatus—Approved under approval series 160.010 or other standard specified by the Commandant. An existing buoyant apparatus may not be used to satisfy the requirements for life floats on existing vessels wishing to upgrade the total number of passengers carried on an oceans route.
(b) If the vessel carries a small boat or boats, the capacity of these boats may be counted toward life float capacity required by this part. Such boats must meet the requirements for safe loading and flotation in 33 CFR part 183, and must meet the stowage, launching, and equipment requirements in this part for the survival craft they replace.
(c) A summary of survival craft requirements is provided in Table 180.200(c).
| Route | Survival craft requirements |
|---|---|
| Oceans | (a) cold water 1—100% IBA—§ 180.202(a)(1). |
| (i) w/subdivision 2—100% LF—§ 180.202(a)(2). | |
| (b) warm water 3—67% IBA 4—§ 180.202(b). | |
| Coastwise | (a) wood vsls in cold water. |
| (i) 67% IBA—§ 180.204(a)(1). | |
| (ii) w/subdivision—100% LF—§ 180.204(a)(2). | |
| (b) nonwood and vsls operating in warm water. | |
| (i) 100% LF—§ 180.204 (b) and (c). | |
| (c) within three miles of shore. | |
| (i) w/o subdivision—100% LF—§ 180.204(d)(1). | |
| (ii) w/subdivision—50% LF—§ 180.204(d)(2). | |
| (iii) w/float free 406 MHz EPIRB—50% LF—§ 180.204(d)(3). | |
| Limited Coastwise (Not more than 20 miles from a harbor of safe refuge) | (a) wood vsls in cold water. (i) 67% IBA—§ 180.205(a)(1). (ii) w/subdivision—100% LF—§ 180.205(a)(2). |
| (b) nonwood vessels in cold water—100% LF—§ 180.205(b). | |
| (c) within three miles of shore—§ 180.205(d). | |
| (A) w/o subdivision—100% LF. | |
| (B) w/subdivision—50% LF. | |
| (C) w/float free 406 MHz EPIRB—50% LF. | |
| (d) vessels operating in warm water. | |
| (i) 50% LF—§ 180.205(c). | |
| (ii) within three miles of shore. | |
| (A) w/o subdivision—50% LF—§ 180.205(e)(1). | |
| (B) w/subdivision—NONE—§ 180.205(e)(2). | |
| (C) w/float free 406 MHz EPIRB—NONE— § 180.205(e)(3). | |
| Great Lakes | (a) same as Limited Coastwise (a) & (b)—§ 180.206(a). |
| (b) within one mile of shore—NONE 5—§ 180.206(b). | |
| Lakes, Bays, & Sounds 6 7 | (a) wood vsls in cold water. |
| (i) 100% LF—§ 180.207(a)(1). | |
| (ii) w/subdivision—50% LF—§ 180.207(a)(2). | |
| (b) nonwood—50% LF—§ 180.207(b). | |
| (c) within 1 mile of shore—NONE—§ 180.207(e). | |
| (d) warm water—NONE—§ 180.207(c). | |
| RIVERS 7 8 | (a) cold water. |
| (i) w/o subdivision—50% LF—§ 180.208(a)(1). | |
| (ii) w/subdivision—NONE—§ 180.208(a)(2). | |
| (iii) within one mile of shore—NONE—§ 180.208(d). | |
| (b) warm water—NONE—§ 180.208(b) | |
| Abbreviations used: | |
| ILR = Inflatable liferaft | |
| IBA = Inflatable Buoyant Apparatus | |
| LF = Life Float. As allowed by § 180.15(b) any buoyant apparatus in use on an existing vessel on March 11, 1996, may be used to meet the requirements for LF as long as the buoyant apparatus is in good and serviceable condition. | |
| Footnotes: | |
| 1 Cold water means the cognizant OCMI has determined the monthly mean low temperature of the water is ≤15 °C (59 °F). | |
| 2 Vessels ≤65 ft carrying ≤49 passengers built before March 11, 2001, may meet the collision bulkhead standards in § 179.310 and one-compartment subdivision subdivision standards in §§ 179.220 and 179.320 at least in way of the engine room and lazarette in lieu of the subdivision requirements contained in this part. | |
| 3 Warm water means the cognizant OCMI has determined the monthly mean low temperature of the water is >15 °C (59 °F). | |
| 4 Vessels operating in warm water may substitute 100% LF in lieu of 67% IBA—§ 180.202(d). | |
| 5 OCMI may reduce primary lifesaving for seasonal or ferry type operations on the Great Lakes—§ 180.206(b). | |
| 6 Shallow water exception—§ 180.207(e). | |
| 7 OCMI may reduce survival craft requirements based upon the route, communications schedule and participation in VTS—§ 180.207(f) and § 180.208(e) | |
| 8 Shallow water exception—§ 180.208(e)C. |
Amendment history: [CGD 85-080, 61 FR 975, Jan. 10, 1996, as amended at 62 FR 51357, Sept. 30, 1997; USCG-2012-0832, 77 FR 59789, Oct. 1, 2012]
§ 180.202 Survival craft—vessels operating on oceans routes.
The regulation, word for word — 46 CFR 180, § 180.202
(a) Each vessel certificated to operate on an oceans route in cold water must either:
(1) Be provided with inflatable buoyant apparatus of an aggregate capacity that will accommodate at least 100% of the total number of persons permitted on board; or
(2) Meet either the standards for collision bulkheads in § 179.310 in this chapter or § 171.085 in subchapter S of this chapter, and the standards for subdivision in §§ 179.220 and 179.320 of this chapter, or the standards for subdivision and damaged stability in §§ 171.070 through 171.073 and 171.080 in subchapter S of this chapter, as appropriate, and be provided with life floats of an aggregate capacity that will accommodate at least 100% of the total number of persons permitted on board.
(b) Each vessel certificated to operate on an oceans route in warm water must either:
(1) Be provided with inflatable buoyant apparatus of an aggregate capacity that will accommodate at least 67% of the total number of persons permitted on board; or
(2) Be provided with life floats of an aggregate capacity that will accommodate at least 100% of the total number of persons permitted on board.
§ 180.204 Survival craft—vessels operating on coastwise routes.
The regulation, word for word — 46 CFR 180, § 180.204
(a) Except as allowed by paragraph (c) of this section, each vessel constructed of wood certificated to operate on a coastwise route in cold water must either:
(1) Be provided with inflatable buoyant apparatus of an aggregate capacity that will accommodate at least 67% of the total number of persons permitted on board; or
(2) Meet either the standards for collision bulkheads in § 179.310 of this chapter or § 171.085 in subchapter S of this chapter and the standards for subdivision in §§ 179.220 and 179.320 of this chapter, or the standards for subdivision and damaged stability in §§ 171.070 through 171.073 and 171.080 in subchapter S of this chapter, as appropriate, and be provided with life floats of an aggregate capacity that will accommodate at least 100% of the total number of persons permitted on board.
(b) Each vessel constructed of a material other than wood certificated to operate on a coastwise route in cold water must be provided with life floats of an aggregate capacity that will accommodate at least 100% of the total number of persons permitted on board.
(c) Except as allowed by paragraph (d) of this section, each vessel certificated to operate on a coastwise route in warm water must be provided with life floats of an aggregate capacity that will accommodate at least 100% of the total number of persons permitted on board.
(d) Each vessel certificated to operate on a coastwise route within three miles of land must either:
(1) Be provided with life floats of an aggregate capacity that will accommodate at least 100% of the total number of persons permitted on board; or
(2) Meet either the standards for collision bulkheads in § 179.310 of this subchapter or § 171.085 in subchapter S of this chapter, and the standards for subdivision in §§ 179.220 and 179.320 of this chapter, or the standards for subdivision and damaged stability in §§ 171.070 through 171.073 and 171.080 in subchapter S of this chapter, as appropriate, and be provided with life floats of an aggregate capacity that will accommodate at least 50% of the total number of persons permitted on board.
(3) Have on board a FCC Type Accepted Category 1 406 MHz EPIRB, installed to automatically float free and activate, and be provided with life floats of an aggregate capacity that will accommodate at least 50% of the total number of persons permitted on board.
Amendment history: [CGD 85-080, 61 FR 975, Jan. 10, 1996; 61 FR 20557, May 7, 1996]
§ 180.205 Survival craft—vessels operating on limited coastwise routes.
The regulation, word for word — 46 CFR 180, § 180.205
(a) Except as allowed by paragraph (d) of this section, each vessel constructed of wood certificated to operate on a limited coastwise route in cold water must either:
(1) Be provided with inflatable buoyant apparatus of an aggregate capacity that will accommodate at least 67% of the total number of persons permitted on board; or
(2) Meet either the standards for collision bulkheads in § 179.310 of this chapter or § 171.085 in subchapter S of this chapter, and the standards for subdivision in §§ 179.220 and 179.320 of this chapter, or the standards for subdivision and damaged stability in §§ 171.070 through 171.073 and 171.080 in subchapter S of this chapter, as appropriate, and be provided with life floats of an aggregate capacity that will accommodate at least 100% of the total number of persons permitted on board.
(b) Except as allowed by paragraph (d) of this section, each vessel constructed of a material other than wood certificated to operate on a limited coastwise route in cold water must be provided with life floats of an aggregate capacity that will accommodate at least 100% of the total number of persons permitted on board.
(c) Except as allowed by paragraph (e) of this section, each vessel certificated to operate on a limited coastwise route in warm water must be provided with life floats of an aggregate capacity that will accommodate at least 50% of the total number of persons permitted on board.
(d) Each vessel certificated to operate on a limited coastwise route within three miles of land in cold water must be provided with the survival craft required by § 180.204(d).
(e) Each vessel certificated to operate on a limited coastwise route within three miles of land in warm water must either:
(1) Be provided with life floats of an aggregate capacity that will accommodate at least 50% of the total number of persons permitted on board; or
(2) Meet either the standards for collision bulkheads in § 179.310 of this chapter or § 171.085 in subchapter S of this chapter, and the standards for subdivision in §§ 179.220 and 179.320 of this chapter, or the standards for subdivision and damaged stability in §§ 171.070 through 171.073 and 171.080 in subchapter S of this chapter, as appropriate, and not be required to carry survival craft; or
(3) Have on board a FCC Type Accepted Category 1 406 MHz EPIRB, installed to automatically float free and activate, and not be required to carry survival craft.
§ 180.206 Survival craft—vessels operating on Great Lakes routes.
The regulation, word for word — 46 CFR 180, § 180.206
(a) Except as allowed by paragraph (b) of this section, each vessel certificated to operate on a Great Lakes route must be provided with the survival craft required by § 180.205 (a) through (e), as appropriate.
(b) Each vessel certificated to operate on a Great Lakes route within one mile of land is not required to carry survival craft if the OCMI determines that it is safe to do so, taking into consideration the vessel's scope of operation, hazards of the route, and availability of assistance.
Amendment history: [CGD 85-080, 61 FR 975, Jan. 10, 1996, as amended at 62 FR 51357, Sept. 30, 1997]
§ 180.207 Survival craft—vessels operating on lakes, bays, and sounds routes.
The regulation, word for word — 46 CFR 180, § 180.207
(a) Except as allowed by paragraphs (d), (e) and (f) of this section, each vessel constructed of wood certificated to operate on a lakes, bays, and sounds route in cold water must either:
(1) Be provided with life floats of an aggregate capacity that will accommodate at least 100% of the total number of persons permitted on board; or
(2) Meet either the standards for collision bulkheads in § 179.310 of this chapter or § 171.085 in subchapter S of this chapter, and the standards for subdivision in §§ 179.220 and 179.320 of this chapter, or the standards for subdivision and damaged stability in §§ 171.070 through 171.073 and 171.080 in subchapter S of this chapter, as appropriate, and be provided with life floats of an aggregate capacity that will accommodate at least 50% of the total number of persons permitted on board.
(b) Except as allowed by paragraphs (e) and (f) of this section, each vessel constructed of a material other than wood certificated to operate on a lakes, bays, and sounds route in cold water must be provided with life floats of an aggregate capacity that will accommodate at least 50% of the total number of persons permitted on board.
(c) A vessel certificated to operate on a lakes, bays, and sounds route in warm water is not required to carry survival craft.
(d) A vessel certificated to operate on lakes, bays, and sounds route within one mile of land is not required to carry survival craft.
(e) For a vessel certificated to operate on a lakes, bays, and sounds route in shallow water where the vessel cannot sink deep enough to submerge the topmost passenger deck or where survivors can wade ashore, the cognizant OCMI may waive a requirement for life floats, if the OCMI determines that it is safe to do so, taking into consideration the vessel's scope of operation, hazards of the route, and availability of assistance.
(f) Each vessel operating with a set schedule on a specific route that does not take it more than 20 nautical miles from a harbor of safe refuge, and that maintains a 15 minute radio communications schedule with an operations base, or participates in a Vessel Traffic Service (VTS), may be granted a reduction in the survival craft requirements of this section if the cognizant OCMI is satisfied that a sufficient level of safety exists.
Amendment history: [CGD 85-080, 61 FR 975, Jan. 10, 1996; 61 FR 24464, May 15, 1996, as amended by CGD 97-057, 62 FR 51050, Sept. 30, 1997; USCG-2014-0688, 79 FR 58288, Sept. 29, 2014]
§ 180.208 Survival craft—vessels operating on rivers routes.
The regulation, word for word — 46 CFR 180, § 180.208
(a) Except as allowed by paragraphs (c), (d) and (e) of this section, each vessel certificated to operate on a rivers route in cold water must either:
(1) Be provided with life floats of an aggregate capacity that will accommodate at least 50% of the total number of persons permitted on board; or
(2) Meet either the standards for collision bulkheads in § 179.310 of this chapter or § 171.085 in subchapter S of this chapter, and the standards for subdivision in §§ 179.220 and 179.320 of this chapter, or the standards for subdivision and damaged stability in §§ 171.070 through 171.073 and 171.080 in subchapter S of this chapter, as appropriate, and not be required to carry survival craft.
(b) A vessel certificated to operate on a rivers route in warm water is not required to carry survival craft.
(c) A vessel certificated to operate on a rivers route within one mile of land is not required to carry survival craft.
(d) For a vessel certificated to operate on a rivers route in shallow water where the vessel cannot sink deep enough to submerge the topmost passenger deck or where survivors can wade ashore, the cognizant OCMI may waive a requirement for life floats, if the OCMI determines that it is safe to do so, taking into consideration the vessel's scope of operation, hazards of the route, and availability of assistance.
(e) Each vessel operating with a set schedule on a specific route that maintains a 15 minute radio communications schedule with an operations base, or participates in a Vessel Traffic Service (VTS), may be granted a reduction in the survival craft requirement of this section if the cognizant OCMI is satisfied that a sufficient level of safety exists.
Amendment history: [CGD 85-080, 61 FR 975, Jan. 10, 1996, as amended by CGD 97-057, 62 FR 51050, Sept. 30, 1997; USCG-2014-0688, 79 FR 58288, Sept. 29, 2014]
§ 180.210 Rescue boats.
The regulation, word for word — 46 CFR 180, § 180.210
(a) A vessel of more than 19.8 meters (65 feet) in length must carry at least one rescue boat unless the cognizant OCMI determines that:
(1) The vessel is sufficiently maneuverable, arranged, and equipped to allow the crew to recover a helpless person from the water;
(2) Recovery of a helpless person can be observed from the operating station; and
(3) The vessel does not regularly engage in operations that restrict its maneuverability.
(b) A vessel of not more than 19.8 meters (65 feet) in length is not required to carry a rescue boat unless:
(1) The vessel carries passengers on an open or partially enclosed deck; and
(2) The cognizant OCMI determines that the vessel is designed, arranged, or involved in operations so that the vessel itself cannot serve as an adequate rescue craft.
(c) In general, a rescue boat must be a small, lightweight boat with built-in buoyancy and capable of being readily launched and easily maneuvered. In addition, it must be of adequate proportion to permit taking an unconscious person on board without capsizing.
(d) On a vessel of more than 19.8 meters (65 feet) in length operating on protected waters, a rescue boat approved under approval series 160.056 is acceptable in meeting the intent of this section. On a vessel of more than 19.8 meters operating on exposed or partially protected waters, a rescue boat approved under approval series 160.156 is acceptable in meeting the intent of this section. On a vessel of not more than 19.8 meters (65 feet) in length, a required rescue boat must be acceptable to the cognizant OCMI.
Amendment history: [CGD 85-080, 61 FR 975, Jan. 10, 1996, as amended at 62 FR 51357, Sept. 30, 1997; 62 FR 64306, Dec. 5, 1997]
§ 185.602 Hull markings.
The regulation, word for word — 46 CFR 185, § 185.602
(a) Each vessel must be marked as required by part 67, subpart I, of this chapter.
(b) Paragraphs (c) through (g) of this section apply to each vessel that does not demonstrate compliance in accordance with § 178.310(c) of this chapter.
(c) Each vessel must—
(1) Have permanent draft marks at each end of the vessel; or
(2) Have permanent loading marks placed on each side of the vessel forward and aft to indicate the maximum allowable trim and amidships to indicate the maximum allowable draft.
(d) A loading mark required by paragraph (c)(2) of this section must be a horizontal line of at least 205 millimeters (8 inches) in length and 25 millimeters (1 inch) in height, with its upper edge passing through the point of maximum draft. The loading mark must be painted in a contrasting color to the sideshell paint.
(e) On a vessel that has a load line, the amidships marks required by paragraph (c)(2) of this section must be those required by the International Convention on Load Lines, 1966.
(f) In cases where draft marks are obscured due to operational constraints or by protrusions, the vessel must be fitted with a reliable draft indicating system from which the bow and stern drafts can be determined.
(g) On a vessel on which the number of passengers permitted on upper decks is limited by stability criteria, as indicated by the vessel's stability letter, the maximum number of passengers allowed on an upper deck must be indicated by a durable marking of at least 25 millimeters (1 inch) numbers and letters at the entranceway to that deck.
Amendment history: [CGD 85-080, 62 FR 51359, Sept. 30, 1997, as amended by USCG-2007-0030, 75 FR 78092, Dec. 14, 2010]
§ 185.604 Lifesaving equipment markings.
The regulation, word for word — 46 CFR 185, § 185.604
(a) The name of a vessel must be marked or painted in clearly legible letters and numbers:
(1) On each side of the bow of each rescue boat; and
(2) On each life float and buoyant apparatus.
(b) Each life jacket, immersion suit, and ring life buoy must be marked in clearly legible block capital letters with the vessel's name. The marking is not required on a life jacket carried to meet a temporary need for additional life jackets, if the life jacket has the name of another vessel or company marked on it. For an immersion suit, the name of the person to whom the immersion suit is assigned is an acceptable alternative to the name of the vessel.
(c) The name of the vessel must be marked or painted in clearly legible letters on each Emergency Position Indicating Radiobeacon (EPIRB), except on an EPIRB in an inflatable liferaft.
(d) The number of persons capacity must be marked or painted in clearly legible letters and numbers on each side of the bow of each rescue boat.
(e) The number of persons capacity must be marked or painted in clearly legible letters and numbers on each life float and buoyant apparatus. This number must:
(1) Be the number of persons the device is equipped for; and
(2) Not be greater than the number of persons the device is approved for as shown on its nameplate.
(f) The number and identification of the items stowed inside, and their sizes, must be marked in clearly legible letters and numbers on each container for life jackets and immersion suits. Identification of the items may be in words, or the appropriate symbols in IMO Resolution A.760(18) (incorporated by reference; see 46 CFR 175.600). Letters and numbers must be at least 50 millimeters (2 inches) high. Symbols must be at least 100 mm (4 inches) square.
(g) The name of the vessel must be marked or painted in clearly legible letters on each life float paddle.
(h) Each life jacket must be marked with Type I retroreflective material approved in 46 CFR 164.018 or other standard specified by the Commandant. The arrangement of the retroreflective material applied after March 11, 1996, must be as specified by IMO Resolution A.658(16) (incorporated by reference; see 46 CFR 175.600).
(i) Each rescue boat and ring life buoy must be marked with Type II retroreflective material approved in accordance with 46 CFR 164.018 or other standard specified by the Commandant. The arrangement of the retroreflective material applied after March 11, 1996, must be as specified by IMO Resolution A.658(16).
Amendment history: [CGD 85-080, 61 FR 1005, Jan. 10, 1996, as amended at 62 FR 51359, Sept. 30, 1997; 62 FR 64306, Dec. 5, 1997; USCG-2003-16630, 73 FR 65210, Oct. 31, 2008]
§ 185.614 Portable watertight containers for distress flares and smoke signals.
The regulation, word for word — 46 CFR 185, § 185.614
Portable watertight containers for distress flares and smoke signals shall be of a bright color, and containers shall be clearly marked in legible contrasting letters at least 12.7 millimeters (0.5 inches) high: “DISTRESS SIGNALS”.
Amendment history: [CGD 85-080, 61 FR 1005, Jan. 10, 1996; 61 FR 24465, May 15, 1996]
§ 185.700 Operational readiness.
The regulation, word for word — 46 CFR 185, § 185.700
(a) Each launching appliance and each survival craft and rescue boat on a vessel must be in good working order and ready for immediate use before the vessel leaves port and at all times when the vessel is underway.
(b) Each deck where survival craft or rescue boats are stowed or boarded must be kept clear of obstructions that would interfere with the boarding and launching of the survival craft or rescue boat.
§ 185.702 Maintenance.
The regulation, word for word — 46 CFR 185, § 185.702
(a) The manufacturer's instructions for onboard maintenance of survival craft, rescue boats, and launching appliances, manufactured on or after March 11, 1996, must be onboard a vessel of more than 19.8 meters (65 feet) in length and readily available for a vessel of not more than 19.8 meters (65 feet) in length. The instructions must also be readily available at each inspection for certification and reinspection.
(b) The owner or managing operator shall make sure that maintenance is carried out in accordance with the instructions required under paragraph (a) of this section.
(c) The cognizant OCMI may accept, instead of the instructions required under paragraph (a) of this section, a shipboard planned maintenance program that includes the items listed in that paragraph.
(d) The inspection and maintenance of the equipment listed in paragraph (a) of this section shall be logged or otherwise documented for review by the Coast Guard upon request.
§ 185.704 Maintenance of falls.
The regulation, word for word — 46 CFR 185, § 185.704
(a) Each fall used in a launching appliance on a vessel must be turned end for end at intervals of not more than 30 months.
(b) Each fall must be renewed when necessary due to deterioration or at intervals of not more than 5 years, whichever is earlier.
(c) Each fall must have a corrosion resistant tag with the following permanently marked on it:
(1) The date the new fall was installed; and
(2) If the fall has been turned end for end, the date it was turned.
§ 185.720 Weekly maintenance and inspections.
The regulation, word for word — 46 CFR 185, § 185.720
The following tests and inspections must be carried out weekly on a vessel:
(a) Each survival craft, rescue boat, and launching appliance must be visually inspected to ensure its readiness for use;
(b) Each rescue boat engine must be run ahead and astern for not less than 3 minutes, unless the ambient temperature is below the minimum temperature required for starting the engine; and
(c) Each battery for rescue boat engine starting must be brought up to full charge at least once each week if:
(1) The battery is of a type that requires recharging; and
(2) The battery is not connected to a device that keeps it continuously charged.
§ 185.722 Monthly inspections.
The regulation, word for word — 46 CFR 185, § 185.722
Each survival craft, rescue boat, and launching appliance on a vessel must be inspected monthly, using the manufacturer's instructions to make sure it is complete and in good order.
Amendment history: [CGD 85-080, 61 FR 1005, Jan. 10, 1996, as amended by USCG-2014-0688, 79 FR 58288, Sept. 29, 2014]
§ 185.724 Quarterly inspections.
The regulation, word for word — 46 CFR 185, § 185.724
(a) Each winch control apparatus of a launching appliance on a vessel, including motor controllers, emergency switches, master switches, and limit switches, must be examined once in each 3 months.
(b) The examination required by paragraph (a) of this section must include the removal of drain plugs and the opening of drain valves to make sure that enclosures are free of water.
§ 185.726 Annual inspections.
The regulation, word for word — 46 CFR 185, § 185.726
(a) Each rescue boat must be stripped, cleaned, and thoroughly inspected, and any necessary repairs made at least once each year, including emptying and cleaning of each fuel tank, and refilling it with fresh fuel.
(b) Each davit, winch, fall and other launching appliance must be thoroughly inspected, and any necessary repairs made, at least once each year.
(c) Each item of lifesaving equipment with an expiration date must be replaced during the annual inspection and repair if the expiration date has passed.
(d) Each battery used in an item of lifesaving equipment, except inflatable survival craft equipment, must be replaced during the annual inspection if the expiration date of the battery has passed. The expiration date of the battery may be marked on the battery or the owner or managing operator may have a record of the expiration date from the manufacturer of a battery marked with a serial number.
(e) Except for a storage battery used in a rescue boat, each battery without an expiration date indicated on it or for which the owner or managing operator does not have a record of the expiration date, used in an item of lifesaving equipment, must be replaced during the annual inspection.
§ 185.728 Testing and servicing of Emergency Position Indicating Radiobeacons (EPIRB).
The regulation, word for word — 46 CFR 185, § 185.728
The master of the vessel shall ensure that:
(a) Each EPIRB, other than an EPIRB in an inflatable liferaft, must be tested monthly, using the integrated test circuit and output indicator, to determine that it is operative;
(b) The EPIRB's battery is replaced after it is used, or before the date required by FCC regulations in 47 CFR part 80, whichever comes sooner; and
(c) The EPIRB test required by paragraph (a) shall be logged or otherwise documented, as applicable.
Amendment history: [CGD 85-080, 61 FR 1005, Jan. 10, 1996, as amended by CGD 97-057, 62 FR 51050, Sept. 30, 1997]
§ 185.730 Servicing of inflatable liferafts, inflatable buoyant apparatus, inflatable life jackets, and inflated rescue boats.
The regulation, word for word — 46 CFR 185, § 185.730
(a) An inflatable liferaft or inflatable buoyant apparatus must be serviced at a facility specifically approved by the Commandant for the particular brand, and in accordance with servicing procedures meeting the requirements of part 160, subpart 160.151, of this chapter—
(1) No later than the month and year on its servicing sticker affixed under 46 CFR 160.151-57(n), except that servicing may be delayed until the next scheduled inspection of the vessel, provided that the delay does not exceed 5 months; and
(2) Whenever the container is damaged or the container straps or seals are broken.
(b) Each inflatable lifejacket and hybrid inflatable lifejacket or work vest must be serviced:
(1) Within 12 months of its initial packing; and
(2) Within 12 months of each subsequent servicing, except that servicing may be delayed until the next scheduled inspection of the vessel, provided that the delay does not exceed 5 months.
(c) Each inflatable life jacket must be serviced in accordance with the servicing procedure under § 160.176 in subchapter Q of this chapter, or other standard specified by the Commandant.
(d) Each hybrid inflatable life jacket or work vest must be serviced in accordance with the servicing procedure under § 160.077 in subchapter Q of this chapter, or other standard specified by the Commandant.
(e) Repair and maintenance of inflated rescue boats must be in accordance with the manufacturer's instructions. All repairs must be made at a servicing facility approved by the Commandant, except for emergency repairs carried out on board the vessel.
Amendment history: [CGD 85-080, 61 FR 1005, Jan. 10, 1996, as amended at 62 FR 51359, Sept. 30, 1997; USCG-2001-11118, 67 FR 58542, Sept. 17, 2002]
§ 185.740 Periodic servicing of hydrostatic release units.
The regulation, word for word — 46 CFR 185, § 185.740
(a) Each hydrostatic release unit, other than a disposable unit, must be serviced:
(1) Within 12 months of its manufacture and within 12 months of each subsequent servicing, except when servicing is delayed until the next scheduled inspection of the vessel, provided that the delay does not exceed 5 months; and
(2) In accordance with the repair and testing procedures under § 160.062 in subchapter Q of this chapter, or other standard specified by the Commandant.
(b) Each disposable hydrostatic release unit must be marked with an expiration date of two years after the date on which the unit is installed.
The Will to Survive
Quoted word for word — COMDTINST 16114.2A, ch. 2, A.1
Based on interviews with a number of sea survivors, twelve characteristics were identified to help in understanding the will to survive. They are: (01) Courage (07) Purpose (02) Determination (08) Attentiveness (03) Cheerfulness (09) Confidence (04) Positiveness (10) Productiveness (05) Flexibility (11) Persistence (06) Willingness (12) Certainty
Courage
Quoted word for word — COMDTINST 16114.2A, ch. 2, A.1.a
Courage is the state or quality of mind or spirit that enables you to face danger or fear with self-possession, confidence, and resolution. Courage enables us to overcome these fears that can overcome us in a survival situation. Each time we encounter danger or fear and overcome it, we strengthen our courage. It is important to realize the difference between fear and panic. Fear has a purpose. It is the mind’s tool to pool all available resources. Panic on the other hand, is an unreasonable, overwhelming, and uncontrollable fear that can be one’s worst enemy in a survival situation.
Determination
Quoted word for word — COMDTINST 16114.2A, ch. 2, A.1.b
Stories about those who did not survive are usually founded on the idea that the would-be survivor did not realize they had it in them to carry on just a little further. Physically, the human body will rise to the occasion and call upon itself when needed. Many survival case histories show determination alone was the only factor in the successful return of the survivor. Determination in thinking leads to quick, decisive action as you may have to act quickly. This excerpt to one survivor’s story is evidence of determination:
The shore was about 50 yards away, but I experienced extreme difficulty in swimming due to the incoming tide. Several times, I had to turn on my back and try to float and propel myself with only my feet. It was only with extreme effort that I was able to make the shore. Upon reaching it, I was completely exhausted and in a state of partial shock, but forced myself to go on.
Cheerfulness
Quoted word for word — COMDTINST 16114.2A, ch. 2, A.1.c
A strong sense of humor is instrumental in influencing the outcome of any survival situation. The ability to use humor and stay cheerful in a stressful situation will help the survivor withstand the anxieties and apprehensiveness of the situation.
Being Positive
Quoted word for word — COMDTINST 16114.2A, ch. 2, A.1.d
Being positive helps the survivor make the best of the situation. Thoughts of failure will hinder the survivor’s ability to make sound and clear decisions. Self- fulfilling prophecies are usually manifested from negative thoughts and attitudes. Failure is inevitable when one believes there is no hope in sight. Self- discipline, adaptability, and tolerance all play parts in being positive in a survival scenario.
Flexibility
Quoted word for word — COMDTINST 16114.2A, ch. 2, A.1.e
Athletes base their performance on being flexible as part of their overall fitness. Coast Guard personnel also maintain high levels of fitness to perform their duties. Flexibility is also a mental process. Being mentally flexible means having an open mind and the ability to act in a unique, creative and imaginative manner.
Willingness
Quoted word for word — COMDTINST 16114.2A, ch. 2, A.1.f
Many studies suggest we avoid psychological pain and discomfort to a greater extent than we do physical pain. In most cases, freedom from mental stress is more important than those that are physical. Willingness is the ability to make decisions and a readiness to act even when the situation seems hopeless.
Purpose
Quoted word for word — COMDTINST 16114.2A, ch. 2, A.1.g
Setting realistic goals (both near-term and long-term) and achieving them drives our sense of purpose. In a survival scenario, goal setting has a high survival value. Goal setting is a motivator, and as such, generates a will to live.
Attentiveness
Quoted word for word — COMDTINST 16114.2A, ch. 2, A.1.h
One of the most dangerous aspects of Coast Guard life is being unprepared. Mental preparedness, whether it be for jogging around a track, executing a patrol mission, or finding oneself in an open water survival situation is absolutely key to efficient planning and effective mental attitude.
Confidence
Quoted word for word — COMDTINST 16114.2A, ch. 2, A.1.i
Being properly trained is key in preparing for any situation. The skills and knowledge we obtain from training yields one important side-effect: confidence. Confidence can only be built through repetition and experience.
Productiveness
Quoted word for word — COMDTINST 16114.2A, ch. 2, A.1.j
Keeping busy can also increase the chance of survival. Humans are social creatures, and teamed with loneliness and boredom can undermine the productive nature that is extremely important in a survival situation. Keeping the mind and body active will help to concentrate on the act of survival.
Persistence
Quoted word for word — COMDTINST 16114.2A, ch. 2, A.1.k
The will to survive is fundamentally based on persistence. Emotionally, the survivor needs to stay active in spite of the situation. Concentrate on those items left behind. Family, friends, and personal goals will once again be met and achieved.
Certainty
Quoted word for word — COMDTINST 16114.2A, ch. 2, A.1.l
The will to survive is inevitably dependent on the survivor’s ability to remain certain that they will once again return to family, friends and co-workers. Those who have survived in the past have not depended on luck or magic, they have depended on the mental skills presented above and on the equipment and procedures presented in the chapters that follow.
Human Elements
Quoted word for word — COMDTINST 16114.2A, ch. 2, A.2
Human Factors play an important role in survival situations. This Section provides detail on such areas of Human Factors as: (01) Strength and Endurance, (02) Skill Level, (03) Intelligence, (04) Age and Gender.
Strength and Endurance
Quoted word for word — COMDTINST 16114.2A, ch. 2, A.2.a
Physical fitness standards are required to ensure crew members have sufficient strength and endurance to safely perform duties during normal and adverse conditions. These standards will also have a positive impact if a crew member is exposed to cold, wet environments. The combination of rough seas, cold temperatures and wet conditions can quickly cause the crew to become less effective. Physical fitness increases the ability to maintain a higher degree of thermoregulation between the skin and vital organs. However, high levels of body fat can increase the potential for survival in cold, wet environments. Increased body fat acts similar to extra layers of clothing in that it adds more protection to vital organs. If the crew member is able to get out of the water and onto the overturned hull, a life raft, or some other floatation device, survival will be highly dependent on the air temperature and wind velocity as well as their ability to sustain shivering. However, this state will decrease the rate of heat loss considerably due to the conductivity of air being less than that of water.
Skill Levels
Quoted word for word — COMDTINST 16114.2A, ch. 2, A.2.b
All tasks require a certain skill level. The required skill level is a function of the situational demands and the experience of the operator. Exposure to a cold, wet environment also has an effect on a person’s skill level. As core temp
erature decreases to 93°F (34°C), cognitive and motor functions become
impaired. Skilled performance can be categorized into three levels: Knowledge-based level, Rule-based level, and Skill-based level. (01) Knowledge-based level behavior is evoked when entirely new, unstructured, or complex problems are encountered. At this level, the individual uses meaningful concepts or physical properties to make decisions. Decision-making involves the identification of options or alternatives, assessing their relative attractiveness, assessing the likelihood of being realized, and integration of considerations to identify what appears to be the best option. Knowledge-based level behavior is the first level of behavior that is affected by exposure to cold, wet environments. (02) At the Rule-based level an action is selected by activating in working memory a hierarchy of rules. Such rules may have been derived empirically during previous occasions, by instruction or by conscious problem solving and planning. Information from the environment is used to select or modify these rules. Rule-based level behavior is the second level of behavior that is affected by exposure to cold, wet environments. (03) Skill-based level is when highly automated sensory-motor and cognitive performances and takes place without conscious control. This level of behavior is the final level to be affected by exposure to cold, wet environments.
Intelligence
Quoted word for word — COMDTINST 16114.2A, ch. 2, A.2.c
Memory capacity plays an important role in open water survival situations. The rate at which we process cognitively (mental storage, retrieval, and manipulation) is not only a function of general intelligence but of individual aptitude as well. The better a survivor learns and acquires new information, the higher the probability of rescue.
Age and Gender
Quoted word for word — COMDTINST 16114.2A, ch. 2, A.2.d
Aging is widely thought to compromise body temperature defense during cold exposure. Controlled laboratory comparisons show that older men may be less able than younger men to defend core temperature during cold exposures. Heat production due to shivering may also be less in older than younger men due to the reduction of muscle mass. These aging effects begin to be apparent after about 45 years of age in men. Older women defend core temperature during cold exposure as well as, or better than younger women; this is due to body composition changes attributable to aging. Older women tend to have more body fat than younger women, which accounts for impaired, as well as improved, thermoregulatory responses to cold environments. Gender related differences in body size, body shape and composition contribute to a difference in cold tolerance between men and women, which is particularly apparent in cold water. Most women have greater body-fat content than men of comparable age. A thicker subcutaneous fat layer accounts for greater maximal tissue insulation and lower critical water temperature. Despite this difference, however, greater body-fat content may not provide women with a thermoregulatory advantage over men. When women and men of equivalent subcutaneous fat thickness are compared, the women have a greater surface area and smaller total body mass. Although insulation is equivalent, women’s total heat loss is greater due to the larger surface area. Because of their smaller body mass, body heat content is less in the women. Therefore body temperature falls more rapidly for any given thermal gradient and metabolic rate. Comparison of men and women with equivalent total body masses shows that women still seem to be at a disadvantage in the cold. In this case, women’s greater body-fat content enhances insulation, and surface area differences between genders are not as pronounced. Nevertheless, a smaller lean body mass limits a women’s capacity for heat production, compared to men of comparable total body mass. However, under colder conditions that stimulate shivering the limited thermogenic capacity of women will result in a more rapid decline in their core temperature than in men of equivalent total body mass.
Sea State
Quoted word for word — COMDTINST 16114.2A, ch. 2, B.1
Sea states can range from calm and mirror-like to driving sea spray with exceptionally high waves. Survivability depends not only on the sea state the survivor deals with, but with the sea state the rescue vessel must bear.
Effects of Wind and Waves
Quoted word for word — COMDTINST 16114.2A, ch. 2, B.1.a
There are several forces that create waves at sea, the most significant of which is wind. The factors which determine the characteristics of wind waves are: wind speed, wind duration, and fetch (the distance over open water which the wind has blown). As the wind begins to blow, it creates seas, which are typically steep, choppy, and have little pattern. As the wind continues, the seas begin to become more defined. In heavy weather, observing and measuring waves is important; if you can get a general sense of the waves in which you are operating, it will allow you and your crew to operate accordingly. Strong winds usually have the same effects as strong currents on wave behavior, but because of the infinite variables of wind speed, direction, and interaction with currents, it is often difficult to predict what effect the wind will have on waves. The survivor must be more vigilant during high sea states and be ready to signal rescuers at a moment’s notice. High seas contribute to severe motion sickness; feelings of frustration and water aspiration are major concerns.
NOTE
The sea anchor, supplied with life rafts provides the most stability in any wave pattern. To ensure proper positioning of the sea anchor, the sea anchor should rest in the trough of the wave as the bow of the craft is at the crest of the wave.
Water Temperature
Quoted word for word — COMDTINST 16114.2A, ch. 2, B.2
Like sea state, water temperature has a significant impact on chances of survival.
Hypothermia
Quoted word for word — COMDTINST 16114.2A, ch. 2, B.2.a
One of the greatest dangers in open water survival is hypothermia. When the human body is submerged in water, heat is lost approximately 26 times faster than it is on dry land. Hypothermia is described in the First Aid Handbook.
Application
Quoted word for word — COMDTINST 16114.2A, ch. 2, B.2.b
Regardless of the type, all clothing will prevent the skin from reaching the temperature of water. Cooling rates will vary depending upon the type of protection, whether wet or dry suits. Clothing provides extra thickness between the skin and water or wind. Since heat is generally conducted away from the body by the movement of water, adding extra layers keeps the skin further away from the moving water thus reducing heat loss to varying extents. Dry suits increase protection and decrease cooling rates in both rough and calm water. Dry suits are the most effective form of protection in both rough and calm water. However, the barrier must be maintained between the water and skin for the suit to remain effective. Cooling rates are slightly higher in rough water, though this is often linked to increased heart rate and exertion in an attempt to stay afloat. If water does penetrate a dry suit, they are not rendered useless; however, the effectiveness of the suit decreases and cooling rates may increase, especially if there is water exchange. A downside is that cold water causes diuresis, or increased urinary output. It is important to remember that dry suits provide protection only to an extent and in all cases, with the exception of heated suits, will eventually lead to heat loss with the potential for hypothermic problems. Regardless of the suit worn, individuals should egress from the water as quickly as possible. A life raft or other floatation device should be used if available. Survival time will increase significantly once out of the water.
Symptoms of Lowered Body Core Temperatures
Quoted word for word — COMDTINST 16114.2A, ch. 2, B.2.c
The body goes through noticeable symptoms when exposed to cold water as indicated in Table 3-2 Core Body Temperature.
| °F | °C | Symptoms |
| 98.6 to 96 | 37 | (01) Cold sensations (02) Skin vasoconstriction (03) Increased muscle tension (04) Increased oxygen consumption |
| 97 | 36 | (05) Sporadic shivering suppressed by voluntary movements (06) Gross shivering spells (07) Further increase in oxygen consumption (08) Uncontrollable shivering |
| 95 (Note 1) | 35 | (09) Mental confusion (10) Impairment of rational thought (11) Drowning possible (12) Decreased will to survive |
| 93 | 34 | (13) Loss of memory – speech impaired (14) Sensory function impaired (15) Motor performance impaired |
| 91 (Note 2) | 33 | (16) Hallucinations, delusions, clouding consciousness (17) Shivering stops |
| 90 | 32 | (18) Heart rhythm irregularities (19) Motor performance grossly impaired |
| 88 | 31 | (20) Shivering stopped |
| 86 | 30 | (21) Loss of consciousness (22) No response to pain |
| 80 | 27 | (23) Death |
| Note 1: Voluntary tolerance limit in laboratory experiments. | ||
| Note 2: 50% of those in survival situations do not survive at this body core temperature. |
Table 3-2 — Core Body Temperature
Predicted Survival Time
Quoted word for word — COMDTINST 16114.2A, ch. 2, B.2.d
Being prepared at the onset of a survival situation can help minimize heat loss. Table 3-3 below shows the predicted survival times of the average person in 50° Fahrenheit water for various situations. Contrary to popular belief, the survivor should not swim around in efforts to keep warm. This will only increase the rate of heat loss and speed the onset of hypothermia.
| Survival Floating | 1.5 Hours |
| Treading Water | 2.0 Hours |
| With Flotation | |
| Swimming | 2.0 Hours |
| Holding Still | 2.7 Hours |
| HELP Posture | 4.0 Hours |
| Huddle w/ Others | 4.0 Hours |
Table 3-3 — Predicted Survival Time
NOTE
When worn correctly, the appropriate anti-exposure coveralls or dry suit will protect the survivor and add layers of insulation. Thermal gloves, socks, underwear and neoprene hoods all add additional layers of protection. Inflatable raft floors will provide an additional layer of insulation.
Air Temperature
Quoted word for word — COMDTINST 16114.2A, ch. 2, B.3
Air Temperature is a prime contributor to hypothermia. The combination of cold air with cold water is a recipe for danger.
Effects of Wind and Waves
Quoted word for word — COMDTINST 16114.2A, ch. 2, B.3.a
When the wind is blowing, heat loss in the body increases exponentially due to the wind chill factor. Actions must be taken to protect against wind chill. In open water survival situations, actions taken to protect the survivor from wind effects (e.g., laying low in a raft, using neoprene hoods, etc) can greatly enhance survivability and lessen the effects of hypothermia.
Wind/Wave Effects Mitigation
Quoted word for word — COMDTINST 16114.2A, ch. 2, B.3.b
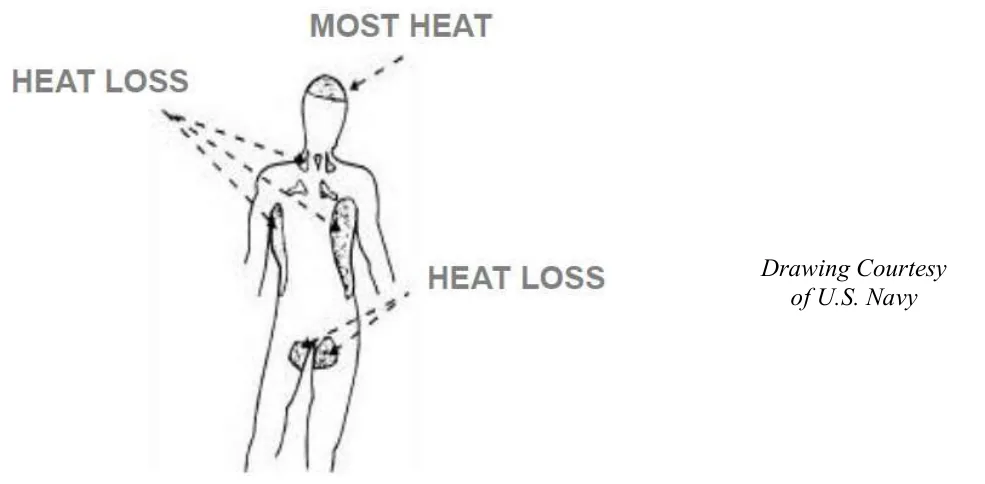
Survivors should be aware of the areas of the body that are most prone to heat loss. Figure 3-4 represents those areas of the human body most prone to cooling. The majority of heat loss occurs in and around the top of the head.
NOTE
When worn correctly, the appropriate anti-exposure assemblies will protect the survivor and add layers of insulation. Insulated boots, balaclavas, watch caps, thermal gloves, socks, underwear and neoprene hoods all add additional layers of protection.
Drawing Courtesy of U.S. Navy
Weather and Time of Day
Quoted word for word — COMDTINST 16114.2A, ch. 2, B.4
The weather and time of day play a major effect on any survival scenario.
Effects of Weather on Survival
Quoted word for word — COMDTINST 16114.2A, ch. 2, B.4.a
Survivors in open water must realize that rescue efforts may be hampered or even postponed because of inclement weather. Survivors must be prepared for a prolonged evolution—even after the weather improves. (01) Fog. Fog is composed of tiny water droplets hanging in the atmosphere, sufficiently dense to scatter light rays and reduce visibility. Fog makes locating anything more difficult, including survivors in the open water. (02) Waves. Waves, seas, and surf can present the greatest challenges to survival skills. By understanding how waves form and behave, survivors know what to expect and how to minimize danger and increase the chance of survivability. Of the two major types of waves, the broad, rounded waves are likely to be the type of wave an open water survivor will have to deal with. Breaking waves are the most dangerous kind of wave for open water survivors. How dangerous the wave is depends on the ratio of wave
height to length, and on wave frequency. Steep sloped waves are the most dangerous.
(03) Rain, Sleet, & Snow. As with fog, precipitation can limit the sight of the survivor as well as the rescue party. Precipitation can add to other complexities such as contributing to the onset of hypothermia.
Time of Day
Quoted word for word — COMDTINST 16114.2A, ch. 2, B.4.b
Statistically, rescues occur within a short time following a mishap. Wind and sea currents make pinpointing survivors more predictable when the mishap site is known. As time progresses, this predictability becomes more difficult. In hours of darkness, it becomes critical that the appropriate signaling devices are employed. Mentally, the first few moments an individual is in a survival situation are the most disorientating, however, the survivor must remember that rescue vessels may be nearby during this time. During hours of darkness, flares and lights are crucial when these vessels are near.
Proximity to Land / Decision Factors
Quoted word for word — COMDTINST 16114.2A, ch. 2, B.5
With land in sight, the survivor must make a decision whether to swim or row for land or to wait. Swimming or rowing away from a “last known position” has inherent risk and survivors from a capsized boat are often safer staying with the boat or other visable debris. Shorelines are dotted with various hazards including sharp rocks, strong current, and breaking waves. Unless land is close and conditions appear favorable, the survivor should not try to swim to shore. Considerations when making the decision to swim to shore include: (01) Distance. With no visible reference from sea, distance can be deceiving and create the illusion that land is closer than it actually is. Glare from the water surface can hinder the ability to gauge the distance to shore. (02) Water Current. Underlying current near the shoreline may hamper progress and severely rob the survivor of available energy. (03) Physical Condition. As mentioned above when dealing with water currents, the survivor’s physical condition can be the limiting factor in surviving a swim or row for shore. (04) Swimming Competency. Swimming skills must be considered in making the shoreline. A poor swimmer will expend more energy to make the shoreline than an accomplished swimmer. (05) Water Temperature. The colder the water temperature, the more energy will be required to swim the same distance in warmer waters. Also, cold water intrusion may occur and hasten hypothermia.
Protection from Exposure
Quoted word for word — COMDTINST 16114.2A, ch. 2, B.6
The most inhospitable location on our planet is the open water. The survivor must be prepared for hot, temperate, cool, or cold conditions. Survivors must be aware of the dangers of too much exposure to the sun and take preventive measures to guard against a decrease in performance.
Hot Climates
Quoted word for word — COMDTINST 16114.2A, ch. 2, B.6.a
Performance in open water can easily be affected by the heat and vibration of the boat, which can increase fatigue. This Section discusses the various sun and heat related factors that crew members may encounter during their activities. Clothing and equipment should be worn so that there is free circulation of air between clothing and the body surface. Clothing acts as a barrier that prevents evaporative cooling. Many synthetic fabrics reduce the absorption and dispersal of sweat needed to achieve optimum heat loss by evaporation. Impermeable clothing does not “breath” and thus greatly increases an individual's susceptibility to heat related illnesses. Impermeable clothing must be avoided. When using impermeable clothing, take precautions to avoid the rapid buildup of body heat. Heat illnesses may be manifested in minutes if impermeable clothing is worn. Survivors should shield themselves from the effects of sun and heat as best as possible. Sunshades should be fabricated from any means available. During the heat of the day, observe the following: The body may be cooled by getting into the water; however, check for marine life and be sure you are secured to the raft. This action will also aid in dehydration, as survivors have actually absorbed enough water to activate the kidneys after only a short time in the water. (01) Clothes can be kept wet by splashing water on them. (02) Keep physical activity to an absolute minimum in the water. (03) Use sun screen cream or similar ointment if available. (04) Wear sunglasses or improvise eye cover made from cloth or paper. Heat stroke can occur when the body’s cooling mechanism (sweating) fails to adequately cool the body. The major symptom of heat stroke is red, hot and dry skin. Mitigating the effects of heat stroke can easily be accomplished by keeping the body cooled by the measures outlined above. Keep incapacitated survivors lying down with the head elevated. Outer clothing should not be removed. Underclothes may be removed and used to cover exposed head, neck or to parts of the body which would otherwise be exposed.
NOTE
Personnel who are not accustomed to strenuous physical activity in hot and humid environments are particularly susceptible to heat injuries. Excess body weight also contributes to this susceptibility.
Sunburn
Quoted word for word — COMDTINST 16114.2A, ch. 2, B.6.b
Continuous exposure to the sun can cause sunburn and other complications such as heat stroke, dehydration, etc. Unprotected exposed skin will suffer from premature aging and an increased chance of skin cancer. The limit to surface heating, the point at whi
ch skin becomes painful, is 109°F (43°C) and higher.
At 113°F (45°C), pain is severe, and if that temperature is maintained burns will result. Symptoms of sunburn are: redness, swelling, or blistering of the skin. Other effects of overexposure to the sun are fever, gastrointestinal symptoms, malaise, and pigment changes in the skin.
Dehydration
Quoted word for word — COMDTINST 16114.2A, ch. 2, B.6.c
An adequate fluid intake is essential to remain healthy. Fluids are lost from the body in several ways. The most obvious loss is through the kidneys. The less obvious loss of body fluid occurs through perspiration from the skin and respiration through the lungs. As a result, an average, healthy adult requires two or three liters of fluid a day to replace these losses. Extremely warm weather significantly increases the loss of fluids. Try to stay away from liquids such as tea, alcohol, coffee, and soft drinks. These liquids speed up fluid loss. Healthy adults must satisfy their water and electrolyte requirements. When water and electrolytes are not replaced, the body experiences dehydration. Drinking alcohol and caffeine increases dehydration. At first there is thirst and general discomfort, followed by an inclination to slow physical movement, and a loss of appetite. As more water is lost, an individual becomes sleepy and experiences a rise in body temperature. By the time the body loses 5% of body weight in fluids, the individual begins to feel nauseated. When 6 to 10% of body fluids are lost, symptoms increase in this order: (01) Dry mouth, (02) Dizziness, (03) Headache, (04) Difficulty in breathing, (05) Tingling in the arms and legs, (06) Skin color turns bluish, (07) Indistinct speech, (08) Inability to walk, (09) Cramping legs and stomach.
Effects of Cold Climates
Quoted word for word — COMDTINST 16114.2A, ch. 2, B.6.d
In cold climates, the major problems range from hypothermia and frostbite, to immersion, or “Trench” foot. In cold climates, observe the following: (01) Keep as dry and warm as conditions will dictate. If possible, remove wet clothing and replace with dry clothing. (02) Clothing should be worn in loose fitting layers. (03) Don anti-exposure suit (if available). (04) Inflate raft floor or add available material for additional layers of insulation. (05) Huddle with other survivors. (06) Mild stretching and exercise improves circulation—this is key in preventing immersion foot. (07) Avoid sitting in cramped positions for long periods. Move arms, feet, and legs as much as possible. (08) Wiggle the toes inside boots. (09) Keep feet as warm and dry as possible. (10) Avoid the use of alcohol and tobacco.
Cold Water Survivability
Quoted word for word — COMDTINST 16114.2A, ch. 2, C.1
The length of time a person can stay alive in cold water depends on the temperature of the water, the physical condition of the survivor, and the action taken by the survivor. Figure 2-1 illustrates the relationship between water temperature and estimated time of useful consciousness. Swimming typically reduces a person’s chance of survival due to more rapid loss of body heat.
[Lettered on the illustration: 14 12 10 8 6 4 2 0 32 41 50 59 68 Water Temperature - Degrees Fahrenheit]
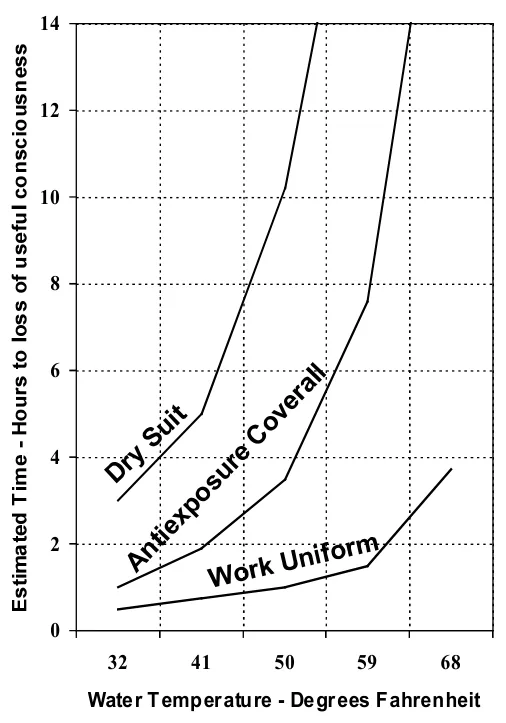
Critical Factors
Quoted word for word — COMDTINST 16114.2A, ch. 2, C.2
Time is critical when forced to enter cold water. The loss of body heat is one of the greatest dangers to survival. Critical factors that increase the threat of hypothermia and other cold-water injuries include: (01) Prolonged exposure to cold-water temperatures, (02) Sea spray, (03) Air temperature, (04) Wind chill.
Survival Measures
Quoted word for word — COMDTINST 16114.2A, ch. 2, C.3
Several preventive measures that can be used to increase the chances for successful cold water survival include: (01) Put on as much warm clothing as possible, making sure to cover head, neck, hands and feet. (02) If the hypothermia protective clothing does not have inherent flotation, put on a PFD. (03) Before entering the water, button up clothing, turn on signal lights (only at night), locate your survival whistle and make any other preparations for rescue. (04) Avoid entering the water if possible. If it is necessary to jump into the water, cover nose and mouth with one hand and place other hand on the PFD or area between wrist and elbow.
Water Survival Skills
Quoted word for word — COMDTINST 16114.2A, ch. 2, C.4
Water survival skills that should be utilized to increase the chances for surviving cold water immersion include: (01) Immediately upon entering the water, become oriented to the surrounding area. Try to locate sinking boat, floating objects, and other survivors. (02) Try to board a life raft, overturned boat (if floating), or other floating platform as soon as possible to shorten the immersion time. Body heat is lost many times faster in the water than in the air. Since the effectiveness of the insulation worn is seriously reduced by being water soaked, it is important to be shielded from wind to avoid a wind-chill effect. Huddling close to the other occupants in the craft will also conserve body heat. (03) While afloat in the water, do not attempt to swim unless it is necessary to reach a fellow survivor or a floating object which can be grasped or climbed onto. (04) Unnecessary swimming will pump out any warm water between the body and the layers of clothing and will increase the rate of body-heat loss. Also, unnecessary movements of arms and legs send warm blood from the inner core to the outer layer of the body resulting in a rapid heat loss.
(05) The body position assumed in the water is very important in
conserving heat. Float as still as possible with legs together, elbows close to your side and arms folded across the front of the PFD. This is called the Heat Escape Lessening Position (HELP) and minimizes exposure of the body surface to the cold water. Try to keep head and neck out of the water (see Figure 3-2). However, if wearing a Type III PFD, or if the HELP position turns the body face down, bring legs together tight and arms tight to sides and head back.
(06) Another heat conserving position is to huddle closely to others in the
water making as much body contact as possible. A PFD must be worn to be able to maintain these positions in the water (see Figure 3-3).
(07) Keep a positive attitude about survival and rescue. This will extend
survival time until rescue comes. A will to live does make a difference.
[Illustration in the handbook: Figure 3-2 — Single PIW]
[Illustration in the handbook: Figure 3-3 — Multiple PIW Huddling]
Climbing onto an Overturned Boat Hull
Quoted word for word — COMDTINST 16114.2A, ch. 2, C.5
Regardless of what factors or condition contributed to the capsizing of your vessel, after you safely egress, you are now faced with an open water survival situation. The ability to think clearly and proficiently can make the difference between life and death. Climbing onboard an overturned vessel will provide greater protection from the elements and hypothermia. Once onboard, your chances of being spotted by rescuers (Coast Guard or good Samaritans) greatly increases because it is a larger object that can be seen from greater distances. The majority of capsized vessels will inherently float and not sink for some time. The hull will float bow-up with the stern lying just beneath the surface of the water due to the vessel hull design and weight of the engines (see Figure 2-2). Although there is no standard procedure for climbing onto an overturned vessel, general procedures are listed below.
[Illustration in the handbook: Figure 2-2 — Capsized Vessel]
Use the following procedures when climbing onto an overturned boat hull: (01) Look for the easiest access point to climb aboard, this is often found towards the stern of the vessel since it will be lower in the water than the bow. (02) Use the natural design of the boats hull for hand holds eg. keel, chine, through hull drains.
CAUTION!
Be careful of sharp edges, burs, and protruding objects that may cause injury or tear PPE when climbing on board the overturned boat hull. (03) Be aware that some leverage points may be slightly below the surface, e.g. Rub rails, swim platforms, life lines. (04) Assist other survivors in climbing aboard. Once on board the overturned vessel, get as much as your body out of the water as possible to reduce your exposure to hypothermia. Apply training principles learned in the Open Water Survival Skills section and Post Capsize Procedures paragraph.
Boarding a Boat from the Water
Quoted word for word — COMDTINST 16114.2A, ch. 2, C.6
After a vessel capsizes or sinks survivors may find themselves floating, awaiting rescue. Assistance can range from minutes to hours. Rescuers (Coast Guard or good Samaritans) will arrive and begin recovering all persons from the water. There are many different types of vessels that may arrive on scene to assist. These will range from military, commercial, and/or recreationally operated vessels. Commercial and recreational vessel operators have limited experience with recovering persons from the water and their vessels are not specifically designed for rescue operations. For this reason, survivors need to become familiar with basic boat characteristics for boarding a boat from the water. Vessel characteristics for recovery consideration: (01) Swim platform or ladder, (02) Lowest point of freeboard, (03) Transom door, (04) Jacobs ladder, You may have to get creative and think about what specific characteristics are available on board the rescue vessel that can aid in your recovery. Depending on duration of exposure to the elements, survivors may have lost dexterity and have limited strength that will require additional assistance for recovery. Remember, you have the training, experience and may have to verbally communicate with the rescue vessel on the most prudent method for recovery. If capable after being rescued, commence overseeing the recovery of remaining survivors and administering first aid as necessary.
Description
Quoted word for word — COMDTINST 16114.2A, ch. 3, A.1
Despite the mildew inhibitor treatment that is required by manufacturers for PFDs, stowing them in moist locations will increase deterioration of the fabric. Heat, moisture, and sunlight will increase the deterioration of PFD parts.
Storage Sterns Model I600 (Type I) PFD
Quoted word for word — COMDTINST 16114.2A, ch. 3, A.2
PFDs should be stored in a climate-controlled environment in accordance with Reference (a). All PFDs should be kept away from oil, paint, and greasy substances. The Coast Guard does not consider any PFD “readily accessible” if it is kept in its original wrapper. Persons under stress may be unable to get them out promptly. Also, the wrapper can trap moisture leading to mildew and rot.
NOTE
Remember, even more important than PFD storage condition is that PFDs be readily accessible.
Description
Quoted word for word — COMDTINST 16114.2A, ch. 3, A.3
The Sterns Model I600, also known as a Type I (Figure 3-1), is a one-piece, PFD required for the J-Davit tender and during abandon ship operations. It is authorized for use by survivors, passengers on towed vessels, or prisoners aboard vessels. Sterns model I600 PFD provides an unconscious person the greatest chance of survival in the water. It is universally sized for adults (90 pounds and over) which provides at least 22 pounds of buoyancy. The PFD must be international orange in color.
[Illustration in the handbook: Figure 3-1 — Sterns Model I600]
Advantages
Quoted word for word — COMDTINST 16114.2A, ch. 3, A.4
Sterns model I600 PFD is effective for all waters, especially open, rough, or remote waters where rescue may be delayed. It is designed to turn most unconscious wearers in the water from a face-down position to a vertical or slightly backward position, allowing the wearer to maintain that position. It provides at least 22 pounds of buoyancy. This buoyancy will allow the wearer to relax and save energy while in the water, thus extending survival time.
Disadvantages
Quoted word for word — COMDTINST 16114.2A, ch. 3, A.5
There are three major disadvantages to this type of PFD:
(01) It is bulky and restricts movement. (02) Its buoyancy restricts the underwater swimming ability needed to escape from a capsized boat or to avoid burning oil or other hazards on the surface of the water. (03) It provides minimal protection against hypothermia.
Donning
Quoted word for word — COMDTINST 16114.2A, ch. 3, A.6
Before entering the water, don and adjust Sterns model I600 PFD using the following procedures:
WARNING
For safety, always tuck all loose straps into your pockets, shirt, or belt. Adjust straps on injured people before they are lowered into the water.
| Step Procedure 1 Don PFD as you would a vest. 2 Buckle upper chest strap and pull tight. 3 Secure lower chest strap snap hook to the ring on the left and pull strap tight. | Step | Procedure |
| 1 | Don PFD as you would a vest. | |
| 2 | Buckle upper chest strap and pull tight. | |
| 3 | Secure lower chest strap snap hook to the ring on the left and pull strap tight. |
Entering the Water Survivors (Type I) PFD
Quoted word for word — COMDTINST 16114.2A, ch. 3, A.7
Use the following procedures to enter the water: Follow these steps before entering the water wearing any type of PFD or combination of cold
NOTE
weather protective device (e.g., dry suit) and PFD.
| Step | Procedure |
| 1 | Ensure all straps on the PFD are securely fastened, tightened to a snug fit, and tucked in to prevent them from snagging. |
| 2 | Stand on the boat’s gunwale, on the windward side, at a point closest to the water. |
| 3 | Check surrounding area for debris and depth. |
| 4 | Hold elbows close to your sides and cover your face with one hand. |
| 5 | Grip PFD or area between wrist and elbow with the other hand. |
| 6 | Looking straight ahead, keep the body erect and legs held together and crossed when entering the water. It is better to gently slip in, if possible, rather than jumping. |
| 7 | Minize initial immersion by spreading arms and applying a scissor kick upon entry. |
If jumping into water is necessary with chemicals, oil, or burning oil on the surface, place one
NOTE
hand over mouth with palm under chin and split fingers tightly squeezing nostrils shut. Place other hand on the PFD collar to keep it in place.
Description
Quoted word for word — COMDTINST 16114.2A, ch. 3, A.8
The Survivors – PFD, is a Type I (Figure 3-2) PFD. A wearable device that will keep most unconscious wearers face-up in the water. It is intended for use by passengers, prisoners, and non-mission essential personnel. It comes in international orange with SOLAS reflective panels: (01) Adult (more than 90 pounds) which provides at least 22 pounds of buoyancy. (02) Child (less than 90 pounds) which provides at least 18 pounds of buoyancy.
[Illustration in the handbook: Figure 3-2 — Survivors Type I]
Advantages
Quoted word for word — COMDTINST 16114.2A, ch. 3, A.9
Lightweight and easy to don. Easily stacked for storage.
Disadvantages
Quoted word for word — COMDTINST 16114.2A, ch. 3, A.10
There are three major disadvantages to this type of PFD: (01) It restricts movement. (02) Its buoyancy restricts the underwater swimming ability needed to escape from a capsized boat or to avoid burning oil or other hazards on the surface of the water. (03) It provides minimal protection against hypothermia.
Donning Type III PFD
Quoted word for word — COMDTINST 16114.2A, ch. 3, A.11
Before entering the water, don and adjust a near-shore buoyant vest PFD using the following procedures:
| Step | Procedure | |
| 1 | Grasp the PFD at the lower part of head opening and pull outward to expand opening. | |
| 2 | Slip head through opening. | |
| 3 | Pass the body strap around the back and fasten at the front of the PFD, then adjust the strap for a snug fit. |
Description
Quoted word for word — COMDTINST 16114.2A, ch. 3, A.12
Type III PFD is routinely worn aboard boats or cutter crews during underway deck evolutions when freedom of movement is required and the risk of falling over the side is minimal. It is not designed to turn an unconscious wearer to a face-up position; the design is such that conscious wearers can place themselves in a vertical or slightly backward position. It has a minimum of 15.5 pounds of buoyancy and comes in many sizes and colors. (Figure 3-3) shows one style of Type III PFD that boat crews are authorized to wear. Most approved flotation jackets (“float coats”) are also Type III devices.
[Illustration in the handbook: Figure 3-3 — Type III Device PFD]
Advantages
Quoted word for word — COMDTINST 16114.2A, ch. 3, A.13
Type III PFDs offer boat crew members greater comfort and freedom of movement. The Type III PFD is designed so wearers can place themselves in a face-up position in the water. Type III PFD allows greater wearing comfort and is particularly useful when water-skiing, sailing, hunting from a boat, or engaging in other water activities. The Type III PFD provides adequate flotation when wearing a full complement of law
NOTE
enforcement gear. If unable to remain afloat, jettison easily accessible equipment.
Disadvantages
Quoted word for word — COMDTINST 16114.2A, ch. 3, A.14
The following are some disadvantages to the Type III PFD: (01) Flotation characteristics are marginal and not suitable for wear in heavy seas, (02) Tendency to ride-up on the wearer in the water, (03) Wearer may have to tilt head back to avoid a face-down posture in the water, (04) The distribution of the flotation material reduces or eliminates the turning ability when compared to the Survivors Type I PFD.
Donning
Quoted word for word — COMDTINST 16114.2A, ch. 3, A.15
Before entering the water, don and adjust a Type III PFD using the following procedures:
| Step | Procedure |
| 1 | Place your arms through the openings in the vest. |
| 2 | Close zipper, if provided. Close front slide fasteners. |
| 3 | Adjust waist straps for a snug fit. |
Non-Coast Guard Approved Type III PFDs
Quoted word for word — COMDTINST 16114.2A, ch. 3, A.16
Non-Coast Guard Approved Type III PFDs (Figure 3-4) are intended for specific activities and may be carried instead of a Coast Guard-approved Type III PFD only if used according to the approval condition on the label. Examples of Non-Coast Guard Approved Type III PFDs are: (01) Mustang Survival MD-3183 v22 with survival equipment pockets, (02) Lifesaving Systems Life Preserver Survival Vest. Non-Coast Guard Approved PFDs are not Coast Guard approved because they have beaded handles
NOTE
vice t-handles (which have been deemed a snag hazard). Reference (a) contains a list of all Non- Coast GuardApproved PFDs.
[Illustration in the handbook: Figure 3-4 — Non-Coast Guard Approved Type III PFD]
Advantages
Quoted word for word — COMDTINST 16114.2A, ch. 3, A.17
The Non-Coast Guard Approved Type III PFD offers boat crew members greater comfort and maneuverability compared to the typical Type III vest. Lightweight and not as bulky, the inflatable Non-Coast Guard Approved Type III device is especially beneficial to units in warmer climates. When fully inflated, the inflatable Non-Coast Guard Approved Type III provides more buoyancy. Some Non-Coast Guard Approved Type III inflatables provide storage pockets/pouches which, when properly outfitted, eliminate the need for wearing the Boat Crew Survival Vest mentioned later in this chapter.
Disadvantages
Quoted word for word — COMDTINST 16114.2A, ch. 3, A.18
The initial purchase price and preventive maintenance costs of Non-Coast Guard Approved Type III inflatable PFDs are greater than most Type III vests. It also requires more frequent and complicated preventive maintenance. As with any other automated feature, if the auto-inflate mechanism were inoperative, the PFD would have to be manually inflated. This could be a problem if the crew member is knocked unconscious while falling overboard. Automatically inflatable PFDs are also know to hinder egress from an enclosed cabin environment.
Donning Ring Buoys/Throwable Devices
Quoted word for word — COMDTINST 16114.2A, ch. 3, A.19
There are several different styles of Non-Coast Guard Approved Type III PFDs. Each has a specific method of donning, equipment storage, and activation. Prior to use, each crew member must complete the performance qualification standards for that specific style of Non-Coast Guard Approved Type III. PFD PQS can be found on the Office of Boat Forces Portal site.
Description Ring Buoys/Throwable Devices are Coast Guard-approved devices that are
Quoted word for word — COMDTINST 16114.2A, ch. 3, A.20
easily deployed to a person-in-the-water and are grasped by the user until rescued. Buoyant cushions come in many different colors. Ring buoys (see Figure 3-5) are usually international orange.
[Illustration in the handbook: Figure 3-5 — Ring Buoy/Throwable Device]
Advantages
Quoted word for word — COMDTINST 16114.2A, ch. 3, A.21
An advantage of Ring Buoys/Throwable Devices is that since they are not worn like other PFDs, there are no size restrictions. This type of device is designed to be stored on deck for easy deployment should someone fall overboard. If quickly deployed following a person in the water, Ring Buoys/Throwable Devices also act as markers assisting in returning to the area where the person originally fell overboard. See Reference (b) for more information on Person-in-the-Water Recovery.
Disadvantages Non-Coast Guard Approved Cutter Specific PFDs
Quoted word for word — COMDTINST 16114.2A, ch. 3, A.22
A disadvantage of Ring Buoys/Throwable Devices is that they are not worn, although some can be secured to the body once reached in the water.
Description
Quoted word for word — COMDTINST 16114.2A, ch. 3, A.23
Examples of Non-Coast Guard Approved Cutter Specific PFDs include the Standard Navy PFD with Collar (Figure 3-5) and the Abandon Ship Life Preserver.
Standard Navy PFD with Collar
Quoted word for word — COMDTINST 16114.2A, ch. 3, A.24
This preserver is one of the best devices for keeping a person afloat; however, its major drawback is that it requires training to become familiar with the many straps and fastenings used to don this device quickly and properly. Consequently, the Standard Navy Preserver is not Coast Guard-approved for civilian use. Auxiliarist or other government agency (OGA) going aboard a Coast Guard cutter as crew (or passenger) should be given instructions in donning this PFD.
[Illustration in the handbook: Figure 3-5 — Standard Navy Preserver]
Donning
Quoted word for word — COMDTINST 16114.2A, ch. 3, A.24.a
Use the following procedure to put on the standard Navy PFD with collar:
| Step | Procedure | |
| 1 | Don the PFD as you would a vest. | |
| 2 | Secure the chest-strap snap hook on the right side to the D-ring on the left and pull strap tight around the chest. | |
| 3 | Extend the leg straps hanging from the rear waist area and route through legs from the rear to the front. |
| 4 | Insert the right leg strap through the right double D- rings hanging from the side waist area and route the bitter end over the top D-ring and through the bottom. Pull all slack from the strap. Rig strap for quick release as shown in the figure (right). Repeat for the left leg strap. |
| 5 | Pull waist drawstrings tight and secure with a bowknot. |
| 6 | Tie upper front tapes together with a bowknot. |
| 7 | Secure collar tapes through collar D-rings and tie with a bowknot. |
Abandon Ship Life Preserver
Quoted word for word — COMDTINST 16114.2A, ch. 3, A.25
The Abandon Ship Life Preserver may be used as an option by cutter personnel in high heat areas and/or confined spaces during general emergency conditions or abandon-ship operations but is not a replacement for the Navy Type I PFD w/ Collar.
Donning, Adjusting and Inflating
Quoted word for word — COMDTINST 16114.2A, ch. 3, A.25.a
Use the following procedures to don, adjust, and inflate the Abandon Ship Life Preserver:
| Step | Procedure |
| 1 | Buckle the waist belt around the waist with the pouch to the rear. |
| 2 | Adjust the waist belt to allow rotation of the pouch to the stomach area. |
| 3 | When required, unsnap the pouch, unroll the inflatable chamber, and pass head through yoke opening. |
| 4 | Inflate the preserver by pulling the yellow inflation lanyard with a slow steady pull until the inflation assembly actuates. |
| 5 | If the CO2 inflation assembly fails, orally inflate preserver by unscrewing the knurled ring, depressing the mouthpiece, and blowing into the oral inflation tube. |
[Illustration in the handbook, page 3-12]
Layered Clothing
Quoted word for word — COMDTINST 16114.2A, ch. 3, B.1
The best way to avoid cold-related injuries is to wear proper clothing. When choosing clothing combinations, the best advice is to layer clothing.
Maintaining Body Heat Anti-Exposure Coverall
Quoted word for word — COMDTINST 16114.2A, ch. 3, B.2
Wet clothing robs the body of heat by breaking down the thermal protection of insulated clothing. It is extremely important to replace wet clothing as soon as possible to prevent cold-related injuries, particularly if the person is idle after a period of heavy perspiring. Many cold weather medical problems involve wet hands, feet and head. These areas should receive special care.
Description
Quoted word for word — COMDTINST 16114.2A, ch. 3, B.3
The anti-exposure coveralls are the primary Layer III garment worn when members are exposed to intermittent sea spray or rain and thermal protection is required (Figure 3-6). If properly worn with the straps appropriately adjusted, the water will not flush out of the suit and will delay the onset of hypothermia.
[Illustration in the handbook: Figure 3-6 — Anti-Exposure Coverall]
Donning
Quoted word for word — COMDTINST 16114.2A, ch. 3, B.4
Anti-exposure coveralls are designed to be worn over the uniform in the same manner as standard coveralls. Also, hoods, balaclava, goggles and gloves should be used to protect against the elements.
Entering the Water Dry Suit
Quoted word for word — COMDTINST 16114.2A, ch. 3, B.5
Before entering the water with anti-exposure coveralls, perform the following procedures:
| Step | Procedure |
| 1 | Ensure the zipper is completely closed. |
| 2 | Tighten straps at the waist, thigh, and ankle to reduce transfer of cold water inside the suit. This increases the degree of hypothermia protection. |
| 3 | Orally inflate the pillow behind the collar. This will provide support for the head. |
Description
Quoted word for word — COMDTINST 16114.2A, ch. 3, B.6
The dry suit, one part of a multilayered maritime cold-weather suit system (MCWSS), provides protection in areas where exposure to wind, spray, cold water, and hypothermia is likely (see Figure 3-7). The dry suit, with proper undergarments, provides the best protection for crew members in adverse weather and cold-water immersion. When the mission performed by the member is more likely to cause excess damage to a dry suit (AtoN maintenance, fisheries boardings), other Coast Guard authorized hypothermia protective clothing may be worn. Details on all authorized PFDs can be found in Reference (a).
[Illustration in the handbook: Figure 3-7 — Dry Suit]
WARNING
Dry suits provide no inherent buoyancy. A PFD must be worn over a dry suit at all times while underway.
Use
Quoted word for word — COMDTINST 16114.2A, ch. 3, B.7
When worn with a PFD and proper undergarments, a dry suit offers mobility and superior protection against the effects of wind, spray and cold-water immersion.
Donning
Quoted word for word — COMDTINST 16114.2A, ch. 3, B.8
Use the following procedure to put on the MCWSS. Follow the steps closely to ensure proper sealing of neck and wrist seals:
| Step | Procedure |
| 1 | Lubricate inside of the neck and wrist seals with unscented talc. |
| 2 | Don Layer I moisture wicking followed by Layer II fleece insulating undergarments. |
| 3 | Don the MCWSS in the same fashion as donning coveralls, entering it one leg at a time. |
| 4 | Pull the bottom section of the suit up to the waist and place arms into the sleeves. |
| 5 | Gently push one hand through the wrist seal at a time using the index finger of the opposite hand to stretch the seal as you push your hand through. Repeat for opposite hand. Make sure insulating undergarments are not sandwiched between seal and skin and flatten any folds or rolls of the seal flat against the skin. |
| 6 | Bring the upper portion of the suit over the head, aligning the neck opening with the top of the head. Reach inside the top of the neck seal with the fingers and gently pull the seal outward and down as you push your head through. Ensure insulating undergarments are not sandwiched between seal and skin, and flatten any folds or rolls of the seal flat against the skin. |
| 7 | Close the entry and relief slide fasteners. Have a fellow crew member double check all fasteners to ensure it is closed completely against the sealing plug. |
| 8 | Remove excess air from the suit by sliding fingers under the neck seal and squatting down, pull arms tight against the chest and release seal. |
| Use of comfort devices to stretch the neck or wrist seals away from the skin such as neck rings or O- ring comfort devices are not authorized. |
WARNING CAUTION!
Use extreme caution when donning the MCWSS. Prior to donning the MCWSS, remove all rings, watches, earrings, necklaces and eyeglasses that will cause damage to wrist and neck seals.
Entering the Water
Quoted word for word — COMDTINST 16114.2A, ch. 3, B.9
Before entering the water, perform the following procedures:
| Step | Procedure | |
| 1 | Slip on a neoprene hood. | |
| 2 | Close all zippers and fasten Velcro wrist and ankle straps. | |
| 3 | Put on gloves. |
Doffing
Quoted word for word — COMDTINST 16114.2A, ch. 3, B.10
Use the following procedure to take off the dry suit:
| Step | Procedure | |
| 1 | Remove all other equipment donned over the dry suit before removing the dry suit. | |
| 2 | Wash down the dry suit while wearing it paying particular attention to entry and relief slide fasteners. Remove all traces of salt. | |
| Failure to completely open slide fastener will damage the suit when it is removed. |
CAUTION!
| 3 Completely open the entry slide fastener. 4 Insert fingers between neck seal and neck. Gently stretch the seal outward and upward while pulling head from seal and shoulders and head out of the suit. 5 Insert two fingers under wrist seal and gently pull seal outward. Cup the hand, fingertips and thumb together, and gently pull hand from seal. Repeat for other hand. 6 Remove legs from suit. Insert a wide dry suit hanger out through the neck seal, close entry slide fastener half way and hang until dry. 7 Completely open the entry slide fastener. 8 Insert fingers between neck seal and neck. Gently stretch the seal outward and upward while pulling head from seal and shoulders and head out of the suit. 9 Insert two fingers under wrist seal and gently pull seal outward. Cup the hand, fingertips and thumb together, and gently pull hand from seal. Repeat for other hand. 10 Remove legs from suit. Insert a wide dry suit hanger out through the neck seal, close entry slide fastener half way and hang until dry. 11 Completely open the entry slide fastener. 12 Insert fingers between neck seal and neck. Gently stretch the seal outward and upward while pulling head from seal and shoulders and head out of the suit. 13 Insert two fingers under wrist seal and gently pull seal outward. Cup the hand, fingertips and thumb together, and gently pull hand from seal. Repeat for other hand. 14 Remove legs from suit. Insert a wide dry suit hanger out through the neck seal, close entry slide fastener half way and hang until dry. | 3 | Completely open the entry slide fastener. |
| 4 | Insert fingers between neck seal and neck. Gently stretch the seal outward and upward while pulling head from seal and shoulders and head out of the suit. | |
| 5 | Insert two fingers under wrist seal and gently pull seal outward. Cup the hand, fingertips and thumb together, and gently pull hand from seal. Repeat for other hand. | |
| 6 | Remove legs from suit. Insert a wide dry suit hanger out through the neck seal, close entry slide fastener half way and hang until dry. | |
| 7 | Completely open the entry slide fastener. | |
| 8 | Insert fingers between neck seal and neck. Gently stretch the seal outward and upward while pulling head from seal and shoulders and head out of the suit. | |
| 9 | Insert two fingers under wrist seal and gently pull seal outward. Cup the hand, fingertips and thumb together, and gently pull hand from seal. Repeat for other hand. | |
| 10 | Remove legs from suit. Insert a wide dry suit hanger out through the neck seal, close entry slide fastener half way and hang until dry. | |
| 11 | Completely open the entry slide fastener. | |
| 12 | Insert fingers between neck seal and neck. Gently stretch the seal outward and upward while pulling head from seal and shoulders and head out of the suit. | |
| 13 | Insert two fingers under wrist seal and gently pull seal outward. Cup the hand, fingertips and thumb together, and gently pull hand from seal. Repeat for other hand. | |
| 14 | Remove legs from suit. Insert a wide dry suit hanger out through the neck seal, close entry slide fastener half way and hang until dry. |
Industrial Style Dry Suit
Quoted word for word — COMDTINST 16114.2A, ch. 3, B.11
Coxswains, crew members, boarding officers and boarding team members may use the Industrial breathable marine survival system (MSD901) in lieu of the MCWSS when operating in conditions requiring dry suit use.
MSD901 Donning Procedure
Quoted word for word — COMDTINST 16114.2A, ch. 3, A.11.a
Use the following procedure to put on the MSD901. Follow the steps closely to ensure proper sealing of neck and wrist seals:
| Step | Procedure |
| 1 | Ensure the MSD901 is completely assembled in accordance with MPC. |
| 2 | Completely loosen the neck seal. |
| 3 | Ensure the wrist, thigh and ankle adjustments are loose. |
| 4 | Completely open the chest zipper. |
| 5 | Completely open the waterproof circumference zipper. |
| 6 | Don Layer I moisture wicking undergarment. |
| 7 | Fold the upper portion of the suit forward at the waist and slide one leg at a time into the suit until your toes reach the end of the socks. |
| 8 | Pull the bottom section of the suit up to the waist and place arms into the sleeves. |
| 9 | Gently push one hand through the wrist seal at a time using the index finger of the opposite hand to stretch the seal as you push your hand through. Repeat for opposite hand. Make sure insulating undergarments are not sandwiched between seal and skin and flatten any folds or rolls of the seal flat against the skin. |
| 10 | Bring the upper portion of the suit over the head, aligning the neck opening with the top of the head. Reach inside the top of the neck seal with the fingers and gently pull the seal outward and down as you push your head through. Make sure insulating undergarments are not sandwiched between seal and skin and flatten any folds or rolls of the seal flat against the skin. |
| 11 | Fold the waterproof zipper cover out of the way. |
| 12 Grasp the end of the waterproof zipper on your right side and the zipper pull with the opposite hand. 13 Pull the zipper closed completely around the waist circumference, ensuring the zipper is tight against the sealing plug. Failure to completely close the waterproof entrance and relief zippers to the sealing plug will allow water to leak into the suit resulting in drastic loss of survival time. | 12 | Grasp the end of the waterproof zipper on your right side and the zipper pull with the opposite hand. |
| 13 | Pull the zipper closed completely around the waist circumference, ensuring the zipper is tight against the sealing plug. | |
| Failure to completely close the waterproof entrance and relief zippers to the sealing plug will allow water to leak into the suit resulting in drastic loss of survival time. |
WARNING
| 14 | Pull relief zipper closed completely ensuring the zipper is tight against the sealing plug. |
| 15 | Fold the waterproof zipper cover closed over the zipper. |
| 16 | Buckle the waist belt and adjust to a comfortable fit. |
| 17 | Adjust and close the ankle and thigh adjustment straps. |
| 18 | Grasp and pull the neck seal drawstring to ensure a watertight and comfortable fit. |
| 19 | Secure the end of the neck seal drawstring to the tab under the outer collar. |
| 20 | Buddy-check all fasteners and zippers. |
WARNING
Use of comfort devices to stretch the neck or wrist seals away from the skin such as neck rings or O-ring comfort devices are not authorized and shall not be used.
WARNING
Per reference (a), the MSD901 shall be worn with all three modules completely assembled. Use extreme caution when donning the MSD901. Prior to donning the MSD901, remove all
CAUTION!
rings, watches, earrings, necklaces and eyeglasses that will cause damage to wrist and neck seals.
Doffing Procedure
Quoted word for word — COMDTINST 16114.2A, ch. 3, A.11.b
Use the following procedure to take off the MSD901:
| Step | Procedure | |
| 1 | Remove all other equipment donned over the MSD901 before proceeding. | |
| 2 | Wash down the MSD901 while wearing it paying particular attention to entry and relief slide fasteners. Remove all traces of salt. | |
| 3 | Unbuckle the waist belt and release the ankle, wrist and thigh adjustment straps. |
CAUTION! Failure to completely open slide fastener will damage the suit when it is removed.
| 4 | Fold the waterproof zipper cover out of the way. Completely open the waterproof zipper. |
| 5 | Completely loosen the neck seal drawstring and open the chest zipper. |
| 6 | Insert fingers between neck seal and neck. Gently stretch the seal outward and upward while pulling head from seal and shoulders and head out of the suit. |
| 7 | Insert two fingers under wrist seal and gently pull seal outward. Cup the hand, fingertips and thumb together, and gently pull hand from seal. Repeat for other hand. |
| 8 | Remove legs from suit. Hang the suit by the hanging loop, close waterproof zipper half way and hang until dry. |
Ice Rescue Dry Suit
Quoted word for word — COMDTINST 16114.2A, ch. 3, B.12
Two dry suits are approved specially for ice rescue operations only: (01) The MSD 640 dry suit, and (02) The MSD 630 dry suit. Per reference (a), all previously purchased dry suits that are still serviceable are authorized for use until the repair cost exceeds 50% of the purchase price of a new
NOTE
dry suit.
[Illustration in the handbook: Figure 3-8 — MSD640 Dry Suit]
MSD640 Donning Procedure
Quoted word for word — COMDTINST 16114.2A, ch. 3, B.12.a
Before
donning the MSD-640, ensure appropriate polypropylene
undergarments are worn.
CAUTION!
Always don the dry suit on a clean surface such as a towel or tarp to avoid attracting debris. Pebbles, sand, dirt and other debris on the ground can cause damage to dry suit sock and compromise the suit’s integrity.
CAUTION!
Use extreme care when donning the dry suit. Prior to donning, remove all rings, watches, earrings, necklaces and eyeglasses that will cause damage to the wrist and neck seals. Footwear other than thermal socks must not be worn inside the drysuit. Use the following procedures to put on the MSD640. Follow the steps closely to ensure proper sealing of the neck and wrist seals:
| Step | Procedure |
| 1 | Ensure that Velcro® wrist covers and ankle covers are unfastened. |
| 2 | Ensure waist adjusters are loosened. |
| 3 | Ensure that both the outer shell entry zipper and waterproof entry zipper are fully opened. |
| 4 | Ensure the suspenders are pulled out of the suit legs. |
| 5 | Slide your legs into the suit until your toes reach the ends of the socks. |
| 6 | Don the suspenders. Ensure they are crossed in the back but not twisted. |
| 7 | Apply unscented talcum powder to the inside of the wrist seals. |
| 8 | Place right arm into right sleeve. |
| 9 | Carefully place the right hand into the right cuff by pointing the fingers straight, tucking the thumb underneath and inserting the hand through the seal. Do not make a fist when putting your wrist through the seal. |
| 10 | Roll the Velcro® wrist covers back and refasten to a snug fit. |
| 11 | Repeat steps 7-10 for the left arm. |
| 12 | Bring the upper portion of the suit over your head, aligning the neck opening with the top of the head. Reach inside the top of the neck seal with fingers and gently pull the seal outward and down as you push your head through. Flatten any folds or rolls of the seal against the skin. |
| 13 | Close the waterproof entry zipper. Reach over your left shoulder with your right hand and grasp the zipper toggle. While holding the top of the zipper, pull the toggle down until the zipper is completely fastened. |
| 14 | Ensure the waterproof relief zipper is completely closed and the slider is fully engaged with the zipper stop. Stow the zipper toggle in the yellow loop located under the zipper cover |
| CAUTION! Per reference (a), dry suits alone provide inadequate insulation for hypothermia protection. Personnel shall wear thermal underwear beneath the dry suit to provide protection from cold temperature, wind, sea spray and rain. Dry suits are not inherently buoyant. The harness flotation vest shall be worn over the dry suit for all cutter swimmer deployments. | |
| 15 | Close the outer shell entry zipper. Reach over your left shoulder with your right hand and grasp the zipper toggle. While holding the top of the zipper, pull the zipper down until the zipper is completely fastened. |
| 16 | Tighten the ankle Velcro® covers to a snug fit. |
| 17 | Prior to water entry, cross arms in front and gently slide finger between neck seal and your neck, squat down and force excess air through the neck opening. |
Doffing Procedure
Quoted word for word — COMDTINST 16114.2A, ch. 3, B.12.b
Use the following procedure to take off the MSD640:
| Step | Procedure |
| 1 | Remove all equipment worn over the suit. |
| 2 | Thoroughly rinse down the exterior of the suit while wearing it, paying special attention to the seals and zippers. Remove all dirt, salt and debris. |
| 3 | Loosen Velcro® waist and ankle adjustment tabs. |
| 4 | Completely open the outer shell entry zipper and the inner immersion layer waterproof zipper. |
| CAUTION! Placing undue force on the zipper may damage the seal and harm the integrity of the suit. Never forcefully yank on the zipper. | |
| 5 | Insert fingers between neck seal and neck. Gently stretch the seal outward and upward while pulling neck seal over your head. |
| 6 | With an unclenched fist, slowly pull each hand through the wrist seals while holding the rubber seal open |
| CAUTION! NOTE Pulling on the wrist seal may damage the seal. If wearing suspenders, remove suspenders prior to proceeding. | |
| 7 | Pull suit down past hips and slide legs from the suit. |
Cutter Surface Swimmer Dry Suit
Quoted word for word — COMDTINST 16114.2A, ch. 3, B.13
The cutter surface swimmer dry suit is worn by cutter surface swimmer personnel when deployed into water that is 50 degrees Fahrenheit and below.
[Illustration in the handbook: Figure 3-9 — Cutter Surface Swimmer Dry Suit]
Donning Procedures
Quoted word for word — COMDTINST 16114.2A, ch. 3, B.13.a
Use the following steps to put on the cutter surface swimmer dry suit:
| Step | Procedure |
| 1 | Lubricate the inside of the neck and wrist seals with unscented talcum powder. |
| 2 | Don insulating undergarments as required. |
| 3 | Pull the bottom section of the suit up to the waist and place arms into the sleeves. |
| 4 | Gently push one hand through the wrist seal at a time using the index finger of the opposite hand to stretch the seal as the hand pushes through. Repeat for opposite hand. Make sure insulating undergarments are not sandwiched between seal and skin and flatten any folds or rolls of the seal flat against the skin. |
| 5 | Bring the upper portion of the suit over the head, aligning the neck opening with the top of the head. Reach inside the top of the neck seal with the fingers and gently pull the seal outward and down as the head pushes through. Make sure insulating undergarments are not sandwiched between seal and skin and flatten any folds or rolls of the seal flat against the skin. |
| NOTE Use only one or two fingers to pull the entry and relief slide fasteners closed. If more force is required, the slide fastener may not be properly aligned or lubricated. If difficulty is encountered when closing slide fasteners, stop immediately, back the slide up and check for the cause of the interference. Correct the problem before proceeding. The slide fastener must be snug tight against the sealing plug. Use paraffin to lubricate the slide fastener. | |
| 6 | Close the entry and relief slide fasteners. Have a fellow crew member double check slide fastener to ensure it is closed completely against the sealing plug. |
| 7 | Remove excess air from the suit by sliding fingers under the neck seal and squatting down, pull arms tight against the chest and release seal. |
Doffing Procedures
Quoted word for word — COMDTINST 16114.2A, ch. 3, B.13.b
Use this procedure to take off the cutter surface swimmer dry suit:
| Step | Procedure |
| 1 | Remove all other equipment before removing the dry suit. |
| 2 | Wash down the dry suit while wearing it; pay particular attention to entry and relief slide fasteners. Remove all traces of salt. |
| CAUTION! Failure to completely open slide fastener will damage the suit when it is removed. | |
| 3 | Completely open the entry slide fastener. |
| 4 | Insert fingers between neck seal and neck. Gently stretch the seal outward and upward while pulling head from seal and shoulders and head out of the suit. |
| 5 | Insert two fingers under wrist seal and gently pull seal outward. Cup the hand, fingertips and thumb together, and gently pull hand from seal. Repeat for other hand. |
| 6 | Remove legs from suit. |
Description
Quoted word for word — COMDTINST 16114.2A, ch. 3, C.1
Boat crew survival vests contain the equipment listed in Table 3-1 Boat Crew Survival Vest Contents, with their use, characteristics, and operation described later in this Section. Figure 3-10 shows the boat crew survival vest and the proper storage location for each item. In addition to the PFD, each crew member must also be outfitted with either a boat crew survival
WARNING
vest, or if wearing a Type III inflatable PFD, the same contents found in the survival vest stored in the PFD’s pocket/pouch. Reference applicable maintenance procedure cards.
[Illustration in the handbook: Figure 3-10 — Boat Crew Survival Vest]
| Item | Equipment | Quantity |
| 1 | Emergency Signaling Mirror | 1 |
| 2 | Strobe Light | 1 |
| 3 | MK 79 Personal Distress Signal Kit | 1 |
| 4 | Whistle | 1 |
| 5 | MK-124 Mod 0/1 Marine Smoke and Illumination Signal | 1 |
| 6 | Survival Knife | 1 |
| 7 | Personal Locator Beacon (PLB) | 1 |
Contents
Quoted word for word — COMDTINST 16114.2A, ch. 3, C.2
Table 3-1 — Boat Crew Survival Vest Contents
Emergency Signaling Mirror
Description
Quoted word for word — COMDTINST 16114.2A, ch. 3, C.3
The emergency signaling mirror is a pocket-sized mirror with a sighting hole in the center and a lanyard attached (see Figure 3-11). However, any common mirror is useful as an emergency signaling device.
[Illustration in the handbook: Figure 3-11 — Emergency Signaling Mirror]
Use
Quoted word for word — COMDTINST 16114.2A, ch. 3, C.4
The mirror is used to attract the attention of passing aircraft, boats, or ground rescue teams by reflecting light at them. Instructions for using the mirror are printed on its backside.
Characteristics
Quoted word for word — COMDTINST 16114.2A, ch. 3, C.5
Light reflected in this manner can be seen at a great distance from the point of origin. Practice is the key to effective use of a signal mirror.
Operation Strobe Light
Quoted word for word — COMDTINST 16114.2A, ch. 3, C.6
The following procedures describe how to properly use this accessory:
| Step | Procedure |
| 1 | Face a point about halfway between the sun and an object you wish to signal. |
| 2 | Reflect sunlight from the mirror onto a nearby surface such as the raft, your hand, etc. |
| 3 | Slowly bring the mirror up to eye-level and look through the sighting hole. You will see a bright light spot, this is the aim indicator. |
| 4 | Hold the mirror near your eye and slowly turn and manipulate it so the bright light spot is on target. |
Description The strobe light is a lightweight, compact, battery-operated strobe light that
Quoted word for word — COMDTINST 16114.2A, ch. 3, C.7
emits a high intensity white LED visual distress signal (Figure 3-12).
[Illustration in the handbook: Figure 3-12 — Strobe light]
Use
Quoted word for word — COMDTINST 16114.2A, ch. 3, C.8
The strobe light is used to attract the attention of aircraft, ships, or ground parties. One side is equipped with hook fasner tape so that it can be attached to the boat crew safety helmet, inflatable PFD, or survival vest. This eliminates the need to hold the strobe light, freeing up hands to operate other signaling equipment.
Characteristics
Quoted word for word — COMDTINST 16114.2A, ch. 3, C.9
The strobe lights emit approximately 50 to 70 flashes per minute. It will operate for a minimum of 8 hours continuous, but typically 18+ hours. Depending on atmospheric conditions, the strobe light has a visual range of 2 – 5 miles.
Operation Illumination Signal Kit, MK-79 MOD 0
Quoted word for word — COMDTINST 16114.2A, ch. 3, C.10
The following are the procedures to operate the strobe light:
| Step | Procedure |
| 1 | Turn on: Slide the switch into the on position. Light should begin flashing within seconds. |
| 2 | Turn off: Slide the switch back into the off position. The light should stop flashing. |
| NOTE Coast Guard Deployable Specialized Forces units utilizing MILTAC stroble light will have different operating procedures. |
Description
Quoted word for word — COMDTINST 16114.2A, ch. 3, C.11
The MK-79 MOD 0 is a pyrotechnic illumination signal kit that contains seven screw-in cartridge flares (MK-80) and one pencil-type projector (MK-31). The projector in this kit is used to aim and fire a signal cartridge (Figure 3-13). Additional information can be found in reference (d).
[Illustration in the handbook: Figure 3-13 — Illumination Signal Kit, MK-79 MOD 0]
Use
Quoted word for word — COMDTINST 16114.2A, ch. 3, C.12
The MK-79 MOD 0 is used to attract vessels, aircraft, and ground rescue teams.
Characteristics
Quoted word for word — COMDTINST 16114.2A, ch. 3, C.13
These signals produce a single red star display at an altitude of 250-650 feet for a minimum time of 4.5 seconds. Their luminous intensity is about 12,000 candle power.
Operation Signal Whistle
Quoted word for word — COMDTINST 16114.2A, ch. 3, C.14
The following are procedures for operating the MK-79 MOD 0:
| Step | Procedure |
| 1 | Remove the bandolier and projector from the plastic envelope. |
| 2 | Cock the firing pin of the projector by moving the trigger screw to the bottom of the vertical slot and slipping it to the right so that it catches at the top of the angular (safety) slot. |
| WARNING Failing to cock the firing pin back may result in the cartridge firing prematurely when attaching to the projector. | |
| 3 | Bend protective plastic tab away from signal in bandolier to allow attachment to projector. |
| WARNING The plastic tabs over signals in the bandolier protect percussion primers on the cartridges from being struck accidentally. They should be kept intact until just before loading into the projector. |
WARNING Keep the projectile-end of the flare pointed in a safe direction while loading the flare in the projector. Ensure Step 2 is completed prior to “loading.” Accidental firing may occur if projector is not cocked.
| 4 | Attach a signal flare to the projector and rotate clockwise until the signal is seated. |
| 5 | Hold projector overhead with arm fully extended. The projector should be pointed at a slight angle away from the body. |
| 6 | While firmly gripping the projector, fire the signal by slipping the trigger screw to the left out of the safety slot and into the firing slot. |
| NOTE This action should be one continuous movement so that the thumb does not interfere with the upward motion of the trigger screw when it is brought into the firing slot. The trigger screw must "snap" upward. | |
| 7 | If the signal fails to fire, try again twice by depressing the trigger screw to the bottom of the firing slot with the thumb and releasing it quickly. If it still fails to fire, wait 30 seconds before unscrewing, to reduce the possibility of hang fire. |
| WARNING Do not aim at personnel, aircraft, or other objects. | |
| 8 | Unscrew (counterclockwise) the spent signal case or signal that has failed to fire. Discard by throwing overboard. |
| 9 | To fire another signal, repeat the procedures above. |
Description
Quoted word for word — COMDTINST 16114.2A, ch. 3, C.15
The whistle is a small, hand-held device (see Figure 3-14) that produces a loud sound when it is blown. The standard whistle is constructed of plastic and resembles a police officer’s whistle.
[Illustration in the handbook: Figure 3-14 — Signal Whistle]
Use
Quoted word for word — COMDTINST 16114.2A, ch. 3, C.16
The sound produced by a whistle will attract the attention of rescuers and guide them to the whistle’s origination. During periods of restricted visibility, fog, and darkness, rescuers may hear the sound it produces before they sight the strobe light.
Characteristics Smoke and Illumination Signal, MK-124 MOD 0/1
Quoted word for word — COMDTINST 16114.2A, ch. 3, C.17
Depending on weather conditions, a whistle’s audible sound may be heard at a distance of up to 1,000 yards. Any wind has the effect of carrying the sound downwind.
Description
Quoted word for word — COMDTINST 16114.2A, ch. 3, C.18
The MK-124 Mod 0/1 is a pyrotechnic smoke and illumination signal used day or night as a distress signal at sea or on land (Figure 3-15). One end produces orange smoke as the day signal and the other end produces a red flare as the night signal. Additional information can be found in Reference (d).
NOTE
Auxiliary crew members may use commercially available Coast Guard approved survival equipment while operating an Auxiliary facility. See reference (c) for specific requirements.
[Illustration in the handbook: Figure 3-15 — Smoke and Illumination Signal, MK-124 MOD 0/1]
Use
Quoted word for word — COMDTINST 16114.2A, ch. 3, C.19
These signals are used to attract vessels, aircraft, and ground rescue teams day or night. The signal may also be used to indicate wind direction for helicopter hoists. It is labeled with the following operating instructions: (01) Do not dispose of the signal until both ends have been used. (02) Only when signals misfire should it be disposed of over the side. Misfires are a safety hazard if kept onboard a vessel. (03) When both ends of the signal have been discharged, properly dispose of it. In an actual distress situation, spent signals may be tossed over the side. Per reference (a), under no circumstances shall personnel ignite both
WARNING
ends simultaneously.
Characteristics
Quoted word for word — COMDTINST 16114.2A, ch. 3, C.20
As mentioned above, both ends of the device produce a signal and each end burns for about 20 seconds. The night end produces a red flare (similar to a road flare) and the day end produces orange smoke.
Operation Survival Knife
Quoted word for word — COMDTINST 16114.2A, ch. 3, C.21
The device has two raised bands around its circumference on its night end (flare). These bands positively identify the night end by sense of touch. Also, a label on the case identifies the day (smoke) and night (flare) ends and provides instructions for use. After choosing which end to use, perform the following procedures:
| Step | Procedure |
| WARNING After ignition, the outer case may overheat and burn the hand. Dropping the signal on land will not decrease its effectiveness. | |
| WARNING Do not look directly at the light of a night flare close up. The intensity of the lights could burn the eyes. | |
| WARNING Do not direct either end of a signal toward another person. | |
| 1 | Remove the protective cap from the end to be ignited. |
| 2 | Slide the plastic lever in the direction of the arrow until fully extended. |
| 3 Hold the signal downwind and overhead at a 45° angle from the horizon over the side of the raft or away from dry debris to prevent burns from hot drippings. WARNING 4 Using the thumb, pull down on the extended tab to ignite signal. 5 If the smoke signal end flames up, briefly immerse it in water or hold it against a solid object. 6 After using one end, douse in water to cool it, or if on land, place it on the ground to cool. Save the signal to use the other end when needed. Prior to pulling lever downward, position all fingers below top of signal. | 3 | Hold the signal downwind and overhead at a 45° angle from the horizon over the side of the raft or away from dry debris to prevent burns from hot drippings. |
| WARNING Prior to pulling lever downward, position all fingers below top of signal. | ||
| 4 | Using the thumb, pull down on the extended tab to ignite signal. | |
| 5 | If the smoke signal end flames up, briefly immerse it in water or hold it against a solid object. | |
| 6 | After using one end, douse in water to cool it, or if on land, place it on the ground to cool. Save the signal to use the other end when needed. |
Description Personal Locator Beacon (PLB)
Quoted word for word — COMDTINST 16114.2A, ch. 3, C.22
The survival knife (Figure 3-16) is a basic tool used to free the crew member from entangling lines. It is also used to cut material blocking a path in escaping a capsized or sinking boat. It should be a fixed blade design with a blunt tip made of corrosion-resistant material. The blade should be checked periodically for sharpness.
[Illustration in the handbook: Figure 3-16 — Survival Knife]
Description
Quoted word for word — COMDTINST 16114.2A, ch. 3, C.23
The PLB (Figure 3-17) is a smaller version of the common ship mounted 406 MHz EPIRB that is used on military, commercial, and recreational vessels. This personal transmitter is capable of broadcasting a distress signal that can be received and tracked world-wide guiding emergency response resources to the transmitting position for rescue.
Use
Quoted word for word — COMDTINST 16114.2A, ch. 3, C.24
The PLB is for emergency use only. This device is the primary distress signal and should be activated immediately to signal for help. Once activated, do not turn it off. Once search vessels or aircraft have reached the transmitting position area, use other signaling equipment (radio, signal mirror, flares, etc.) to vector them to the position.
Characteristics
Quoted word for word — COMDTINST 16114.2A, ch. 3, C.25
The PLB is a personal transmitter capable of broadcasting on both 406 MHz and 121.5 MHz. The international satellite based search and rescue system (COSPAS SARSAT) monitors 406 MHz and is able to provide a position accurate to within three nautical miles within 90 minutes. Once the rescue platform is in the vicinity, the 121.5 MHz transmitter provides a signal allowing the resource to home in on the vessel or individual in distress particularly if the individual is equipped with flares and a strobe light.
Operation
Quoted word for word — COMDTINST 16114.2A, ch. 3, C.26
Since PLB’s may vary in style and operation, as new models are produced, each crew member should read and understand the PLB owner’s handbook. Prior to getting underway with the PLB the first time, each crew member should demonstrate the test sequence and explain the activation procedure to a qualified member.
[Illustration in the handbook: Figure 3-17 — Personal Locator Beacon (PLB)]
Parachute Illumination Signal, M127A1
Quoted word for word — COMDTINST 16114.2A, ch. 3, D.1
The parachute illumination signal, M127A1 is a night time illumination- signaling device. When fired, it climbs to an altitude of 650 to 700 feet before igniting. Upon ignition, it produces a parachute-suspended white star flare that burns for about 36 seconds with 125,000 candlepower. The signal descends at a rate of 10 to 15 feet per second (Figure 3-18).
[Illustration in the handbook: Figure 3-18 — Parachute Illumination Signal, M127A1]
Safety Precautions
Quoted word for word — COMDTINST 16114.2A, ch. 3, E.3.a
Per reference (a), the following safety precautions shall be strictly observed when firing the parachute illumination signal: (01) Do not remove a signal from its sealed container until just before use. (02) Do not attempt to use dented, cracked, or otherwise damaged or deteriorated signals. (03) While handling the illumination signal outside of its canister, be sure to avoid striking the primer.
Firing Procedures
Quoted word for word — COMDTINST 16114.2A, ch. 3, E.3.b
The following are procedures for firing the parachute illumination signal M127A1:
| Step | Procedure |
| 1 | Remove a signal from its container. |
| 2 | Hold the signal in left hand with the RED knurled band of the signal FACING UP. Align left thumb and forefinger along the red band. |
| 3 | Withdraw the firing cap from the lower end of the signal. |
| 4 | Point the ejection end of the signal (the end opposite the red knurled band) away from personnel, equipment, and materials. Slowly push the cap onto the primer (red band) end until the cap meets the edge of the knurled band. DO NOT PERMIT THE CAP TO GO BEYOND THE RED BAND. |
| CAUTION! Exercise due care to prevent the expended rocket body from falling on people, watercraft, and structures. |
| 5 | Hold the signal FIRMLY at arm’s length with the left hand, with the ejection end facing straight up. The signal should be held in a vertical position (90° elevation) when firing. |
| 6 | Strike the firing cap bottom sharply with the palm of the right hand, keeping the left arm rigid and pointing straight up. |
| 7 | If a misfire occurs while underway, toss it overboard. Or If a signal misfires while on land, place it in a secure position to prevent people from being hurt should the signal fire. The signal must not be approached for at least 30 minutes. |
WARNING
When conducting SAR operations with a helicopter, extreme caution and coordination must be used by surface units using pyrotechnics. Do not fire pyrotechnics without permission and instructions from the Aircraft Commander.
Firing Angles
Quoted word for word — COMDTINST 16114.2A, ch. 3, E.3.c
Firing a signal at angles other than a vertical position may be necessary under the following circumstances: (01) To compensate for high wind velocities. (02) To gain maximum illumination of the area.
NOTE
If a signal is fired at an angle less than 90° elevation (directly overhead), the altitude reached is reduced and the altitude of candle burnout is lessened. If the firing angle is 60° or less, the candle will, in almost all cases, still be burning when it strikes the surface.
Potential Capsizing Forces and Factors
Quoted word for word — COMDTINST 16114.2A, ch. 4, A.1
When a boat is in the water, two forces, buoyancy versus gravity work against each other. While buoyancy pushes up from the water to keep a boat afloat, gravity pushes the boat down into the water. Under normal circumstances the forces of buoyancy and gravity will offset each other, unless an external force acts upon a boat. Stability is of paramount importance – if a boat becomes unstable, small, normally minor outside forces can create a situation where capsizing can occur or perhaps be just one bad boat handling maneuver away. While stability loss itself can cause a boat to capsize, it is often a combination of loss of stability, environmental factors, and maneuvering decisions that lead to capsizing. A boat is less likely to capsize in deep, open water. The chances of capsizing are greatest while operating in or near the surf or breaking seas. The force needed to capsize is most likely to come from heavy seas directly astern (following seas), or large breakers striking abeam. If in doubt, a boat should stay at sea until conditions change. The safest point for most boats to take heavy seas is nearly bow-on. A boat should not operate or tow in conditions beyond the capability of the boat or crew. In such conditions, the Operational Commander should be advised so that the proper resource (e.g. MLB, cutter, or helicopter) can respond. While not necessarily contributing or causal factors, conditions present in many capsizings included: (01) Surf or breaking seas, (02) Shallow water depth (less than 20 feet), (03) High speed maneuvers, (04) Going against a strong tidal current and with steep following seas, (05) Escorting or towing another boat through an inlet, (06) Maneuvering a boat alongside another vessel while underway, (07) Restricted visibility due to darkness, rain, or fog, (08) Center of gravity changes (e.g. low fuel in the tank, execessive amounts of water in the bilges, icing of topsides, or overloading of cargo and/or people).
Preparations for Egress
Quoted word for word — COMDTINST 16114.2A, ch. 4, A.2
If the hull is intact after capsizing, it may not sink for some time, even in rough seas, but quick egress is the best option for survival. The crew will be able to escape if panic is avoided. Some preparations and good to know information ahead of time include: (01) Perform frequent visualization “what-if” scenarios (night time, seating locations, etc.). (02) Learn the boat’s interior. Initially the crew will be disoriented due to being upside down, water up your nose, and with a lack of lighting. (03) Stow all loose gear, and have all equipment and doors operating properly for ease in escaping. (04) Know the location and use of all survival equipment. Check them regularly to be sure that it is adequate, in good repair, and that all signalling devices work. (05) Be ready to grab a sturdy support to prevent being thrown about. (06) Cold water decreases the length of time most people can hold their breath underwater. Immersion in cold water may give a sensation of tightness in the chest and also causes a gasp reflex which may impact your ability to hold your breath. (07) Remember if you are wearing an inherently buoyant PFD or an inflatable PFD that has been activated, the PFD’s buoyancy will try to bring you to the surface of the water but the cabin will be in the way. In theory, if you remain upright, you will be able to walk out of the boat on the overhead which is now acting as the deck. In most cases it will be difficult to remain upright and therefore your PFD may “pin” you to the overhead (deck). Consider removing PFD if necessary.
Know When Something is Wrong Escape
Quoted word for word — COMDTINST 16114.2A, ch. 4, A.3
A boat doesn’t capsize without influencing forces. As mentioned in A.1. Potential Capsizing Forces and Factors of this Section there are certain conditions and factors that make capsizing more likely. Regardless of whether the above conditions are present or not, there comes a point where the operator feels a difference inhow the boat normally feels. For example, the time for action is as soon as the boat starts to roll beyond normal limits, heel, or feel different from normal.
Escape Procedures – Initial Response
Quoted word for word — COMDTINST 16114.2A, ch. 4, A.4
If the boat you are on capsizes make every effort to egress as quickly as possible. If you are not entrapped, GET OUT as quickly as possible! Your escape route is a common sense decision. Do not think of egress routes in terms of primary, secondary or tertiary egress routes where there are preferred exits. Instead consider where you are and your initial response given your position in the boat. Procedures for egress from a cabin boat are below: (01) Remain Calm, (02) Brace for impact/roll, (03) Wait until all violent motion has stopped, (04) Maintain reference point with one hand on armrest, handrail. etc. (05) Open window/door, (06) Release restraint (If applicable), (07) Continue to maintain reference points while exiting through door/window, (08) Exit through door/window by pulling your body using a hand-over- hand technique – DO NOT Kick as this can disorient or injure a crew member following you out the same exit, (09) If necessary, remove excess gear (PFD, LE belt, etc.), (10) Once on the surface – see A.6. Post Capsize Procedures.
Escape Procedures – Secondary Response
Quoted word for word — COMDTINST 16114.2A, ch. 4, A.5
If the boat you are on capsizes and your initial response to egress is blocked or unsuccessful, shift to your secondary response. This will be the next most logical exit available to you. Additional procedures are below: (01) Remain Calm. (02) If needed, seek air pocket prior to secondary attempt. (03) Maintain reference point and use hand-over-hand technique to the secondary response exit - DO NOT Kick as this can disorient or injure a crew member following you out the same exit. (04) Open Door/Window. (05) If necessary, remove excess gear (PFD, LE belt, etc.). (06) Once on the surface – see Post capsize procedures.
Post Capsize Procedures
Quoted word for word — COMDTINST 16114.2A, ch. 4, A.6
Survivors from a capsized boat should attempt to stay with the boat or other visible floating debris. This not only offers a larger target for search assets but also affords more protection against hypothermia as water robs your body of heat faster than air. (01) Climb onto hull of vessel (if possible). (02) Take personnel muster. (03) Activate PLB. (04) Visually scan for possible rescue vessels. If in range, personnel act as a team to signal using pyro, signal mirror, etc. (05) Inventory Survival gear. (06) Stay with the boat until rescued or boat sinks.
NOTE
If unable to board the overturned hull, survivors should huddle and tether themselves together and stay with the overturned vessel. Survivors should make every effort to stay with the overturned vessels without physically tying themselves to the vessel.
Remaining Inside a Capsized Boat
Quoted word for word — COMDTINST 16114.2A, ch. 4, A.6.a
Make every effort to egress from a capsized boat quickly, it is your best option to survive but if for some reason someone cannot exit the capsized boat: (01) Remain calm and stay within an air pocket. (02) Unless certain of rescue efforts on the surface, activate PLB. There is no guarantee that other crew were able to escape and initiate rescue. (03) When hearing rescuers, attempt to communicate to them by shouting or tapping on the hull. (04) Conserve oxygen by remaining calm and minimizing physical activity. If possible, get out of the water to reduce risk of hypothermia. (05) Remember that rescuers should arrive soon.
Automatic Inflation and Deployment
Quoted word for word — COMDTINST 16114.2A, ch. 4, B.1
When properly stowed, this life raft is designed to automatically float free from its storage rack and inflate in the event of capsizing or sinking. As the raft container is released and drifts away, the inflation cable, attached to the raft-end of the 50-foot painter line, is pulled tight. When this occurs, the CO2 cylinder will automatically discharge and inflate the life raft. The painter line will remain attached to the rack by a weak link, which requires 500 pounds of force to separate. Separation will also occur by heaving around on the painter line or by the stress exerted on it from the raft’s buoyancy if the boat/cutter sinks to a depth greater than 50 feet.
Manual Inflation and Deployment
Quoted word for word — COMDTINST 16114.2A, ch. 4, B.2
Because of increased functionality and capability of boats, the use of rescue rafts is dwindling in the Coast Guard. Depending on the situation, if time permits before sinking, manually deploy the life raft. If the life raft is not automatic, or if its automatic functions do not work, follow the procedures outlined in B.2.a. Manual Inflation Procedures of Boat-Installed Life Raft or B.2.b. Manual Inflation Procedures of Cutter Life Raft for manual deployment.
Manual Inflation Procedures of Boat-Installed Life Raft
Quoted word for word — COMDTINST 16114.2A, ch. 4, B.2.a
| Step | Procedure |
| 1 | Cut/untie painter line from hydrostatic release unit. |
| 2 | Secure painter line to a strong point on boats deck. |
| 3 | Lift container and toss overboard. |
| 4 | Pull painter line to actuate inflation cylinder, life raft will inflate. |
| NOTE In the event of a fire on your vessel, drop the raft into the water on the windward side of the vessel to stay upwind of harmful smoke, fumes and fire. | |
| 5 | Time permitting; place extra equipment and supplies aboard the raft such as signals, portable radios, water, and food. |
| 6 | If practical, pull raft alongside and board directly from the boat. |
| 7 | Deploy sea anchor. |
| 8 | Pull the canopy over the support tubes and secure. |
| 9 | If the boat begins to sink, cut the painter line to free the raft to drift. |
| 10 | Follow the “Immediate Actions” instruction booklet located inside equipment container. |
| CAUTION! In the event of upside-down inflation, right the raft from the end opposite of the inflation assembly and CO2 bottle. This end is marked “here to right.” |
[Illustration in the handbook: Figure 4-1 — Manual Deployment of Survival Raft]
Manual Inflation Procedures of Cutter Life Raft Boarding a Life Raft from the Water
Quoted word for word — COMDTINST 16114.2A, ch. 4, B.2.b
Use the following procedure to deploy the raft for use by the crew:
| Step | Procedure |
| 1 | Cut or untie the painter line from the weak link. |
| 2 | Trigger the hydrostatic release and remove the raft container from the stowage rack. |
| 3 | Secure the painter line to a cleat or bitt. |
| 4 | Drop the raft into the water on the leeward side of the cutter. |
| 5 | Pull the remaining painter line (approximately 50 feet) from the raft container to actuate the inflation assembly. As the raft inflates, tend the painter line to keep the raft close. Fend off the inflating raft to prevent damage to the raft from the cutter. |
| 6 | Time permitting; place extra equipment and supplies aboard the raft such as signals, portable radios, immersion suits, water and food |
| 7 | If practical, pull the raft alongside the embarkation net/Jacobs ladder and board the raft directly. |
| 8 | Set a watch on the cutter and painter line. If the cutter begins to sink, cut the painter line to free the raft to drift. |
Boarding a Life Raft from the Water
Quoted word for word — COMDTINST 16114.2A, ch. 4, B.3
With the life raft deployed and tied off alongside, the boat/cutter crew should try to remain onboard the platform for as long as possible. If the boat/cutter starts to sink rapidly, try and board the life raft directly, cutting the painter line once onboard. If unable to board the raft directly, you will need to enter the water. Once in the water get aboard the life raft. This is done by climbing on the boarding ladder or ramp depending on the type of raft and pulling yourself up using the straps attached to the raft for this purpose.
Boarding a Life Raft from the Water Without Ramp On-Raft Conduct
Quoted word for word — COMDTINST 16114.2A, ch. 4, B.3.a
Perform the following procedures:
| Step | Procedure |
| 1 | Facing entrance, use buoyancy of worn PPE to spring up. |
| 2 | Legs together, dolphin kick. |
| 3 | Grab top tube, then straps inside raft to pull in. |
| 4 | Get help from people inside the raft. |
WARNING
Due to the high risk of accidentally puncturing inflatable rafts, extreme care must be taken when boarding or assisting personnel out of the water and into the raft. This is especially important if such persons are wearing survival vests. Once in the life raft all persons should seat themselves on the floor and remain in that position if possible. All sharp objects should be collected and stored to prevent puncturing the raft fabric.
Tasks Onboard a Raft
Quoted word for word — COMDTINST 16114.2A, ch. 4, B.4
Upon boarding a raft, complete the following procedures as soon as possible:
CAUTION!
Be careful not to snag the raft with your shoes or with sharp objects.
| Step Procedure 1 Account for everyone and search for survivors. 2 If more than one raft is deployed, tie them together. 3 Check the physical condition of all people aboard. Give first aid as necessary. Weather permitting, wash any oil or gasoline from clothing and body. These substances will not only burn skin, but also pose a fire hazard. Additionally, they may be transferred from skin to the raft, deteriorating the rubber surfaces. 4 Salvage any floating equipment that may be useful. Inventory, stow, and secure all survival items. 5 If no longer attached to the vessel, deploy the sea anchor to reduce rate of drift and improve stability in heavy seas. 6 Check the raft for proper inflation and points of possible chafing (areas where equipment may wear a hole in the buoyancy tubes). 7 Bail out any water that may have entered the raft. 8 Inflate the floor immediately. 9 In cold water, put on hypothermia protective clothing, if available. Rig the entrance cover, close when necessary. 10 If other people are with you, huddle together for warmth. | Step | Procedure |
| 1 | Account for everyone and search for survivors. | |
| 2 | If more than one raft is deployed, tie them together. | |
| 3 | Check the physical condition of all people aboard. Give first aid as necessary. Weather permitting, wash any oil or gasoline from clothing and body. These substances will not only burn skin, but also pose a fire hazard. Additionally, they may be transferred from skin to the raft, deteriorating the rubber surfaces. | |
| 4 | Salvage any floating equipment that may be useful. Inventory, stow, and secure all survival items. | |
| 5 | If no longer attached to the vessel, deploy the sea anchor to reduce rate of drift and improve stability in heavy seas. | |
| 6 | Check the raft for proper inflation and points of possible chafing (areas where equipment may wear a hole in the buoyancy tubes). | |
| 7 | Bail out any water that may have entered the raft. | |
| 8 | Inflate the floor immediately. | |
| 9 | In cold water, put on hypothermia protective clothing, if available. Rig the entrance cover, close when necessary. | |
| 10 | If other people are with you, huddle together for warmth. |
Conduct in a Raft
Quoted word for word — COMDTINST 16114.2A, ch. 4, B.5
The safety and survival of everyone in a raft depends on clear thinking and common sense. To protect those aboard and increase survival time, perform the following procedures:
| Step | Procedure |
| 1 | Maintain a positive attitude. |
| 2 | Inventory all equipment. Ration water and food. Assign lookout and other necessary duties to crew members. |
| 3 | Do not rely on memory. If materials are available, keep a written log. Record the following: (01) Time of entry into the water, (02) Names and physical condition of survivors, (03) Ration schedule, (04) Winds, (05) Weather, (06) Direction of swells, (07) Times of sunrise and sunset, (08) Other navigation data. |
Using a Raft to Rescue Others Introduction In this Appendix Introduction In this Appendix
Quoted word for word — COMDTINST 16114.2A, ch. 4, B.6
When it is impossible or too dangerous to maneuver close to a distressed vessel, the life raft may be used to ferry survivors to the boat. It may also be used to recover people from the water if a boat cannot get close enough to them.
WARNING
Although the raft is ballasted and very stable in most sea states, it may capsize in large breaking waves. For this reason, consider other methods for rescue of people in breaking surf or seas. (e.g., helicopter rescue).
[Illustration in the handbook: Figure 4-2 — Life Raft as Rescue Ferry]
Use the following procedures when deploying a life raft during a rescue attempt (see Figure 4-2):
| Step Procedure 1 Remove the raft container from its storage rack. 2 Do not manually or automatically inflate the life raft while removing the tape sealing the life raft case (half shells) together. 3 Roll the life raft out of the case and place it in the water on the leeward side of the boat. 4 Pull the painter line from the raft container, manually inflate the raft, and hold it alongside your boat. 5 Attach two lines, each of a length longer than the maximum distance between your boat and the people in distress. 6 Use one line to tend the life raft from your boat during the evolution (NEVER LET GO OF THIS LINE). 7 Pass the other line to the people in distress with a heaving line or let the current float it down to them. 8 Tell the persons being assisted to haul the life raft to their position. WARNING 9 Once the life raft is alongside, direct the persons to board the life raft, one person at a time. 10 If the number of people being assisted is more than the carrying capacity of the raft, direct the people remaining to tend the line attached to the life raft from their location; haul back the maximum number of survivors and repeat the procedure. 11 After recovering all people, deflate the raft and bring it aboard the rescue boat. The raft may have taken on water during the rescue evolution. De-ballast the raft before bringing it aboard. Use the handles located on the ballast bags and slowly lift one side of the raft until all the water has run out. 12 Once the raft is aboard, do not repack the raft. Wash the raft and have it repacked at a certified packing station before returning it to service. Ensure each person is wearing a PFD. Do not permit more people to enter the raft than are allowed by the raft’s specifications. | Step | Procedure |
| 1 | Remove the raft container from its storage rack. | |
| 2 | Do not manually or automatically inflate the life raft while removing the tape sealing the life raft case (half shells) together. | |
| 3 | Roll the life raft out of the case and place it in the water on the leeward side of the boat. | |
| 4 | Pull the painter line from the raft container, manually inflate the raft, and hold it alongside your boat. | |
| 5 | Attach two lines, each of a length longer than the maximum distance between your boat and the people in distress. | |
| 6 | Use one line to tend the life raft from your boat during the evolution (NEVER LET GO OF THIS LINE). | |
| 7 | Pass the other line to the people in distress with a heaving line or let the current float it down to them. | |
| 8 | Tell the persons being assisted to haul the life raft to their position. | |
| WARNING Ensure each person is wearing a PFD. Do not permit more people to enter the raft than are allowed by the raft’s specifications. | ||
| 9 | Once the life raft is alongside, direct the persons to board the life raft, one person at a time. | |
| 10 | If the number of people being assisted is more than the carrying capacity of the raft, direct the people remaining to tend the line attached to the life raft from their location; haul back the maximum number of survivors and repeat the procedure. | |
| 11 | After recovering all people, deflate the raft and bring it aboard the rescue boat. The raft may have taken on water during the rescue evolution. De-ballast the raft before bringing it aboard. Use the handles located on the ballast bags and slowly lift one side of the raft until all the water has run out. | |
| 12 | Once the raft is aboard, do not repack the raft. Wash the raft and have it repacked at a certified packing station before returning it to service. |
APPENDIX A Glossary
This appendix contains a list of terms that may be useful when reading this Manual. This appendix contains the following information:
| Topic | See Page |
| Glossary | A-1 |
| TERM | DEFINITION |
| Abeam | To one side of a vessel, at a right angle to the fore-and-aft centerline. |
| Aft | Near or toward the stern. |
| Astern | The direction toward or beyond the back of a vessel. |
| Attitude | A vessel’s position relative to the wind, sea, hazard, or other vessel. |
| Beam | The widest point of a vessel on a line perpendicular to the keel, the fore-and-aft centerline. |
| Below | The space or spaces that are underneath a vessel’s main deck. |
| Bilge | The lowest point of a vessel’s inner hull, which is underwater. |
| Bitt | A strong post of wood or metal, on deck in the bow or stern, to which anchor, mooring, or towing lines may be fastened. |
| Bow | The forward end of the vessel. |
| Breaker | A wave cresting with the top breaking down over its face. |
| Buoyancy | The tendency or capacity of a vessel to remain afloat. |
| Capsize | To turn a vessel bottom side up. |
| Center of Gravity | Point in a ship where the sum of all moments of weight is zero. With the ship at rest, the center of gravity and the center of buoyancy are always in a direct vertical line. For surface ships, center of buoyancy is usually below center of gravity, and the ship is prevented from capsizing by the additional displacement on the low side during a roll. Thus the point at which the deck edge enters the water is critical because from here onward, increased roll will not produce corresponding increased righting force. |
| Characteristic | The audible, visual, or electronic signal displayed by an aid to navigation to assist in the identification of an aid to navigation. Characteristic refers to lights, sound signals, racons, radiobeacons, and daybeacons. |
| TERM | DEFINITION |
| Chine | The intersection of the bottom and the sides of a flat bottom or “V” hull boat. |
| Chop | Short steep waves usually generated by local winds and/or tidal changes. Change of operational control. The date and time at which the responsibility for operational control of a ship or convoy passes from one operational control authority to another. |
| Cleat | An anvil-shaped deck fitting for securing or belaying lines. Wedge cleats are used in yachting to hold sheets ready for instant release. |
| Coast Guard- Approved | Label denoting compliance with Coast Guard specifications and regulations relating to performance, construction, and materials. |
| Course (C) | The horizontal direction in which a vessel is steered or intended to be steered, expressed as angular distance from north, usually from 000° at north, clockwise through 360°. |
| Coxswain | Person in charge of a boat, pronounced “COX-un.” |
| Craft | Any air or sea-surface vehicle, or submersible of any kind or size. |
| Crest | The top of a wave, breaker, or swell. |
| Current (Ocean) | Continuous movement of the sea, sometimes caused by prevailing winds, as well as large constant forces, such as the rotation of the earth, or the apparent rotation of the sun and moon. Example is the Gulf Stream. |
| Datum | In SAR, refers to the probable location of a distressed vessel, downed aircraft, or PIW, which is corrected for drift at any moment in time. Depending on the information received this may be represented as a point, a line or an area. |
| Deck | The horizontal plating or planking on a ship or boat. |
| Distress | As used in the Coast Guard, when a craft or person is threatened by grave or imminent danger requiring immediate assistance. |
| Draft | The point on a vessel’s underwater body, measured from the waterline, that reaches the greatest depth. |
| Drift | The rate/speed at which a vessel moves due to the effects of wind, wave, current, or the accumulative effects of each. Usually expressed in knots. |
| Drogue | A device used to slow rate of movement. Commonly rigged off the stern of a boat while under tow to reduce the effects of following seas. May prevent yawing and/or broaching. (see sea anchor). |
| Dry Suit | A coverall type garment made of waterproof material having a rubber or neoprene seal around the neck and wrist cuffs. Allows the wearer to work in the water or in a marine environment without getting wet. |
| Emergency Position-Indicating | A device, usually carried aboard a maritime craft, that transmits a signal that alerts search and rescue authorities and enables rescue units to locate the scene of the distress. |
| TERM | DEFINITION |
| Radio Beacon (EPIRB) | |
| Emergency Signal Mirror | A mirror used to attract attention of passing aircraft or boats by reflecting light at them. Such reflected light may be seen up to five miles or more from the point of origin. |
| Eye | The permanently fixed loop at the end of a line. |
| Eye Splice | The splice needed to make a permanently fixed loop at the end of a line. |
| Fatigue | Physical or mental weariness due to exertion. Exhausting effort or activity. Weakness in material, such as metal or wood, resulting from prolonged stress. |
| Ferry | To transport a boat, people or goods across a body of water. |
| Fetch | The unobstructed distance over which the wind blows across the surface of the water. |
| Fitting | Generic term for any part or piece of machinery or installed equipment. |
| Flash | A relatively brief appearance of light, in comparison with the longest interval of darkness in the same character. |
| Freeboard | Distance from the weather deck to the waterline on a vessel. |
| Gunwale | The upper edge of a boat’s side. Pronounced “gun-ul.” |
| Heaving Line | Light, weighted line thrown across to a ship or pier when coming along side to act as a messenger for a mooring line. The weight is called a monkey fist. |
| Heel | Temporary leaning of a vessel to port or starboard caused by the wind and sea or by a high speed turn. |
| High Seas | That body of water extending seaward of a country’s territorial sea to the territorial sea of another country. |
| Hoist | To lift. Display of signal flags at yardarm. The vertical portion of a flag alongside its staff. |
| Hull | The body or shell of a ship or seaplane. |
| Hull Integrity | The hull’s soundness. |
| Hypothermia | A lowering of the core body temperature due to exposure of cold (water or air) resulting in a subnormal body temperature that can be dangerous or fatal. The word literally means “under heated.” |
| Inboard | Toward the center of a ship or a group of ships, as opposed to outboard. |
| Inlet | A recess, as a bay or cove, along a coastline. A stream or bay leading inland, as from the ocean. A narrow passage of water, as between two islands. |
| TERM | DEFINITION |
| Keel | The central, longitudinal beam or timber of a ship from which the frames and hull plating rise. |
| Kicker Hook | See skiff hook. |
| Knot (kn or kt) | A unit of speed equivalent to one nautical mile (6,080 feet) per hour. A measurement of a ship’s speed through water. A collective term for hitches and bends. |
| Leeward | The side or direction away from the wind, the lee side. |
| Life Jacket | See personal flotation device. |
| Life Ring (Ring Buoy) | A buoyant device, usually fitted with a light and smoke marker, for throwing to a person-in- the-water. |
| Lifeline | Line secured along the deck to lay hold of in heavy weather; any line used to assist personnel; knotted line secured to the span of lifeboat davits(manropes or monkey lines) for the use of the crew when hoisting and lowering. The lines between stanchions along the outboard edges of a ship’s weather decks are all loosely referred to as lifelines, but specifically the top line is the lifeline, middle is the housing line, and bottom is the footline. Any line attached to a lifeboat or life raft to assist people in the water. Also called a grab rope. |
| Light | The signal emitted by a lighted aid to navigation. The illuminating apparatus used to emit the light signal. A lighted aid to navigation on a fixed structure. |
| List | The static, fixed inclination or leaning of a ship to port or starboard due to an unbalance of weight. |
| Log | A device for measuring a ship’s speed and distance traveled through the water. To record something is to log it. Short for logbook. |
| Logbook | Any chronological record of events, as an engineering watch log. |
| Lookout | A person stationed as a visual watch. |
| Maritime | Located on or close to the sea; of or concerned with shipping or navigation. |
| Mayday | The spoken international distress signal, repeated three times. Derived from the French M’aider (help me). |
| Mooring | A chain or synthetic line that attaches a floating object to a stationary object. (e.g., dock, sinker). |
| Nautical Mile (NM) | 2000 yards; Length of one minute of arc of the great circle of the earth; 6,076 feet compared to 5,280 feet per a statute (land) mile. |
| Navigation | The art and science of locating the position and plotting the course of a ship or aircraft. |
| On Scene | The search area or the actual distress site. |
| TERM | DEFINITION |
| Overdue | When a vessel or person has not arrived at the time and place expected. |
| Overload | Exceeding the designed load limits of a vessel; exceeding the recommended work load of line or wire rope. |
| Painter Line (Painter) | A line at the bow or stern of a boat which is used for making fast; a single line used to take a vessel in tow alongside, commonly used with ships and their boats when placing the boat into use over the side. |
| Personal Flotation Device (PFD) | A general name for various types of devices designed to keep a person afloat in water (e.g., life preserver, vest, cushion, ring, and other throwable items). |
| Port | The left side of the vessel looking forward toward the bow. |
| Range | A measurement of distance usually given in yards. Also, a line formed by the extension of a line connecting two charted points. |
| Rig | To devise, set up, arrange. An arrangement or contrivance. General description of a ship’s upper works; to set up spars or to fit out. A distinctive arrangement of sails (rigging), as in a schooner rig. An arrangement of equipment and machinery, as an oil rig. |
| Roll | Vessel motion caused by a wave lifting up one side of the vessel, rolling under the vessel and dropping that side, then lifting the other side and dropping it in turn. |
| Rubrail | A permanent fixture, often running the length of a boat, made of rubber that provides protection much as a fender would. |
| SARSAT | Search and rescue satellite aided tracking. See Cospas-Sarsat System. |
| Sea Anchor | A device, usually of wood and/or canvas, streamed by a vessel in heavy weather to hold the bow up to the sea. Its effect is similar to a drogue in that it slows the vessel’s rate of drift. However, it is usually made off to the bow opposed to the stern as in the use of a drogue. |
| Sea Current | Movement of water in the open sea. |
| Sea Drogue | See sea anchor. |
| Set (of a Current) | The direction toward which the water is flowing. A ship is set by the current. A southerly current and a north wind are going in the same direction. Measured in degrees (usually true). |
| Ship | Any vessel of considerable size navigating deepwater, especially one powered by engines and larger than a boat. Also, to set up, to secure in place. To take something aboard. |
| Signal Kit/MK-79 | A signal kit used to attract vessels, aircraft, and ground rescue teams. Each cartridge flare burns red, has a minimum duration of 4.5 seconds, and reaches a altitude of 250’ to 650’. |
| TERM | DEFINITION |
| Smoke and Illumination Signal | A signal used to attract vessels and aircraft. It has a night end and a day end. The night end produces a red flame, the day end has an orange smoke. |
| Sound Signal | A device that transmits sound, intended to provide information to mariners during periods of restricted visibility and foul weather; a signal used to communicate a maneuver between vessels in sight of each other. |
| Standard Navy Preserver (Vest Type with Collar) | A Navy PFD vest used by the Coast Guard onboard cutters. Allows user to relax, save energy, increase survival time and will keep users head out of water, even if user is unconscious. Not found as part of a boat outfit. |
| Starboard | The right side of the vessel looking forward toward the bow. |
| Stern | The extreme after end of a vessel. |
| Strobe Light | A device that emits a high intensity flashing light visible for great distances. Used to attract the attention of aircraft, ships, or ground parties, it flashes white light at 50 plus or minus 10 times per minute. |
| Surface Swimmer | In the Coast Guard, a specially trained individual that is deployed from floating units, piers, or the shore to help people in the water. |
| Swell | Wind-generated waves which have advanced into a calmer area and are decreased in height and gaining a more rounded form. The heave of the sea. See roller. |
| Swimmer’s Harness | A harness used to tether and retrieve surface swimmers during rescue/recovery operations. |
| Tide | The periodic vertical rise and fall of the water resulting from the gravitational interactions between the sun, moon, and earth. |
| Trough | The valley between waves. |
| Vessel | By U.S. statutes, includes every description of craft, ship or other contrivance used as a means of transportation on water. “Any vehicle in which man or goods are carried on water.” (see ship). |
| Wave | A periodic disturbance of the sea surface, caused by wind (and sometimes by earthquakes). |
| Wave Frequency | The number of crests passing a fixed point in a given time. |
| Wedge | Used as temporary repair in event of damage aboard vessel. Made of soft wood, they are forced into holes or damaged areas to stop leaking, to plug damaged structures, or to reinforce shoving. Part of a damage control kit. |
| TERM | DEFINITION |
| Wet Suit | A tight-fitting rubber suit worn by a skin diver in order to retain body heat. Designed to protect wearer from exposure to cold, wind, and spray. Constructed of foam neoprene, a durable and elastic material with excellent flotation characteristics. These buoyancy characteristics, which affect the entire body, will cause floating horizontally, either face up or face down. |
| Whistle | A piece of survival equipment used to produce a shrill sound by blowing on or through it. To summon, signal or direct by whistling. A device for making whistling sounds by means of forced air or steam. A whistling sound used to summon or command. It is attached to some PFDs and is an optional item for the personal signal kit. It has proven very useful in locating survivors in inclement weather and can be heard up to 1,000 yards. |
| Wind-Chill Factor | An estimated measurement of the cooling effect of a combination of air temperature and wind speed in relation to the loss of body heat from exposed skin. |
| Windward | Towards the wind. |
APPENDIX B List of Acronyms This Appendix contains a list of acronyms that may be useful when reading this and other Coast Guard manuals. This appendix contains the following information:
| Topic | See Page |
| List of Acronyms | B-1 |
| ACRONYM | DEFINITION |
| A/C | Air Conditioning |
| AAR | After Action Report |
| ACFT | Aircraft |
| ACIP | Aviation Incentive Pay |
| ACMS | Aviation Computerized Maintenance System |
| ACP | Area Contingency Plan |
| ACP | Alternate Compliance Program |
| ACTSUS | Active Suspension |
| ADF | Automatic Radio Direction Finder |
| ADSW-AC | Active Duty Special Work in Support of Active Component |
| A/C | Air Conditioning |
| ADT | Active Duty for Training |
| ADT-AT | Active Duty Training for Annual Training |
| AEO | Assistant Engineering Officer |
| AEPO | Assistant Engineering Petty Officer |
| AFC | Allowance Fund Control |
| AFFF | Aqueous Film – Forming Foam |
| AIDS | Acquired Immunodeficiency Syndrome |
| AIM | Administrative Investigations Manual |
| AIS | Automatic Identification System |
| AH | Amplitude Modulation |
| AMIO | Alien/Migrant Interdiction Operation |
| AMS | Automated Manifest System |
| ACRONYM | DEFINITION |
| AMVER | Automated Mutual-Assistance Vessel Rescue |
| ANB | Aids to Navigation Boat |
| ANS | Aquatic Nuisance Species |
| ANSI | American National Standards Institute |
| ANT | Aids to Navigation Team |
| AOPS | Abstract of Operations |
| AOR | Area of Responsibility |
| API | American Petroleum Institute |
| APPS | Act to Prevent Pollution from Ships |
| APR | Aid Positioning Report |
| ASB | Arctic Survey Boat |
| ATB | Aviation Training Boat |
| AtoN | Aids to Navigation |
| AtoNIS | Aids to Navigation Information System |
| ATR | Ammunition Transaction Report |
| AUXCOM | Auxiliary Boat Commander |
| AUX DATA | Auxiliary Data |
| AUXPATCOM | Auxiliary Patrol Commander |
| AV | Aid Verifier |
| BA | Bridge Administration |
| BAC | Blood Alcohol Content |
| BAS | Basic Allowance for Subsistence |
| BCEB | Boat Crew Examination Boards |
| BCM | Boat Crew member |
| BCMP | Boat Class Maintenance Plan |
| BDCM | Buoy Deck Crew member |
| BDS | Buoy Deck Supervisor |
| BECCE | Basic Engineering Casualty Control Exercises |
| BEQ | Bachelor Enlisted Quarters |
| BM | Boatswain’s Mate |
| BNTM | Broadcast Notice to Mariners |
| BO | Boarding Officer |
| BO/BTM PQS | Boarding Officer / Boarding Team Member Personnel Qualification Standard |
| ACRONYM | DEFINITION |
| BOSN | Boatswain |
| BS | Breaking Strength |
| BSC | Boating Safety Circular |
| BTM | Boarding Team Member |
| BUSL | Buoy Utility Stern Loading |
| BWI | Boating While Intoxicated |
| BWM | Ballast Water Management |
| C2 | Command and Control |
| C2PC | Command/Control Personal Computer |
| CABs | Compressions, Airway, and Breathing |
| CAC | Crisis Action Center |
| CASCOR | Casualty Correct |
| CASREP | Casualty Report |
| CBL | Commercial Bill of Lading |
| CB-L | Cutter Boat – Large |
| CB-M | Cutter Boat – Medium |
| CB-OTH | Cutter Boat – Over the Horizon |
| CBRN | Chemical, Biological, Radiological, Nuclear |
| CB-S | Cutter Boat – Small |
| CDAR | Collateral Duty Addictions Representative |
| CDI | Course Deviation Indicator |
| CDO | Command Duty Officer |
| CDR | Commander |
| CDV | Course Deviation Variance |
| CEM | Crew Endurance Management |
| CERCLA | Comprehensive Environment Compensation and Liability Act |
| CEU | Civil Engineering Unit |
| CF | Comparison Factors |
| CFC | Combined Federal Campaign |
| CFR | Code of Federal Regulations |
| CFVS | Commercial Fishing Vessel Safety |
| CGADD | Coast Guard Addendum |
| CGDF | Coast Guard Dining Facility |
| ACRONYM | DEFINITION |
| CGIS | Coast Guard Investigative Service |
| CGPC | Coast Guard Personnel Command |
| CIC | Combat Information Center |
| CIO | Command Intelligence Officer |
| CISM | Critical Incident Stress Management |
| CM | Configuration Management |
| CMAA | Chief Master at Arms |
| CMCO | Classified Material Control Officer |
| CMG | Course Made Good |
| CMS | COMSEC (Communication Security) Material System |
| CO | Commanding Officer or Carbon Monoxide |
| CO/OIC | Commanding Officer/Officer-in-Charge |
| COCO | Chief of Contracting Officer |
| COFR | Certificate of Financial Responsibility |
| COG | Course Over Ground |
| COI | Certificate of Inspection |
| COLREG | International Regulations for Preventing Collisions at Sea |
| COMCEN | Communications Center |
| COMDTINST | Commandant Instruction |
| COMINT | Communications Intelligence |
| COMMS | Communications |
| CONOPS | Concept of Operations |
| COR | Certificate of Registry |
| COTP | Captain-of-the-Port |
| COTR | Contracting Officer’s Technical Representative |
| CPC | Commandant’s Performance Challenge |
| CPO | Chief Petty Officer |
| CPR | Cardiopulmonary Resuscitation |
| CPU | Central Processing Unit |
| CQA | Commandant’s Quality Award |
| CRT | Cathode Ray Tube |
| CS | Creeping Line Search |
| CSIM | Control Station Interface Module |
| ACRONYM | DEFINITION |
| CSMP | Current Ship’s Maintenance Project |
| CSP | Commence Search Point |
| CSP | Career Sea Pay |
| CVE | Control Verification Examination |
| CVS | Commercial Vessel Safety |
| CWO | Chief Warrant Officer |
| DAMA | Demand Assigned Multiple Access |
| DAN | Driver’s Alert Network |
| DANTES | Defense Activity for Non-Traditional Education Support |
| DAPA | Drug and Alcohol Program Administration |
| DDEC | Detroit Diesel Electronically Controlled |
| DEER | Defense Enrollment and Eligibility Reporting System |
| DEMPs | Diesel Engine Maintenance Programs |
| DF | Direction Finding |
| DGPS | Differential Global Positioning System |
| DICP | Drop-In Communications Package |
| DISREP | Discrepancy Report |
| DISREPS | Discrepancy Report |
| DIW | Dead-in-the-Water |
| DMA | Defense Mapping Agency |
| DMB | Data Marker Buoy |
| DMOA | Designated Medical Officer Advisor |
| DMS | Docket Management System |
| DO | Defense Operations |
| DoD | Department of Defense |
| DONCAF | Department of the Navy Central Adjudication Facility |
| DOT | Department of Transportation |
| DPB | Deployable Pursuit Boat |
| DR | Dead Reckoning |
| DSC | Digital Selective Calling |
| DVL | Digital Voice Logger |
| DWO | Deck Watch Officer |
| DWONR | Deck Watch Officer Navigation Rules |
| ACRONYM | DEFINITION |
| EAP | Employee Assistance Program |
| EAPC | Employee Assistance Program Coordinator |
| EBL | Electronic Bearing Line |
| EC | Electronic Control |
| EC | Engineering Change |
| ECM | Electronic Control Module |
| ECR | Engineering Change Request |
| ECS | Electronic Chart System |
| EDF | Enlisted Drug Facilities |
| EDM | Electronic Display Module |
| EEZ | Exclusive Economic Zone |
| EGIM | Electronic Gear Interface Module |
| ELC | Engineering Logistics Center |
| ELINT | Electronics Intelligence |
| ELT | Emergency Locator Transmitter |
| ELT | Enforcement of Laws and Treaties |
| EMI | Extra Military Instruction |
| EMS | Emergency Medical Services |
| EMT | Emergency Medical Technician |
| EO | Engineering Officer |
| EOCT | End-of-Course Test |
| EP | Estimated Position |
| EPA | Environmental Protection Agency |
| EPES | Enlisted Personnel Evaluation System |
| EPIRB | Emergency Position Indicating Radio Beacon |
| EPO | Engineering Petty Officer |
| EPO/EO | Engineering Petty Officer/Engineering Officer |
| EPS | Environmental Protection Specialist |
| ERIM | Engine Room Interface Module |
| ESA | Endangered Species Act |
| ESD | Electronics Support Detachment |
| ESU/D | Electronics Support Unit/detachment |
| ET | Electronics Technician |
| ACRONYM | DEFINITION |
| ETA | Electronic Transportation Acquisition |
| ETA | Estimated Time of Arrival |
| EXCOM | Extended Communications |
| FAA | Federal Aviation Agency |
| FAR | Family Advocacy Representative |
| FAR | Federal Acquisition Regulations |
| FAST | Facial Drooping, Arm Weakness, Speech Difficulty, and Time is Critical |
| FBIS | Foreign Broadcast Information Service |
| FEDEX | Federal Express |
| FEEF | Federal Energy Efficiency Funding |
| FFCS | Full Function Crew Station |
| FID | Field Information Document |
| FINCEN | Finance Center |
| FIR | Field Intelligence Report |
| FL | Fitness Leader |
| FLOCS | Fast Lubricating Oil Change System |
| FLS | Fleet Logistics Supply |
| FM | Frequency Modulation |
| FMP | Fisheries Management Plan |
| FOIA | Freedom of Information Act |
| FOSC | Federal On-Scene Coordinator |
| FOUO | For Official Use Only |
| FPCON | Force Protection Conditions |
| FPM | Feet Per Minute |
| FRP | Fiberglass Reinforced Plastic |
| FS | Food Service Specialist |
| FSC | Federal Supply Classification |
| FSI | Field Sobriety Test |
| FSIC | Fiscal, Sanitation, Immigration or Customs |
| FSO | Food Services Officer |
| FWPCA | Federal Water Pollution Control Act |
| FWS | Fish and Wildlife Service |
| GAR | Green-Amber-Red |
| ACRONYM | DEFINITION |
| GFM | Global Freight Management |
| GMDSS | Global Maritime Distress and Safety System |
| G-OCS | Office of Boat Forces |
| G-OI | Office of Intelligence |
| GPH | Gallons Per Hour |
| GPS | Global Positioning System |
| GRUCOM | Group Commander |
| GSA | Government Service Administration |
| GTA | Government Transportation Account |
| GV | Government Vehicle |
| HAZCOM | Hazardous Communication |
| HAZMAT | Hazardous Material |
| HAZWASTE | Hazardous Waste |
| HCPV/HIV | High Capacity Passenger Vessel/High Interest Vessel |
| HDOP | Horizontal Dilution of Precision |
| HEA | Harbor Entrance and Approach |
| HELP | Heat Escape Lessening Position |
| HF | High Frequency |
| HIN | Hull Identification Number |
| HIV | Human Immunodeficiency Virus |
| HS | Homeland Security |
| HPU | Hydraulic Power Unit |
| HRSIC | Human Resources Services and Information Center |
| HSC | Harbor Safety Committee |
| HUMINT | Human Intelligence |
| HVAC | Heating, Ventilation, and Air Conditioning |
| IACS | International Association of Classification Societies |
| IALA | International Association of Lighthouse Authorities |
| IAMSAR | International Aeronautical and Maritime Search and Rescue |
| I-AtoNIS | Integrated Aids to Navigation Information Systems |
| ICA | Individual Credit Accounts |
| ACRONYM | DEFINITION |
| ICAO | International Civil Aviation Organization |
| ICC | Intelligence Coordination Center |
| ICLL | International Convention on Load Lines |
| ICMTS | Interagency Committee of the Marine Transportation System |
| ICS | Incident Command System |
| ICV | Intercommunicating Fill Valve |
| ICW | Intracoastal Waterway |
| IDT | Inactive Duty for Training |
| IEC | International Electrotechnical Commission |
| IIP | International Ice Patrol |
| IIR | Intelligence Information Report |
| IIRAIRA | Illegal Immigration Reform and Immigrant Responsibility Act |
| ILO | International Labor Organization |
| IMARV | Independent Maritime Response Vessel |
| IMO | International Maritime Organization |
| IMPAC | International Merchant Purchase Authorization Card |
| INA | Immigration and Nationality Act |
| INS | Immigration and Naturalization Service |
| IPIECA | International Petroleum Industry Environmental Conservation Association |
| IPS | International Pipe Standard |
| IRIS | Incident Reporting Information System |
| ISC | Integrated Support Command |
| ISM | International Ship Management |
| ISO | International Standards Organization |
| IT | Information Systems Technician |
| IUU | Illegal, Unreported, and Unregulated |
| JOOD | Junior Officer of the Day |
| JQR | Job Qualification Requirement |
| KO | Contracting Officer |
| LC | Load Center |
| LCD | Liquid Crystal Display |
| ACRONYM | DEFINITION |
| LCVP | Landing Craft, Vehicle, Personnel |
| LE | Law Enforcement |
| LEISII | Law Enforcement Information System II |
| LEMAN | Law Enforcement Manual |
| LEO | Law Enforcement Officer |
| LEQB | Law Enforcement Qualification Board |
| LEU | Law Enforcement Unit |
| LHA | Local Housing Authority |
| LHI | Local Housing Inspector |
| LIR | Letter Incident Report |
| LKP | Last Known Position |
| LLNR | Light List Number |
| LMR | Living Marine Resource |
| LNB | Large Navigation Buoy |
| LNG | Liquid Natural Gas |
| LOA | Length Overall |
| LOB | Line-of-Bearing |
| LOC | Letter of Commendation or Level of Consciousness |
| LOGREQ | Logistics Requirements |
| LOP | Line of Position |
| LORAN-C | Long-Range Aid to Navigation |
| LORSTA | LORAN Station |
| LOS | Line-of-Sight |
| LUFS | Large Unit Financial System |
| LUT | Local User Terminal |
| LWL | Length on Waterline |
| MAA | Master at Arms |
| MARB | Maritime Assistance Request Broadcast |
| MARPOL | International Convention for the Prevention of Pollution from Ships |
| MARSEC | Marine Security Conditions |
| MASINT | Measurement and Signature Intelligence |
| ACRONYM | DEFINITION |
| MAW | Maximum Allowable Weight |
| MBR INT | Member’s Initials |
| MCB | Motor Cargo Boat |
| MCM | Manual for Courts-Martial |
| MCS | Master Control Station |
| MDA | Maritime Domain Awareness |
| MDV | Marine Dealer Visit |
| MDZ | Maritime Defense Zone |
| MEDICO | Medical Advice |
| MEDEVAC | Medical Evacuation |
| MEP | Marine Environmental Protection |
| MEPC | Marine Environment Protection Committee |
| MER | Marine Environmental Response |
| MF | Medium Frequency |
| MFPU | Maritime Force Protection Unit |
| MHS | Maritime Homeland Security |
| MI | Marine Information |
| MI | Maintenance Inspection |
| MI & R | Maintenance, Improvement and Repair |
| MIC | Manufacturer Identification Code |
| MICA | Management Information for Configuration and Allowances |
| MICA | Machinery Information Catalog Allowance |
| MIM | Marine Interface Module |
| MISLE | Marine Information for Safety and Law Enforcement |
| MJM | Military Justice Manual |
| MLB | Motor Lifeboat |
| MLC | Maintenance and Logistics Command |
| MLCPAC | Maintenance and Logistics Command Pacific |
| MMD | Merchant Mariner Document |
| MMPA | Marine Mammal Protection Act |
| MMS | Minerals Management Services |
| MMSI | Maritime Mobile Service Identity |
| ACRONYM | DEFINITION |
| MOA | Memorandum of Agreement |
| MOB | Man Overboard |
| MOU | Memorandum of Understanding |
| MPR | Multiple Persons-in-the-Water |
| MPS | Marine Protected Species |
| MRE | Military Rule of Evidence |
| MRR | Medium-Range Recovery |
| MSAP | Maritime SAR Assistance Policy |
| MSB | Motor Surf Boat |
| MSC | Marine Safety Center |
| MSFCMA | Magnuson-Stevens Fisheries Conservation and Management Act |
| MSO | Maintenance Support Outline |
| MSO | Marine Safety Office |
| MSS | Marine Safety and Security |
| MSST | Maritime Safety and Security Team |
| MTL | Master Training List |
| MTS | Marine Transportation System |
| MTSNAC | Marine Transportation System National Advisory Council |
| MWR | Moral, Welfare and Recreation |
| NAFA | Non-Appropriated Fund Activity |
| NAVAIDS | Navigational Aids |
| NAVRULS | Navigation Rules |
| NCP | National Contingency Plan |
| NCW | Naval Coastal Warfare |
| NDRS | National Distress Response System |
| NDRSMP | National Distress Response System Modernization Project |
| NDS | National Distress System |
| NESU | Naval Engineering Support Unit |
| NJP | Non-Judicial Punishment |
| NLB | Nearshore Life Boat |
| NLT | No Later Than |
| NM | Nautical Miles |
| NMEA | National Marine Electronics Association |
| ACRONYM | DEFINITION |
| NMFS | National Marine Fisheries Service |
| NMLBS | National Motor Lifeboat School |
| NOS | National Ocean Survey |
| NOAA | National Oceanic and Atmospheric Administration |
| NRC | National Response Center |
| NRT | National Response Team |
| NSARC | National Search and Rescue Committee |
| NSB | Non-Standard Boat |
| NSF | National Strike Force |
| NSFCC | National Strike Force Coordination Center |
| NSN | National Stock Number |
| NSP | National Search and Rescue Plan |
| NSS | National Search and Rescue Supplement |
| NTP | Naval Training Publication |
| NVDC | National Vessel Documentation Center |
| NVIC | Navigation and Vessel Inspection Circular |
| NWP | Naval Warfare Publication |
| OBA | Oxygen Breathing Apparatus |
| O/S WX | On-Scene Weather |
| OCMI | Officer-in-Charge Marine Inspection |
| OER | Officer Evaluation Report |
| OIC | Officer-in-Charge |
| OIC INT | Officer in Charge’s Initials |
| OJT | On-the-Job Training |
| OM & S | Operating Materials and Supplies |
| OMMP | Occupational Medical Monitoring Program |
| OOD | Officer of the Deck (Day) |
| OPA | Oil Pollution Act |
| OPAREA | Operational Area |
| OPCEN | Operations Center |
| OPCON | Operational Control |
| OPFAC | Operating Facility |
| OPLAN | Operations Plan |
| ACRONYM | DEFINITION |
| OPORD | Operations Order |
| OPORDER | Operations Order |
| OQB | Operations Qualification Board |
| ORM | Operational Risk Management |
| OS | Operations Specialist |
| OSB | Operations Standards Board |
| OSC | Operations Systems Center |
| OSC | On-Scene Commander |
| OSHA | Occupational Safety and Health Administration |
| OTC | Officer in Tactical Command |
| PA | Privacy Act |
| PAL | Personnel Allowance List |
| PALMS | Patrol Order Management System |
| PAO | Public Affairs Officer |
| PATCOM | Patrol Commander |
| PAWSS | Ports and Waterways Safety System |
| PCS | Permanent Change of Station |
| PDD | Presidential Decision Directive |
| PDR | Personnel Data Record |
| PDS | Personnel Data System |
| PERSRU | Personnel Reporting Unit |
| PES | Port and Environmental Safety |
| PFD | Personal Flotation Device |
| PI | Personnel Inspection |
| PIAT | Public Information Assistance Team |
| PIE | Partnership in Education |
| PIW | Person-in-the-Water |
| PLB | Personal Locator Beacon |
| PMIS/JUMPS | Personnel Management Information System/Joint Uniform Military Pay System |
| PMLV | Personnel Marker Light |
| PMS | Preventative/Planned Maintenance System |
| PO | Petty Officer |
| POB | Persons Onboard |
| ACRONYM | DEFINITION |
| POD | Probability of Detection |
| POP | Planned Obligation Priority |
| POS | Probability of Success |
| POPFAC | Parent Operating Facility |
| POW | Plan of the Week |
| PPE | Personal Protective Equipment |
| PPI | Plan Position Indicator |
| PPS | Precise Positioning Service |
| PQS | Personnel Qualification Standard |
| PR | Position Report |
| PRECOM | Preliminary Communications |
| PREP | Preparedness for Response Exercise Program |
| PS | Parallel Search |
| PSCO | Port State Control Officer |
| PSU | Port Security Unit |
| PTO | Power Take-Off |
| PWB | Port and Waterways Boat |
| PWSA | Ports and Waterway Safety Act |
| QAWTD | Quick-Acting Watertight Door |
| QEB | Qualification Examining Board |
| QRC | Quick Response Card |
| RACON | Radar Beacon |
| RB-HS | Response Boat-Homeland Security |
| RB-M | Response Boat-Medium |
| RBS | Recreational Boating Safety |
| RB-S | Response Boat-Small |
| RCC | Rescue Coordination Center |
| RDF | Radio Direction Finder |
| RFMC | Regional Fisheries Management Council |
| RFMO | Regional Fisheries Management Organization |
| RFO | Ready for Operations |
| RIK | Rations-In-Kind |
| RMS | Readiness Management System |
| ACRONYM | DEFINITION |
| RNAV | Radio Aids to Navigation |
| ROC/POE | Required Operational Capability/Projected Operational Environment |
| RP | Responsible Party |
| RPAL | Reserve Personnel Allowance List |
| RS | Rescue Swimmer |
| RSC | Rescue Sub-Center |
| RT | Receiver/Transmitter |
| SAFE | Substance Abuse Free Environment |
| SAI | Small Arms Instructor |
| SAP | Simplified Acquisition Procedures |
| SAR | Search and Rescue |
| SAREX | SAR Exercise |
| SARMIS | Search and Rescue Mission Information System |
| SARSAT | Search and Rescue Satellite Aided Tracking |
| SAT | Subsistence Advisory Team |
| SATCOM | Satellite Communication |
| SB | Sailboat |
| SC | SAR Coordinator |
| SCUBA | Self-Contained Underwater Breathing Apparatus |
| SDB | Service Dress Blue |
| SDO | Sector Duty Officer |
| SEAOP | Special and Emergency Operations Procedure |
| SEPRATS | Separate Rations |
| SF | Safety Factor |
| SIGINT | Signals Intelligence |
| SIPRNET | Secret Internet Protocol Routing Network |
| SITREP | Situation Report |
| SKF | Skiff |
| SLDMB | Self Locating Datum Marker Buoy |
| SMC | SAR Mission Coordinator |
| SMS | Safety Management System |
| SMTJ | Special Maritime and Territorial Jurisdiction |
| SNO | Statement of No Objection |
| ACRONYM | DEFINITION |
| SOA | Speed of Advance |
| SOG | Speed Over Ground |
| SOLAS | Safety of Life at Sea |
| SO-OP | Auxiliary Division Operations Officer |
| SOP | Standard Operating Procedure |
| SOPA | Senior Officer Present Afloat |
| SOPEP | Shipboard Oil Pollution Emergency Plan |
| SOQ | Sailor of the Quarter |
| SOS | Save Our Ship |
| SPC | Special Purpose Craft |
| SPC (HWX) | Heavy Weather Special Purpose Craft |
| SPC (LE) | Special Purpose Craft (Law Enforcement) |
| SPE | Severity-Probability-Exposure |
| SPF | Sun Protection Factor |
| SPOC | SAR Point of Contact |
| SPS | Standard Positioning Service |
| SRA | Short-Range Aids to Navigation |
| SROE | Standing Rules of Engagement |
| SRR | Search and Rescue Region |
| SRR | Short-Range Recovery |
| SRS | Synchronous Reference Sensor |
| SRU | Search and Rescue Unit |
| SS | Square Search |
| SSB | Single Side Band |
| SSB-HF | Single Side Band - High Frequency |
| SSL | Standard Support Level |
| SSM | Support and Special Mission |
| SSMR | Shore Station Maintenance Record |
| SSPO | Station Support Petty Officer |
| STA OPS | Station Operations |
| STAN & RFO | Readiness and Standardization Program |
| STANT | Station Aids to Navigation Team |
| STAR | Standard Automated Requisitioning |
| ACRONYM | DEFINITION |
| STCW | Standards of Training, Certification and Watchkeeping for Seafarers |
| STTR | Short Term Resident Training Request |
| STU III | Secure Telephone Unit |
| SURPIC | Surface Picture |
| SWE | Service-wide Exam |
| SWL | Safe Working Load |
| TACON | Tactical Control |
| TAD | Temporary Assigned Duty |
| TAIT | Temporary Access Inventory Tool |
| TANB | Trailerable Aids to Navigation Boat |
| TB | Tuberculosis |
| TBSA | Total Body Surface Area |
| TC | Technical Committee |
| TCM | Telecommunications Manual |
| TCOW | Telecommunications Watchstander |
| TCT | Team Coordination Training |
| TD | Temporary Duty |
| TD | Time Difference |
| TFC | Total Fuel Consumption |
| THREATCON | Threat Conditions |
| TMT | Training Management Tool |
| TOI | Target of Interest |
| TPSB | Transportable Port Security Boat |
| TQC | Training Quota Management Center |
| TRACEN | Training Center |
| TRATEAM | Training Team |
| TRS | Timing Reference Sensor |
| TSN | Track Line Non-Return Search |
| TSR | Track Line Return Search |
| U/W | Underway |
| UCMJ | Uniform Code of Military Justice |
| UEG | Unit Environmental Guide |
| UEPH | Unaccompanied Enlisted Personnel Housing |
| ACRONYM | DEFINITION |
| UHF | Ultra High Frequency |
| UMI | Universal Marine Interface |
| UMIB | Urgent Marine Information Broadcast |
| UOF | Use of Force |
| UPF | Unit Performance Factor |
| UPH | Unaccompanied Personnel Housing |
| UPS | United Parcel Service |
| USBP | United States Border Patrol |
| USC | United States Code |
| USFWS | U.S. Fish and Wildlife Service |
| USPS | U.S. Power Squadron |
| USWMS | Uniform State Waterway Marking System |
| UTB | Utility Boat |
| UTBSC | Utility Boat Systems Center |
| UTC | Coordinated Universal Time |
| UTL | Utility Boat Light |
| UTM | Utility Boat Medium |
| UTS | Unit Travel System |
| UV | Ultraviolet |
| VHA | Variable Housing Allowance |
| VHF | Very High Frequency |
| VRM | Variable Range Marker |
| VRO | Variable Ratio Oiler |
| VRP | Vessel Response Plan |
| VS | Sector Search |
| VSC | Vessel Safety Check |
| VTS | Vessel Traffic Services |
| WP | Working Punt |
| WAAS | Wide Area Augmentation System |
| WAMS | Waterways Analysis and Management System |
| WC | Wellness Coordinator |
| WLIC | Construction Tender |
| WLL | Working Load Limit |
| ACRONYM | DEFINITION |
| WPB | Patrol Boat |
| WR | Wellness Representative |
| WWM | Waterways Management |
| XO | Executive Officer |
| XPO | Executive Petty Officer |
| XTE | Cross Track Error |
Flash cards
46 CFR 180, § 180.10 — Applicability to vessels on an international voyage. What does it provide?
A vessel on an international voyage subject to the International Convention for the Safety of Life at Sea, 1974, (SOLAS) must meet the requirements in subchapter W of this chapter for passenger vessels in the same service, instead of the requirements of this part.
46 CFR 180, § 180.10
46 CFR 180, § 180.15 — Applicability to existing vessels. What does it provide?
An existing vessel must comply with the requirements of this part except as otherwise specified by this section.
46 CFR 180, § 180.15
46 CFR 180, § 180.15(a) — Applicability to existing vessels. What does it provide?
(a) A vessel that meets the following requirements shall be considered in compliance with the subdivision requirements contained in §§ 180.202, 180.204, 180.205, 180.206, 180.207 and 180.208:
(1) The vessel was constructed before March 11, 2001.
(2) The vessel is of not more than 19.8 meters (65 feet) in length and carries not more than 49 passengers;
(3) The vessel meets the standards for collision bulkheads in § 179.310 of this chapter; and
(4) The vessel meets the standards for one-compartment subdivision in §§ 179.220 and 179.320 of this chapter, at least in way of the engine room and lazarette.
46 CFR 180, § 180.15(a)
46 CFR 180, § 180.15(b) — Applicability to existing vessels. What does it provide?
(b) Each inflatable liferaft, inflatable buoyant apparatus, life float, and buoyant apparatus on the vessel on March 11, 1996, may be used to meet the requirements of this part for these survival craft as long as the survival craft is continued in use on the vessel, and is in good and serviceable condition.
46 CFR 180, § 180.15(b)
46 CFR 180, § 180.15(c) — Applicability to existing vessels. What does it provide?
(c) An existing vessel need not comply with § 180.78(a)(4).
46 CFR 180, § 180.15(c)
46 CFR 180, § 180.15(d) — Applicability to existing vessels. What does it provide?
(d) An existing vessel must comply with § 180.210 or may comply with the regulations for rescue boats that were in effect for the vessel prior to March 11, 1996.
46 CFR 180, § 180.15(d)
46 CFR 180, § 180.25(a) — Additional requirements. What does it provide?
(a) Each item of lifesaving equipment carried on board a vessel but not required under this part, must be approved by the Commandant.
46 CFR 180, § 180.25(a)
46 CFR 180, § 180.25(b) — Additional requirements. What does it provide?
(b) The cognizant Officer in Charge, Marine Inspection (OCMI) may require a vessel to carry specialized or additional lifesaving equipment if:
(1) The OCMI determines the conditions of the voyage render the requirements of this part inadequate; or
(2) The vessel is operated in Arctic, Antarctic, or other severe conditions not covered under this part.
46 CFR 180, § 180.25(b)
46 CFR 180, § 180.64 — Emergency Position Indicating Radiobeacons (EPIRB). What does it provide?
Each vessel that operates on the high seas, or that operates beyond three miles from the coastline of the Great Lakes, must have on board a FCC Type Accepted Category 1, 406 MHz EPIRB, installed to automatically float free and activate.
46 CFR 180, § 180.64
46 CFR 180, § 180.68(a) — Distress flares and smoke signals. What does it provide?
(a) Oceans, coastwise, limited coastwise, and Great Lakes routes. A vessel on an oceans, coastwise, limited coastwise, or Great Lakes route must carry—
(1) Six hand red flare distress signals approved in accordance with § 160.021 in subchapter Q of this chapter, or other standard specified by the Commandant, including, but not limited to, approval series 160.121; and
(2) Six hand orange smoke distress signals approved in accordance with § 160.037 in subchapter Q of this chapter, or other standard specified by the Commandant.
46 CFR 180, § 180.68(a)
46 CFR 180, § 180.68(b) — Distress flares and smoke signals. What does it provide?
(b) Lakes, bays, and sounds, and rivers routes. A vessel on a lakes, bays, and sounds, or rivers route must carry:
(1) Three hand red flare distress signals approved in accordance with § 160.021 in subchapter Q of this chapter, or other standard specified by the Commandant; and
(2) Three hand orange smoke distress signals approved in accordance with § 160.037 in subchapter Q of this chapter, or other standard specified by the Commandant.
46 CFR 180, § 180.68(b)
46 CFR 180, § 180.68(c) — Distress flares and smoke signals. What does it provide?
(c) Substitutions. (1) A rocket parachute flare approved in accordance with § 160.036 in subchapter Q of this chapter, or other standard specified by the Commandant may be substituted for any of the hand red flare distress signals required under paragraph (a) or (b) of this section.
(2) One of the following may be substituted for any of the hand orange smoke distress signals required under paragraph (a) or (b) of this section:
46 CFR 180, § 180.68(c)
46 CFR 180, § 180.68(i) — Distress flares and smoke signals. What does it provide?
(i) A rocket parachute flare approved in accordance with § 160.036 in subchapter Q of this chapter, or other standard specified by the Commandant.
(ii) A hand red flare distress signal approved in accordance with § 160.021 in subchapter Q of this chapter, or other standard specified by the Commandant, including, but not limited to, approval series 160.121.
(iii) A floating orange smoke distress signal approved in accordance with § 160.022 in subchapter Q of this chapter, or other standard specified by the Commandant, including, but not limited to, approval series 160.122.
(d) Exemption for vessels on short runs. A vessel operating on short runs limited to approximately 30 minutes away from the dock is not required to carry distress flares and smoke signals under this section.
(e) Stowage. Each flare carried to meet this section must be stowed in one of the following:
(1) A portable watertight container marked as required by § 185.614 of this chapter, carried at the operating station; or
(2) A pyrotechnic locker secured above the freeboard deck, away from heat, in the vicinity of the operating station.
46 CFR 180, § 180.68(i)
46 CFR 180, § 180.70(a) — Ring life buoys. What does it provide?
(a) A vessel must have one or more ring life buoys as follows:
(1) A vessel of not more than 7.9 meters (26 feet) in length must carry a minimum of one life buoy of not less than 510 millimeters (20 inches) in diameter;
(2) A vessel of more than 7.9 meters (26 feet) in length, but not more than 19.8 meters (65 feet), must carry a minimum of one life buoy of not less than 610 millimeters (24 inches) in diameter; and
(3) A vessel of more than 19.8 meters (65 feet) in length must carry a minimum of three life buoys of not less than 610 millimeters (24 inches) in diameter.
46 CFR 180, § 180.70(a)
46 CFR 180, § 180.70(b) — Ring life buoys. What does it provide?
(b) Each ring life buoy on a vessel must:
(1) Be approved in accordance with § 160.050 in subchapter Q of this chapter, or other standard specified by the Commandant, including, but not limited to, approval series 160.150;
(2) Be readily accessible;
(3) Be stowed in a way that it can be rapidly cast loose;
(4) Not be permanently secured in any way; and
(5) If on a vessel on an oceans or coastwise route, be orange in color.
46 CFR 180, § 180.70(b)
46 CFR 180, § 180.70(c) — Ring life buoys. What does it provide?
(c) At least one ring life buoy must be fitted with a lifeline. If more than one ring life buoy is carried, at least one must not have a lifeline attached. Each lifeline on a ring life buoy must:
(1) Be buoyant;
(2) Be of at least 18.3 meters (60 feet) in length;
(3) Be non-kinking;
(4) Have a diameter of at least 7.9 millimeters ( 5/16 inch);
(5) Have a breaking strength of at least 5 kilonewtons (1,124 pounds); and
(6) Be of a dark color if synthetic, or of a type certified to be resistant to deterioration from ultraviolet light.
46 CFR 180, § 180.70(c)
46 CFR 180, § 180.70(d) — Ring life buoys. What does it provide?
(d) A vessel must carry one floating waterlight, unless it is limited to daytime operation, in which case no floating waterlight is required.
(1) Each floating waterlight must be approved in accordance with § 161.010 in subchapter Q of this chapter, or other standard specified by the Commandant, including, but not limited to, approval series 160.110.
(2) Each ring life buoy with a floating waterlight must have a lanyard of at least 910 millimeters (3 feet) in length, but not more than 1,830 millimeters (6 feet), securing the waterlight around the body of the ring life buoy.
(3) Each floating waterlight installed after March 11, 1997, on a vessel carrying only one ring buoy, must be attached to the lanyard with a corrosion-resistant clip. The clip must have a strength of at least 22.7 kilograms (50 pounds), and allow the waterlight to be quickly disconnected from the ring life buoy.
46 CFR 180, § 180.70(d)
46 CFR 180, § 180.71(a) — Lifejackets. What does it provide?
(a) An adult life jacket must be provided for each person carried on board a vessel.
46 CFR 180, § 180.71(a)
46 CFR 180, § 180.71(b) — Lifejackets. What does it provide?
(b) In addition, a number of child size life jackets equal to at least 10% of the number of persons permitted on board must be provided, or such greater number as necessary to provide a life jacket for each person being carried that is smaller than the lower size limit of the adult life jackets provided to meet this section, except that:
(1) Child-size life jackets are not required if the vessel's Certificate of Inspection is endorsed for the carriage of adults only; or
(2) When all “extended size” life preservers (those with a lower size limit for persons of 1,195 millimeters (47 inches) in height or weighing 20.4 kilograms (45 pounds)) are carried on board, a minimum of only 5% additional child size devices need be carried.
46 CFR 180, § 180.71(b)
46 CFR 180, § 180.71(c) — Lifejackets. What does it provide?
(c) Each lifejacket must be approved under approval series in subparts 160.002, 160.005, 160.055, 160.115, 160.176, or 160.255 in part 160 of this chapter, or other standard specified by the Commandant. An inflatable lifejacket approved under approval series in subpart 160.255 of part 160 of this chapter must include a full back-up inflation chamber.
46 CFR 180, § 180.71(c)
46 CFR 180, § 180.71(d) — Lifejackets. What does it provide?
(d) Each life jacket carried on board the vessel must be marked in accordance with § 185.604 of this chapter.
46 CFR 180, § 180.71(d)
46 CFR 180, § 180.72(a) — Personal flotation devices carried in addition to lifejackets. What does it provide?
(a) Equipment carried under this section is not acceptable in lieu of any portion of the required number of approved lifejackets and must not be substituted for the approved lifejackets required to be worn during drills and emergencies.
46 CFR 180, § 180.72(a)
46 CFR 180, § 180.72(b) — Personal flotation devices carried in addition to lifejackets. What does it provide?
(b) Wearable marine buoyant devices approved in accordance with § 160.064, 160.076, 160.264, or 160.276 in subchapter Q of this chapter, or other standard specified by the Commandant, may be carried as additional equipment.
46 CFR 180, § 180.72(b)
46 CFR 180, § 180.72(c) — Personal flotation devices carried in addition to lifejackets. What does it provide?
(c) Buoyant work vests approved in accordance with § 160.053 in subchapter Q of this chapter, or other standard specified by the Commandant, may be carried as additional equipment for use of persons working near or over the water.
46 CFR 180, § 180.72(c)
46 CFR 180, § 180.72(d) — Personal flotation devices carried in addition to lifejackets. What does it provide?
(d) A commercial hybrid approved under former approval series 160.077 prior to January 6, 2025 may be carried as additional equipment for use by persons working near or over the water if it is in good and serviceable condition, used in accordance with the conditions marked on the PFD and in the owner's manual, and of the same or similar design and has the same method of operation as each other hybrid PFD carried on board.
46 CFR 180, § 180.72(d)
46 CFR 180, § 180.75(a) — Life jacket lights. What does it provide?
(a) Each life jacket carried on a vessel on oceans, coastwise, or Great Lakes route, must have a life jacket light approved in accordance with § 161.012 in subchapter Q of this chapter, or other standard specified by the Commandant, including, but not limited to, approval series 160.112. Each life jacket light must be securely attached to the front shoulder area of the life jacket.
46 CFR 180, § 180.75(a)
46 CFR 180, § 180.75(b) — Life jacket lights. What does it provide?
(b) Notwithstanding the requirements of paragraph (a) of this section, life jacket lights are not required for life jackets on:
(1) Ferries; and
(2) Vessels with Certificates of Inspection endorsed only for routes that do not extend more than 20 miles from a harbor of safe refuge.
46 CFR 180, § 180.75(b)
46 CFR 180, § 180.78(a) — Stowage of life jackets. What does it provide?
(a) General. Unless otherwise stated in this section, life jackets must be stored in convenient places distributed throughout accommodation spaces.
(1) Each stowage container for life jackets must not be capable of being locked. If practicable, the container must be designed to allow the life jackets to float free.
(2) Each life jacket kept in a stowage container must be readily available.
(3) Each life jacket stowed overhead must be supported in a manner that allows quick release for distribution.
(4) If life jackets are stowed more than 2,130 millimeters (7 feet) above the deck, a means for quick release must be provided and must be capable of operation by a person standing on the deck.
(5) Each child size life jacket must be stowed in a location that is appropriately marked and separated from adult life jackets so the child size life jackets are not mistaken for adult life jackets.
46 CFR 180, § 180.78(a)
46 CFR 180, § 180.78(b) — Stowage of life jackets. What does it provide?
(b) Additional personal flotation devices. The stowage locations of the personal flotation devices carried in addition to life jackets under § 180.72, must be separate from the life jackets, and such as not to be easily confused with that of the life jackets.
46 CFR 180, § 180.78(b)
46 CFR 180, § 180.130(a) — Stowage of survival craft. What does it provide?
(a) Each survival craft must be:
(1) Secured to the vessel by a painter with a float-free link permanently attached to the vessel except that a float-free link is not required if the vessel operates only on waters not as deep as the length of the painter;
(2) Stowed so that when the vessel sinks the survival craft floats free and, if inflatable, inflates automatically;
(3) Stowed in a position that is readily accessible to crew members for launching, or else provided with a remotely operated device that releases the survival craft into launching position or into the water;
(4) Stowed in a way that permits manual release from its securing arrangements;
(5) Ready for immediate use so that crew members can carry out preparations for embarkation and launching in less than 5 minutes;
(6) Provided with means to prevent shifting;
(7) Stowed in a way that neither the survival craft nor its stowage arrangements will interfere with the embarkation and operation of any other survival craft at any other launching station;
(8) Stowed in a way that any protective covers will not interfere with launching and embarkation;
(9) Fully equipped as required under this part; and
(10) Stowed, as far as practicable, in a position sheltered from breaking seas and protected from damage by fire.
46 CFR 180, § 180.130(a)
46 CFR 180, § 180.130(b) — Stowage of survival craft. What does it provide?
(b) A hydrostatic release unit when used in a float-free arrangement must be approved under approval series 160.062 or 160.162 or other standard specified by the Commandant.
46 CFR 180, § 180.130(b)
46 CFR 180, § 180.130(c) — Stowage of survival craft. What does it provide?
(c) A mechanical, manually operated device to assist in launching a survival craft must be provided if:
(1) The survival craft weights more than 90.7 kilograms (200 pounds); and
(2) The survival craft requires lifting more than 300 vertical millimeters (one vertical foot) to be launched.
46 CFR 180, § 180.130(c)
46 CFR 180, § 180.137(a) — Stowage of life floats and buoyant apparatus. What does it provide?
(a) In addition to meeting § 180.130, each life float and buoyant apparatus must be stowed as required under this section,
46 CFR 180, § 180.137(a)
46 CFR 180, § 180.137(b) — Stowage of life floats and buoyant apparatus. What does it provide?
(b) The float-free link required by § 180.130(a)(1) must be:
(1) Certified to meet § 160.073 in subchapter Q of this chapter, or other standard specified by the Commandant;
(2) Of proper strength for the size of the life float or buoyant apparatus as indicated on its identification tag; and
(3) Secured to the painter at one end and to the vessel on the other end.
46 CFR 180, § 180.137(b)
46 CFR 180, § 180.137(c) — Stowage of life floats and buoyant apparatus. What does it provide?
(c) The means used to attach the float-free link to the vessel must:
(1) Have a breaking strength of at least the breaking strength of the painter;
(2) If synthetic, be of a dark color or of a type certified to be resistant to deterioration from ultraviolet light; and
(3) If metal, be corrosion resistant.
46 CFR 180, § 180.137(c)
46 CFR 180, § 180.137(d) — Stowage of life floats and buoyant apparatus. What does it provide?
(d) If the life float or buoyant apparatus does not have a painter attachment fitting, a means for attaching the painter must be provided by a wire or line that:
(1) Encircles the body of the device;
(2) Will not slip off;
(3) Has a breaking strength that is at least the strength of the painter; and
(4) If synthetic, is of a dark color or is of a type certified to be resistant to deterioration from ultraviolet light.
46 CFR 180, § 180.137(d)
46 CFR 180, § 180.137(e) — Stowage of life floats and buoyant apparatus. What does it provide?
(e) If the vessel carries more than one life float or buoyant apparatus in a group with each group secured by a single painter:
(1) The combined weight of each group of life floats and buoyant apparatus must not exceed 181 kilograms (400 pounds);
(2) Each group of life floats and buoyant apparatus is considered a single survival craft for the purposes of § 180.130(c);
(3) Each life float and buoyant apparatus must be individually attached to the painter by a line meeting § 180.175(f)(3) (ii), (iii), and (iv) and long enough that each life float or buoyant apparatus can float without contacting any other life float or buoyant apparatus in the group; and
(4) The strength of the float-free link under paragraph (b)(2) of this section and the strength of the painter under § 180.175(f)(3)(ii) must be determined by the combined capacity of the group of life floats and buoyant apparatus.
46 CFR 180, § 180.137(e)
46 CFR 180, § 180.137(f) — Stowage of life floats and buoyant apparatus. What does it provide?
(f) Life floats and buoyant apparatus must not be stowed in tiers more than 1,220 millimeters (4 feet) high. When stowed in tiers, the separate units must be kept apart by spacers.
46 CFR 180, § 180.137(f)
46 CFR 180, § 180.150(a) — Survival craft embarkation arrangements. What does it provide?
(a) A launching appliance described in paragraph (c) of this section, or a marine evacuation system approved under approval series 160.175, must be provided for each inflatable liferaft and inflatable buoyant apparatus when either—
(1) The embarkation station for the survival craft is on a deck more than 4.5 meters (15 feet) above the waterline; or
(2) The inflatable liferaft and inflatable buoyant apparatus is boarded prior to being placed in the water.
46 CFR 180, § 180.150(a)
46 CFR 180, § 180.150(b) — Survival craft embarkation arrangements. What does it provide?
(b) An embarkation ladder, approved in accordance with § 160.017 in subchapter Q of this chapter, or other standard specified by the Commandant, must be at each embarkation station if the distance from the deck on which an embarkation station is located to the vessel's lightest operating waterline is more than 3,050 millimeters (10 feet).
46 CFR 180, § 180.150(b)
46 CFR 180, § 180.150(c) — Survival craft embarkation arrangements. What does it provide?
(c) Each launching appliance for a davit-launched liferaft must include an automatic disengaging apparatus approved under 46 CFR part 160, subpart 160.170 and be either—
(1) A davit approved under 46 CFR part 160, subpart 160.132 for use with a liferaft, with a winch approved under 46 CFR part 160, subpart 160.115 for use with a liferaft; or
(2) A launching appliance approved on or before November 10, 2011 under approval series 160.163.
46 CFR 180, § 180.150(c)
46 CFR 180, § 180.175(a) — Survival craft equipment. What does it provide?
(a) General. Each item of survival craft equipment must be of good quality, and efficient for the purpose it is intended to serve. Unless otherwise stated in this section, each item of equipment carried, whether required under this section or not, must be secured by lashings, stored in lockers, compartments, brackets, or have equivalent mounting or storage arrangements that do not:
(1) Reduce survival craft capacity;
(2) Reduce space available to the occupants;
(3) Interfere with launching, recovery, or rescue operations; or
(4) Adversely affect seaworthiness of the survival craft.
46 CFR 180, § 180.175(a)
46 CFR 180, § 180.175(b) — Survival craft equipment. What does it provide?
(b) Inflatable liferafts. Each inflatable liferaft must have one of the following equipment packs as shown by the markings on its container:
(1) Safety of Life at Sea (SOLAS) B Pack; or
(2) SOLAS A Pack.
46 CFR 180, § 180.175(b)
46 CFR 180, § 180.175(c) — Survival craft equipment. What does it provide?
(c) Inflatable buoyant apparatus. Each inflatable buoyant apparatus must be equipped in accordance with the manufacturer's approved servicing manual.
46 CFR 180, § 180.175(c)
46 CFR 180, § 180.175(d) — Survival craft equipment. What does it provide?
(d) Life floats. Each life float must be fitted with a lifeline, pendants, two paddles, a painter, and a light.
46 CFR 180, § 180.175(d)
46 CFR 180, § 180.175(e) — Survival craft equipment. What does it provide?
(e) Buoyant apparatus. Each buoyant apparatus must be fitted with a lifeline, pendants, a painter, and a light.
46 CFR 180, § 180.175(e)
46 CFR 180, § 180.175(f) — Survival craft equipment. What does it provide?
(f) Equipment specifications for life floats and buoyant apparatus. The equipment required for lifefloats and buoyant apparatus must meet the following specifications:
(1) Lifeline and pendants. The lifeline and pendants must be as furnished by the manufacturer with the approved life float or buoyant apparatus. Replacement lifelines and pendants must meet the requirements in Subpart 160.010 of this chapter.
(2) Paddle. Each paddle must be of at least 1,220 millimeters (4 feet) in length, lashed to the life float to which it belongs and buoyant.
(3) Painter. The painter must:
46 CFR 180, § 180.175(f)
46 CFR 180, § 180.175(i) — Survival craft equipment. What does it provide?
(i) Be of at least 30.5 meters (100 feet) in length, but not less than 3 times the distance between the deck where the life float or buoyant apparatus it serves is stowed and the lowest load waterline of the vessel;
(ii) Have a breaking strength of at least 680 kilograms (1,500 pounds), except that if the capacity of the life float or buoyant apparatus is 50 persons or more, the breaking strength must be at least 1,360 kilograms (3,000 pounds);
(iii) Be of a dark color if synthetic, or of a type certified to be resistant to deterioration from ultraviolet light; and
(iv) Be stowed in such a way that it runs out freely when the life float or buoyant apparatus floats away from a sinking vessel.
(4) Light. The light must be a floating waterlight approved under approval series 161.010 or other standard specified by the Commandant. The floating waterlight must be attached around the body of the life float or buoyant apparatus by a 10 mm (3/8 inch) lanyard, resistant to deterioration from ultraviolet light, and at least 5.5 meters (18 feet) in length.
(g) Other survival craft. If survival craft other than inflatable liferafts, life floats, inflatable buoyant apparatus, and buoyant apparatus are carried on the vessel, such as lifeboats or rigid liferafts, they must be installed, arranged, and equipped as required under subchapter H (Passenger Vessels) of this chapter for passenger vessels on the same route.
46 CFR 180, § 180.175(i)
46 CFR 180, § 180.200(a) — Survival craft—general. What does it provide?
(a) Each survival craft required on a vessel by this part must meet one of the following:
(1) For an inflatable liferaft—Approved under approval series 160.151 or other standard specified by the Commandant, with the applicable equipment pack, as determined by the cognizant OCMI. Each inflatable liferaft required on a vessel by this part must have a capacity of 6 persons or more. Inflatable liferafts may be substituted for inflatable buoyant apparatus or life floats required under this section;
(2) For a life float—Approved under approval series 160.027 or other standard specified by the Commandant. Buoyant apparatus may be used to meet requirements for life floats if the buoyant apparatus was installed on board the vessel on or before March 11, 1996, and if the buoyant apparatus remains in good and serviceable condition;
(3) For an inflatable buoyant apparatus—Approved under approval series 160.010 or other standard specified by the Commandant. Inflatable buoyant apparatus may be substituted for life floats required under this section.
(4) For a buoyant apparatus—Approved under approval series 160.010 or other standard specified by the Commandant. An existing buoyant apparatus may not be used to satisfy the requirements for life floats on existing vessels wishing to upgrade the total number of passengers carried on an oceans route.
46 CFR 180, § 180.200(a)
46 CFR 180, § 180.200(b) — Survival craft—general. What does it provide?
(b) If the vessel carries a small boat or boats, the capacity of these boats may be counted toward life float capacity required by this part. Such boats must meet the requirements for safe loading and flotation in 33 CFR part 183, and must meet the stowage, launching, and equipment requirements in this part for the survival craft they replace.
46 CFR 180, § 180.200(b)
46 CFR 180, § 180.200(c) — Survival craft—general. What does it provide?
(c) A summary of survival craft requirements is provided in Table 180.200(c).
| Route | Survival craft requirements |
|---|---|
| Oceans | (a) cold water 1—100% IBA—§ 180.202(a)(1). |
| (i) w/subdivision 2—100% LF—§ 180.202(a)(2). | |
| (b) warm water 3—67% IBA 4—§ 180.202(b). | |
| Coastwise | (a) wood vsls in cold water. |
| (i) 67% IBA—§ 180.204(a)(1). | |
| (ii) w/subdivision—100% LF—§ 180.204(a)(2). | |
| (b) nonwood and vsls operating in warm water. | |
| (i) 100% LF—§ 180.204 (b) and (c). | |
| (c) within three miles of shore. | |
| (i) w/o subdivision—100% LF—§ 180.204(d)(1). | |
| (ii) w/subdivision—50% LF—§ 180.204(d)(2). | |
| (iii) w/float free 406 MHz EPIRB—50% LF—§ 180.204(d)(3). | |
| Limited Coastwise (Not more than 20 miles from a harbor of safe refuge) | (a) wood vsls in cold water. (i) 67% IBA—§ 180.205(a)(1). (ii) w/subdivision—100% LF—§ 180.205(a)(2). |
| (b) nonwood vessels in cold water—100% LF—§ 180.205(b). | |
| (c) within three miles of shore—§ 180.205(d). | |
| (A) w/o subdivision—100% LF. | |
| (B) w/subdivision—50% LF. | |
| (C) w/float free 406 MHz EPIRB—50% LF. | |
| (d) vessels operating in warm water. | |
| (i) 50% LF—§ 180.205(c). | |
| (ii) within three miles of shore. | |
| (A) w/o subdivision—50% LF—§ 180.205(e)(1). | |
| (B) w/subdivision—NONE—§ 180.205(e)(2). | |
| (C) w/float free 406 MHz EPIRB—NONE— § 180.205(e)(3). | |
| Great Lakes | (a) same as Limited Coastwise (a) & (b)—§ 180.206(a). |
| (b) within one mile of shore—NONE 5—§ 180.206(b). | |
| Lakes, Bays, & Sounds 6 7 | (a) wood vsls in cold water. |
| (i) 100% LF—§ 180.207(a)(1). | |
| (ii) w/subdivision—50% LF—§ 180.207(a)(2). | |
| (b) nonwood—50% LF—§ 180.207(b). | |
| (c) within 1 mile of shore—NONE—§ 180.207(e). | |
| (d) warm water—NONE—§ 180.207(c). | |
| RIVERS 7 8 | (a) cold water. |
| (i) w/o subdivision—50% LF—§ 180.208(a)(1). | |
| (ii) w/subdivision—NONE—§ 180.208(a)(2). | |
| (iii) within one mile of shore—NONE—§ 180.208(d). | |
| (b) warm water—NONE—§ 180.208(b) | |
| Abbreviations used: | |
| ILR = Inflatable liferaft | |
| IBA = Inflatable Buoyant Apparatus | |
| LF = Life Float. As allowed by § 180.15(b) any buoyant apparatus in use on an existing vessel on March 11, 1996, may be used to meet the requirements for LF as long as the buoyant apparatus is in good and serviceable condition. | |
| Footnotes: | |
| 1 Cold water means the cognizant OCMI has determined the monthly mean low temperature of the water is ≤15 °C (59 °F). | |
| 2 Vessels ≤65 ft carrying ≤49 passengers built before March 11, 2001, may meet the collision bulkhead standards in § 179.310 and one-compartment subdivision subdivision standards in §§ 179.220 and 179.320 at least in way of the engine room and lazarette in lieu of the subdivision requirements contained in this part. | |
| 3 Warm water means the cognizant OCMI has determined the monthly mean low temperature of the water is >15 °C (59 °F). | |
| 4 Vessels operating in warm water may substitute 100% LF in lieu of 67% IBA—§ 180.202(d). | |
| 5 OCMI may reduce primary lifesaving for seasonal or ferry type operations on the Great Lakes—§ 180.206(b). | |
| 6 Shallow water exception—§ 180.207(e). | |
| 7 OCMI may reduce survival craft requirements based upon the route, communications schedule and participation in VTS—§ 180.207(f) and § 180.208(e) | |
| 8 Shallow water exception—§ 180.208(e)C. |
46 CFR 180, § 180.200(c)
46 CFR 180, § 180.202(a) — Survival craft—vessels operating on oceans routes. What does it provide?
(a) Each vessel certificated to operate on an oceans route in cold water must either:
(1) Be provided with inflatable buoyant apparatus of an aggregate capacity that will accommodate at least 100% of the total number of persons permitted on board; or
(2) Meet either the standards for collision bulkheads in § 179.310 in this chapter or § 171.085 in subchapter S of this chapter, and the standards for subdivision in §§ 179.220 and 179.320 of this chapter, or the standards for subdivision and damaged stability in §§ 171.070 through 171.073 and 171.080 in subchapter S of this chapter, as appropriate, and be provided with life floats of an aggregate capacity that will accommodate at least 100% of the total number of persons permitted on board.
46 CFR 180, § 180.202(a)
46 CFR 180, § 180.202(b) — Survival craft—vessels operating on oceans routes. What does it provide?
(b) Each vessel certificated to operate on an oceans route in warm water must either:
(1) Be provided with inflatable buoyant apparatus of an aggregate capacity that will accommodate at least 67% of the total number of persons permitted on board; or
(2) Be provided with life floats of an aggregate capacity that will accommodate at least 100% of the total number of persons permitted on board.
46 CFR 180, § 180.202(b)
46 CFR 180, § 180.204(a) — Survival craft—vessels operating on coastwise routes. What does it provide?
(a) Except as allowed by paragraph (c) of this section, each vessel constructed of wood certificated to operate on a coastwise route in cold water must either:
(1) Be provided with inflatable buoyant apparatus of an aggregate capacity that will accommodate at least 67% of the total number of persons permitted on board; or
(2) Meet either the standards for collision bulkheads in § 179.310 of this chapter or § 171.085 in subchapter S of this chapter and the standards for subdivision in §§ 179.220 and 179.320 of this chapter, or the standards for subdivision and damaged stability in §§ 171.070 through 171.073 and 171.080 in subchapter S of this chapter, as appropriate, and be provided with life floats of an aggregate capacity that will accommodate at least 100% of the total number of persons permitted on board.
46 CFR 180, § 180.204(a)
46 CFR 180, § 180.204(b) — Survival craft—vessels operating on coastwise routes. What does it provide?
(b) Each vessel constructed of a material other than wood certificated to operate on a coastwise route in cold water must be provided with life floats of an aggregate capacity that will accommodate at least 100% of the total number of persons permitted on board.
46 CFR 180, § 180.204(b)
46 CFR 180, § 180.204(c) — Survival craft—vessels operating on coastwise routes. What does it provide?
(c) Except as allowed by paragraph (d) of this section, each vessel certificated to operate on a coastwise route in warm water must be provided with life floats of an aggregate capacity that will accommodate at least 100% of the total number of persons permitted on board.
46 CFR 180, § 180.204(c)
46 CFR 180, § 180.204(d) — Survival craft—vessels operating on coastwise routes. What does it provide?
(d) Each vessel certificated to operate on a coastwise route within three miles of land must either:
(1) Be provided with life floats of an aggregate capacity that will accommodate at least 100% of the total number of persons permitted on board; or
(2) Meet either the standards for collision bulkheads in § 179.310 of this subchapter or § 171.085 in subchapter S of this chapter, and the standards for subdivision in §§ 179.220 and 179.320 of this chapter, or the standards for subdivision and damaged stability in §§ 171.070 through 171.073 and 171.080 in subchapter S of this chapter, as appropriate, and be provided with life floats of an aggregate capacity that will accommodate at least 50% of the total number of persons permitted on board.
(3) Have on board a FCC Type Accepted Category 1 406 MHz EPIRB, installed to automatically float free and activate, and be provided with life floats of an aggregate capacity that will accommodate at least 50% of the total number of persons permitted on board.
46 CFR 180, § 180.204(d)
46 CFR 180, § 180.205(a) — Survival craft—vessels operating on limited coastwise routes. What does it provide?
(a) Except as allowed by paragraph (d) of this section, each vessel constructed of wood certificated to operate on a limited coastwise route in cold water must either:
(1) Be provided with inflatable buoyant apparatus of an aggregate capacity that will accommodate at least 67% of the total number of persons permitted on board; or
(2) Meet either the standards for collision bulkheads in § 179.310 of this chapter or § 171.085 in subchapter S of this chapter, and the standards for subdivision in §§ 179.220 and 179.320 of this chapter, or the standards for subdivision and damaged stability in §§ 171.070 through 171.073 and 171.080 in subchapter S of this chapter, as appropriate, and be provided with life floats of an aggregate capacity that will accommodate at least 100% of the total number of persons permitted on board.
46 CFR 180, § 180.205(a)
46 CFR 180, § 180.205(b) — Survival craft—vessels operating on limited coastwise routes. What does it provide?
(b) Except as allowed by paragraph (d) of this section, each vessel constructed of a material other than wood certificated to operate on a limited coastwise route in cold water must be provided with life floats of an aggregate capacity that will accommodate at least 100% of the total number of persons permitted on board.
46 CFR 180, § 180.205(b)
46 CFR 180, § 180.205(c) — Survival craft—vessels operating on limited coastwise routes. What does it provide?
(c) Except as allowed by paragraph (e) of this section, each vessel certificated to operate on a limited coastwise route in warm water must be provided with life floats of an aggregate capacity that will accommodate at least 50% of the total number of persons permitted on board.
46 CFR 180, § 180.205(c)
46 CFR 180, § 180.205(d) — Survival craft—vessels operating on limited coastwise routes. What does it provide?
(d) Each vessel certificated to operate on a limited coastwise route within three miles of land in cold water must be provided with the survival craft required by § 180.204(d).
46 CFR 180, § 180.205(d)
46 CFR 180, § 180.205(e) — Survival craft—vessels operating on limited coastwise routes. What does it provide?
(e) Each vessel certificated to operate on a limited coastwise route within three miles of land in warm water must either:
(1) Be provided with life floats of an aggregate capacity that will accommodate at least 50% of the total number of persons permitted on board; or
(2) Meet either the standards for collision bulkheads in § 179.310 of this chapter or § 171.085 in subchapter S of this chapter, and the standards for subdivision in §§ 179.220 and 179.320 of this chapter, or the standards for subdivision and damaged stability in §§ 171.070 through 171.073 and 171.080 in subchapter S of this chapter, as appropriate, and not be required to carry survival craft; or
(3) Have on board a FCC Type Accepted Category 1 406 MHz EPIRB, installed to automatically float free and activate, and not be required to carry survival craft.
46 CFR 180, § 180.205(e)
46 CFR 180, § 180.206(a) — Survival craft—vessels operating on Great Lakes routes. What does it provide?
(a) Except as allowed by paragraph (b) of this section, each vessel certificated to operate on a Great Lakes route must be provided with the survival craft required by § 180.205 (a) through (e), as appropriate.
46 CFR 180, § 180.206(a)
46 CFR 180, § 180.206(b) — Survival craft—vessels operating on Great Lakes routes. What does it provide?
(b) Each vessel certificated to operate on a Great Lakes route within one mile of land is not required to carry survival craft if the OCMI determines that it is safe to do so, taking into consideration the vessel's scope of operation, hazards of the route, and availability of assistance.
46 CFR 180, § 180.206(b)
46 CFR 180, § 180.207(a) — Survival craft—vessels operating on lakes, bays, and sounds routes. What does it provide?
(a) Except as allowed by paragraphs (d), (e) and (f) of this section, each vessel constructed of wood certificated to operate on a lakes, bays, and sounds route in cold water must either:
(1) Be provided with life floats of an aggregate capacity that will accommodate at least 100% of the total number of persons permitted on board; or
(2) Meet either the standards for collision bulkheads in § 179.310 of this chapter or § 171.085 in subchapter S of this chapter, and the standards for subdivision in §§ 179.220 and 179.320 of this chapter, or the standards for subdivision and damaged stability in §§ 171.070 through 171.073 and 171.080 in subchapter S of this chapter, as appropriate, and be provided with life floats of an aggregate capacity that will accommodate at least 50% of the total number of persons permitted on board.
46 CFR 180, § 180.207(a)
46 CFR 180, § 180.207(b) — Survival craft—vessels operating on lakes, bays, and sounds routes. What does it provide?
(b) Except as allowed by paragraphs (e) and (f) of this section, each vessel constructed of a material other than wood certificated to operate on a lakes, bays, and sounds route in cold water must be provided with life floats of an aggregate capacity that will accommodate at least 50% of the total number of persons permitted on board.
46 CFR 180, § 180.207(b)
46 CFR 180, § 180.207(c) — Survival craft—vessels operating on lakes, bays, and sounds routes. What does it provide?
(c) A vessel certificated to operate on a lakes, bays, and sounds route in warm water is not required to carry survival craft.
46 CFR 180, § 180.207(c)
46 CFR 180, § 180.207(d) — Survival craft—vessels operating on lakes, bays, and sounds routes. What does it provide?
(d) A vessel certificated to operate on lakes, bays, and sounds route within one mile of land is not required to carry survival craft.
46 CFR 180, § 180.207(d)
46 CFR 180, § 180.207(e) — Survival craft—vessels operating on lakes, bays, and sounds routes. What does it provide?
(e) For a vessel certificated to operate on a lakes, bays, and sounds route in shallow water where the vessel cannot sink deep enough to submerge the topmost passenger deck or where survivors can wade ashore, the cognizant OCMI may waive a requirement for life floats, if the OCMI determines that it is safe to do so, taking into consideration the vessel's scope of operation, hazards of the route, and availability of assistance.
46 CFR 180, § 180.207(e)
46 CFR 180, § 180.207(f) — Survival craft—vessels operating on lakes, bays, and sounds routes. What does it provide?
(f) Each vessel operating with a set schedule on a specific route that does not take it more than 20 nautical miles from a harbor of safe refuge, and that maintains a 15 minute radio communications schedule with an operations base, or participates in a Vessel Traffic Service (VTS), may be granted a reduction in the survival craft requirements of this section if the cognizant OCMI is satisfied that a sufficient level of safety exists.
46 CFR 180, § 180.207(f)
46 CFR 180, § 180.208(a) — Survival craft—vessels operating on rivers routes. What does it provide?
(a) Except as allowed by paragraphs (c), (d) and (e) of this section, each vessel certificated to operate on a rivers route in cold water must either:
(1) Be provided with life floats of an aggregate capacity that will accommodate at least 50% of the total number of persons permitted on board; or
(2) Meet either the standards for collision bulkheads in § 179.310 of this chapter or § 171.085 in subchapter S of this chapter, and the standards for subdivision in §§ 179.220 and 179.320 of this chapter, or the standards for subdivision and damaged stability in §§ 171.070 through 171.073 and 171.080 in subchapter S of this chapter, as appropriate, and not be required to carry survival craft.
46 CFR 180, § 180.208(a)
46 CFR 180, § 180.208(b) — Survival craft—vessels operating on rivers routes. What does it provide?
(b) A vessel certificated to operate on a rivers route in warm water is not required to carry survival craft.
46 CFR 180, § 180.208(b)
46 CFR 180, § 180.208(c) — Survival craft—vessels operating on rivers routes. What does it provide?
(c) A vessel certificated to operate on a rivers route within one mile of land is not required to carry survival craft.
46 CFR 180, § 180.208(c)
46 CFR 180, § 180.208(d) — Survival craft—vessels operating on rivers routes. What does it provide?
(d) For a vessel certificated to operate on a rivers route in shallow water where the vessel cannot sink deep enough to submerge the topmost passenger deck or where survivors can wade ashore, the cognizant OCMI may waive a requirement for life floats, if the OCMI determines that it is safe to do so, taking into consideration the vessel's scope of operation, hazards of the route, and availability of assistance.
46 CFR 180, § 180.208(d)
46 CFR 180, § 180.208(e) — Survival craft—vessels operating on rivers routes. What does it provide?
(e) Each vessel operating with a set schedule on a specific route that maintains a 15 minute radio communications schedule with an operations base, or participates in a Vessel Traffic Service (VTS), may be granted a reduction in the survival craft requirement of this section if the cognizant OCMI is satisfied that a sufficient level of safety exists.
46 CFR 180, § 180.208(e)
46 CFR 180, § 180.210(a) — Rescue boats. What does it provide?
(a) A vessel of more than 19.8 meters (65 feet) in length must carry at least one rescue boat unless the cognizant OCMI determines that:
(1) The vessel is sufficiently maneuverable, arranged, and equipped to allow the crew to recover a helpless person from the water;
(2) Recovery of a helpless person can be observed from the operating station; and
(3) The vessel does not regularly engage in operations that restrict its maneuverability.
46 CFR 180, § 180.210(a)
46 CFR 180, § 180.210(b) — Rescue boats. What does it provide?
(b) A vessel of not more than 19.8 meters (65 feet) in length is not required to carry a rescue boat unless:
(1) The vessel carries passengers on an open or partially enclosed deck; and
(2) The cognizant OCMI determines that the vessel is designed, arranged, or involved in operations so that the vessel itself cannot serve as an adequate rescue craft.
46 CFR 180, § 180.210(b)
46 CFR 180, § 180.210(c) — Rescue boats. What does it provide?
(c) In general, a rescue boat must be a small, lightweight boat with built-in buoyancy and capable of being readily launched and easily maneuvered. In addition, it must be of adequate proportion to permit taking an unconscious person on board without capsizing.
46 CFR 180, § 180.210(c)
46 CFR 180, § 180.210(d) — Rescue boats. What does it provide?
(d) On a vessel of more than 19.8 meters (65 feet) in length operating on protected waters, a rescue boat approved under approval series 160.056 is acceptable in meeting the intent of this section. On a vessel of more than 19.8 meters operating on exposed or partially protected waters, a rescue boat approved under approval series 160.156 is acceptable in meeting the intent of this section. On a vessel of not more than 19.8 meters (65 feet) in length, a required rescue boat must be acceptable to the cognizant OCMI.
46 CFR 180, § 180.210(d)
46 CFR 185, § 185.602(a) — Hull markings. What does it provide?
(a) Each vessel must be marked as required by part 67, subpart I, of this chapter.
46 CFR 185, § 185.602(a)
46 CFR 185, § 185.602(b) — Hull markings. What does it provide?
(b) Paragraphs (c) through (g) of this section apply to each vessel that does not demonstrate compliance in accordance with § 178.310(c) of this chapter.
46 CFR 185, § 185.602(b)
46 CFR 185, § 185.602(c) — Hull markings. What does it provide?
(c) Each vessel must—
(1) Have permanent draft marks at each end of the vessel; or
(2) Have permanent loading marks placed on each side of the vessel forward and aft to indicate the maximum allowable trim and amidships to indicate the maximum allowable draft.
46 CFR 185, § 185.602(c)
46 CFR 185, § 185.602(d) — Hull markings. What does it provide?
(d) A loading mark required by paragraph (c)(2) of this section must be a horizontal line of at least 205 millimeters (8 inches) in length and 25 millimeters (1 inch) in height, with its upper edge passing through the point of maximum draft. The loading mark must be painted in a contrasting color to the sideshell paint.
46 CFR 185, § 185.602(d)
46 CFR 185, § 185.602(e) — Hull markings. What does it provide?
(e) On a vessel that has a load line, the amidships marks required by paragraph (c)(2) of this section must be those required by the International Convention on Load Lines, 1966.
46 CFR 185, § 185.602(e)
46 CFR 185, § 185.602(f) — Hull markings. What does it provide?
(f) In cases where draft marks are obscured due to operational constraints or by protrusions, the vessel must be fitted with a reliable draft indicating system from which the bow and stern drafts can be determined.
46 CFR 185, § 185.602(f)
46 CFR 185, § 185.602(g) — Hull markings. What does it provide?
(g) On a vessel on which the number of passengers permitted on upper decks is limited by stability criteria, as indicated by the vessel's stability letter, the maximum number of passengers allowed on an upper deck must be indicated by a durable marking of at least 25 millimeters (1 inch) numbers and letters at the entranceway to that deck.
46 CFR 185, § 185.602(g)
46 CFR 185, § 185.604(a) — Lifesaving equipment markings. What does it provide?
(a) The name of a vessel must be marked or painted in clearly legible letters and numbers:
(1) On each side of the bow of each rescue boat; and
(2) On each life float and buoyant apparatus.
46 CFR 185, § 185.604(a)
46 CFR 185, § 185.604(b) — Lifesaving equipment markings. What does it provide?
(b) Each life jacket, immersion suit, and ring life buoy must be marked in clearly legible block capital letters with the vessel's name. The marking is not required on a life jacket carried to meet a temporary need for additional life jackets, if the life jacket has the name of another vessel or company marked on it. For an immersion suit, the name of the person to whom the immersion suit is assigned is an acceptable alternative to the name of the vessel.
46 CFR 185, § 185.604(b)
46 CFR 185, § 185.604(c) — Lifesaving equipment markings. What does it provide?
(c) The name of the vessel must be marked or painted in clearly legible letters on each Emergency Position Indicating Radiobeacon (EPIRB), except on an EPIRB in an inflatable liferaft.
46 CFR 185, § 185.604(c)
46 CFR 185, § 185.604(d) — Lifesaving equipment markings. What does it provide?
(d) The number of persons capacity must be marked or painted in clearly legible letters and numbers on each side of the bow of each rescue boat.
46 CFR 185, § 185.604(d)
46 CFR 185, § 185.604(e) — Lifesaving equipment markings. What does it provide?
(e) The number of persons capacity must be marked or painted in clearly legible letters and numbers on each life float and buoyant apparatus. This number must:
(1) Be the number of persons the device is equipped for; and
(2) Not be greater than the number of persons the device is approved for as shown on its nameplate.
46 CFR 185, § 185.604(e)
46 CFR 185, § 185.604(f) — Lifesaving equipment markings. What does it provide?
(f) The number and identification of the items stowed inside, and their sizes, must be marked in clearly legible letters and numbers on each container for life jackets and immersion suits. Identification of the items may be in words, or the appropriate symbols in IMO Resolution A.760(18) (incorporated by reference; see 46 CFR 175.600). Letters and numbers must be at least 50 millimeters (2 inches) high. Symbols must be at least 100 mm (4 inches) square.
46 CFR 185, § 185.604(f)
46 CFR 185, § 185.604(g) — Lifesaving equipment markings. What does it provide?
(g) The name of the vessel must be marked or painted in clearly legible letters on each life float paddle.
46 CFR 185, § 185.604(g)
46 CFR 185, § 185.604(h) — Lifesaving equipment markings. What does it provide?
(h) Each life jacket must be marked with Type I retroreflective material approved in 46 CFR 164.018 or other standard specified by the Commandant. The arrangement of the retroreflective material applied after March 11, 1996, must be as specified by IMO Resolution A.658(16) (incorporated by reference; see 46 CFR 175.600).
(i) Each rescue boat and ring life buoy must be marked with Type II retroreflective material approved in accordance with 46 CFR 164.018 or other standard specified by the Commandant. The arrangement of the retroreflective material applied after March 11, 1996, must be as specified by IMO Resolution A.658(16).
46 CFR 185, § 185.604(h)
46 CFR 185, § 185.614 — Portable watertight containers for distress flares and smoke signals. What does it provide?
Portable watertight containers for distress flares and smoke signals shall be of a bright color, and containers shall be clearly marked in legible contrasting letters at least 12.7 millimeters (0.5 inches) high: “DISTRESS SIGNALS”.
46 CFR 185, § 185.614
46 CFR 185, § 185.700(a) — Operational readiness. What does it provide?
(a) Each launching appliance and each survival craft and rescue boat on a vessel must be in good working order and ready for immediate use before the vessel leaves port and at all times when the vessel is underway.
46 CFR 185, § 185.700(a)
46 CFR 185, § 185.700(b) — Operational readiness. What does it provide?
(b) Each deck where survival craft or rescue boats are stowed or boarded must be kept clear of obstructions that would interfere with the boarding and launching of the survival craft or rescue boat.
46 CFR 185, § 185.700(b)
46 CFR 185, § 185.702(a) — Maintenance. What does it provide?
(a) The manufacturer's instructions for onboard maintenance of survival craft, rescue boats, and launching appliances, manufactured on or after March 11, 1996, must be onboard a vessel of more than 19.8 meters (65 feet) in length and readily available for a vessel of not more than 19.8 meters (65 feet) in length. The instructions must also be readily available at each inspection for certification and reinspection.
46 CFR 185, § 185.702(a)
46 CFR 185, § 185.702(b) — Maintenance. What does it provide?
(b) The owner or managing operator shall make sure that maintenance is carried out in accordance with the instructions required under paragraph (a) of this section.
46 CFR 185, § 185.702(b)
46 CFR 185, § 185.702(c) — Maintenance. What does it provide?
(c) The cognizant OCMI may accept, instead of the instructions required under paragraph (a) of this section, a shipboard planned maintenance program that includes the items listed in that paragraph.
46 CFR 185, § 185.702(c)
46 CFR 185, § 185.702(d) — Maintenance. What does it provide?
(d) The inspection and maintenance of the equipment listed in paragraph (a) of this section shall be logged or otherwise documented for review by the Coast Guard upon request.
46 CFR 185, § 185.702(d)
46 CFR 185, § 185.704(a) — Maintenance of falls. What does it provide?
(a) Each fall used in a launching appliance on a vessel must be turned end for end at intervals of not more than 30 months.
46 CFR 185, § 185.704(a)
46 CFR 185, § 185.704(b) — Maintenance of falls. What does it provide?
(b) Each fall must be renewed when necessary due to deterioration or at intervals of not more than 5 years, whichever is earlier.
46 CFR 185, § 185.704(b)
46 CFR 185, § 185.704(c) — Maintenance of falls. What does it provide?
(c) Each fall must have a corrosion resistant tag with the following permanently marked on it:
(1) The date the new fall was installed; and
(2) If the fall has been turned end for end, the date it was turned.
46 CFR 185, § 185.704(c)
46 CFR 185, § 185.720 — Weekly maintenance and inspections. What does it provide?
The following tests and inspections must be carried out weekly on a vessel:
46 CFR 185, § 185.720
46 CFR 185, § 185.720(a) — Weekly maintenance and inspections. What does it provide?
(a) Each survival craft, rescue boat, and launching appliance must be visually inspected to ensure its readiness for use;
46 CFR 185, § 185.720(a)
46 CFR 185, § 185.720(b) — Weekly maintenance and inspections. What does it provide?
(b) Each rescue boat engine must be run ahead and astern for not less than 3 minutes, unless the ambient temperature is below the minimum temperature required for starting the engine; and
46 CFR 185, § 185.720(b)
46 CFR 185, § 185.720(c) — Weekly maintenance and inspections. What does it provide?
(c) Each battery for rescue boat engine starting must be brought up to full charge at least once each week if:
(1) The battery is of a type that requires recharging; and
(2) The battery is not connected to a device that keeps it continuously charged.
46 CFR 185, § 185.720(c)
46 CFR 185, § 185.722 — Monthly inspections. What does it provide?
Each survival craft, rescue boat, and launching appliance on a vessel must be inspected monthly, using the manufacturer's instructions to make sure it is complete and in good order.
46 CFR 185, § 185.722
46 CFR 185, § 185.724(a) — Quarterly inspections. What does it provide?
(a) Each winch control apparatus of a launching appliance on a vessel, including motor controllers, emergency switches, master switches, and limit switches, must be examined once in each 3 months.
46 CFR 185, § 185.724(a)
46 CFR 185, § 185.724(b) — Quarterly inspections. What does it provide?
(b) The examination required by paragraph (a) of this section must include the removal of drain plugs and the opening of drain valves to make sure that enclosures are free of water.
46 CFR 185, § 185.724(b)
46 CFR 185, § 185.726(a) — Annual inspections. What does it provide?
(a) Each rescue boat must be stripped, cleaned, and thoroughly inspected, and any necessary repairs made at least once each year, including emptying and cleaning of each fuel tank, and refilling it with fresh fuel.
46 CFR 185, § 185.726(a)
46 CFR 185, § 185.726(b) — Annual inspections. What does it provide?
(b) Each davit, winch, fall and other launching appliance must be thoroughly inspected, and any necessary repairs made, at least once each year.
46 CFR 185, § 185.726(b)
46 CFR 185, § 185.726(c) — Annual inspections. What does it provide?
(c) Each item of lifesaving equipment with an expiration date must be replaced during the annual inspection and repair if the expiration date has passed.
46 CFR 185, § 185.726(c)
46 CFR 185, § 185.726(d) — Annual inspections. What does it provide?
(d) Each battery used in an item of lifesaving equipment, except inflatable survival craft equipment, must be replaced during the annual inspection if the expiration date of the battery has passed. The expiration date of the battery may be marked on the battery or the owner or managing operator may have a record of the expiration date from the manufacturer of a battery marked with a serial number.
46 CFR 185, § 185.726(d)
46 CFR 185, § 185.726(e) — Annual inspections. What does it provide?
(e) Except for a storage battery used in a rescue boat, each battery without an expiration date indicated on it or for which the owner or managing operator does not have a record of the expiration date, used in an item of lifesaving equipment, must be replaced during the annual inspection.
46 CFR 185, § 185.726(e)
46 CFR 185, § 185.728 — Testing and servicing of Emergency Position Indicating Radiobeacons (EPIRB). What does it provide?
The master of the vessel shall ensure that:
46 CFR 185, § 185.728
46 CFR 185, § 185.728(a) — Testing and servicing of Emergency Position Indicating Radiobeacons (EPIRB). What does it provide?
(a) Each EPIRB, other than an EPIRB in an inflatable liferaft, must be tested monthly, using the integrated test circuit and output indicator, to determine that it is operative;
46 CFR 185, § 185.728(a)
46 CFR 185, § 185.728(b) — Testing and servicing of Emergency Position Indicating Radiobeacons (EPIRB). What does it provide?
(b) The EPIRB's battery is replaced after it is used, or before the date required by FCC regulations in 47 CFR part 80, whichever comes sooner; and
46 CFR 185, § 185.728(b)
46 CFR 185, § 185.728(c) — Testing and servicing of Emergency Position Indicating Radiobeacons (EPIRB). What does it provide?
(c) The EPIRB test required by paragraph (a) shall be logged or otherwise documented, as applicable.
46 CFR 185, § 185.728(c)
46 CFR 185, § 185.730(a) — Servicing of inflatable liferafts, inflatable buoyant apparatus, inflatable life jackets, and inflated rescue boats. What does it provide?
(a) An inflatable liferaft or inflatable buoyant apparatus must be serviced at a facility specifically approved by the Commandant for the particular brand, and in accordance with servicing procedures meeting the requirements of part 160, subpart 160.151, of this chapter—
(1) No later than the month and year on its servicing sticker affixed under 46 CFR 160.151-57(n), except that servicing may be delayed until the next scheduled inspection of the vessel, provided that the delay does not exceed 5 months; and
(2) Whenever the container is damaged or the container straps or seals are broken.
46 CFR 185, § 185.730(a)
46 CFR 185, § 185.730(b) — Servicing of inflatable liferafts, inflatable buoyant apparatus, inflatable life jackets, and inflated rescue boats. What does it provide?
(b) Each inflatable lifejacket and hybrid inflatable lifejacket or work vest must be serviced:
(1) Within 12 months of its initial packing; and
(2) Within 12 months of each subsequent servicing, except that servicing may be delayed until the next scheduled inspection of the vessel, provided that the delay does not exceed 5 months.
46 CFR 185, § 185.730(b)
46 CFR 185, § 185.730(c) — Servicing of inflatable liferafts, inflatable buoyant apparatus, inflatable life jackets, and inflated rescue boats. What does it provide?
(c) Each inflatable life jacket must be serviced in accordance with the servicing procedure under § 160.176 in subchapter Q of this chapter, or other standard specified by the Commandant.
46 CFR 185, § 185.730(c)
46 CFR 185, § 185.730(d) — Servicing of inflatable liferafts, inflatable buoyant apparatus, inflatable life jackets, and inflated rescue boats. What does it provide?
(d) Each hybrid inflatable life jacket or work vest must be serviced in accordance with the servicing procedure under § 160.077 in subchapter Q of this chapter, or other standard specified by the Commandant.
46 CFR 185, § 185.730(d)
46 CFR 185, § 185.730(e) — Servicing of inflatable liferafts, inflatable buoyant apparatus, inflatable life jackets, and inflated rescue boats. What does it provide?
(e) Repair and maintenance of inflated rescue boats must be in accordance with the manufacturer's instructions. All repairs must be made at a servicing facility approved by the Commandant, except for emergency repairs carried out on board the vessel.
46 CFR 185, § 185.730(e)
46 CFR 185, § 185.740(a) — Periodic servicing of hydrostatic release units. What does it provide?
(a) Each hydrostatic release unit, other than a disposable unit, must be serviced:
(1) Within 12 months of its manufacture and within 12 months of each subsequent servicing, except when servicing is delayed until the next scheduled inspection of the vessel, provided that the delay does not exceed 5 months; and
(2) In accordance with the repair and testing procedures under § 160.062 in subchapter Q of this chapter, or other standard specified by the Commandant.
46 CFR 185, § 185.740(a)
46 CFR 185, § 185.740(b) — Periodic servicing of hydrostatic release units. What does it provide?
(b) Each disposable hydrostatic release unit must be marked with an expiration date of two years after the date on which the unit is installed.
46 CFR 185, § 185.740(b)
The Will to Survive — what does the handbook teach? (COMDTINST 16114.2A, ch. 2, A.1)
Based on interviews with a number of sea survivors, twelve characteristics were identified to help in understanding the will to survive. They are: (01) Courage (07) Purpose (02) Determination (08) Attentiveness (03) Cheerfulness (09) Confidence (04) Positiveness (10) Productiveness (05) Flexibility (11) Persistence (06) Willingness (12) Certainty
COMDTINST 16114.2A, ch. 2, A.1
Courage — what does the handbook teach? (COMDTINST 16114.2A, ch. 2, A.1.a)
Courage is the state or quality of mind or spirit that enables you to face danger or fear with self-possession, confidence, and resolution. Courage enables us to overcome these fears that can overcome us in a survival situation. Each time we encounter danger or fear and overcome it, we strengthen our courage. It is important to realize the difference between fear and panic. Fear has a purpose. It is the mind’s tool to pool all available resources. Panic on the other hand, is an unreasonable, overwhelming, and uncontrollable fear that can be one’s worst enemy in a survival situation.
COMDTINST 16114.2A, ch. 2, A.1.a
Determination — what does the handbook teach? (COMDTINST 16114.2A, ch. 2, A.1.b)
Stories about those who did not survive are usually founded on the idea that the would-be survivor did not realize they had it in them to carry on just a little further. Physically, the human body will rise to the occasion and call upon itself when needed. Many survival case histories show determination alone was the only factor in the successful return of the survivor. Determination in thinking leads to quick, decisive action as you may have to act quickly. This excerpt to one survivor’s story is evidence of determination:
The shore was about 50 yards away, but I experienced extreme difficulty in swimming due to the incoming tide. Several times, I had to turn on my back and try to float and propel myself with only my feet. It was only with extreme effort that I was able to make the shore. Upon reaching it, I was completely exhausted and in a state of partial shock, but forced myself to go on.
COMDTINST 16114.2A, ch. 2, A.1.b
Cheerfulness — what does the handbook teach? (COMDTINST 16114.2A, ch. 2, A.1.c)
A strong sense of humor is instrumental in influencing the outcome of any survival situation. The ability to use humor and stay cheerful in a stressful situation will help the survivor withstand the anxieties and apprehensiveness of the situation.
COMDTINST 16114.2A, ch. 2, A.1.c
Being Positive — what does the handbook teach? (COMDTINST 16114.2A, ch. 2, A.1.d)
Being positive helps the survivor make the best of the situation. Thoughts of failure will hinder the survivor’s ability to make sound and clear decisions. Self- fulfilling prophecies are usually manifested from negative thoughts and attitudes. Failure is inevitable when one believes there is no hope in sight. Self- discipline, adaptability, and tolerance all play parts in being positive in a survival scenario.
COMDTINST 16114.2A, ch. 2, A.1.d
Flexibility — what does the handbook teach? (COMDTINST 16114.2A, ch. 2, A.1.e)
Athletes base their performance on being flexible as part of their overall fitness. Coast Guard personnel also maintain high levels of fitness to perform their duties. Flexibility is also a mental process. Being mentally flexible means having an open mind and the ability to act in a unique, creative and imaginative manner.
COMDTINST 16114.2A, ch. 2, A.1.e
Willingness — what does the handbook teach? (COMDTINST 16114.2A, ch. 2, A.1.f)
Many studies suggest we avoid psychological pain and discomfort to a greater extent than we do physical pain. In most cases, freedom from mental stress is more important than those that are physical. Willingness is the ability to make decisions and a readiness to act even when the situation seems hopeless.
COMDTINST 16114.2A, ch. 2, A.1.f
Purpose — what does the handbook teach? (COMDTINST 16114.2A, ch. 2, A.1.g)
Setting realistic goals (both near-term and long-term) and achieving them drives our sense of purpose. In a survival scenario, goal setting has a high survival value. Goal setting is a motivator, and as such, generates a will to live.
COMDTINST 16114.2A, ch. 2, A.1.g
Attentiveness — what does the handbook teach? (COMDTINST 16114.2A, ch. 2, A.1.h)
One of the most dangerous aspects of Coast Guard life is being unprepared. Mental preparedness, whether it be for jogging around a track, executing a patrol mission, or finding oneself in an open water survival situation is absolutely key to efficient planning and effective mental attitude.
COMDTINST 16114.2A, ch. 2, A.1.h
Confidence — what does the handbook teach? (COMDTINST 16114.2A, ch. 2, A.1.i)
Being properly trained is key in preparing for any situation. The skills and knowledge we obtain from training yields one important side-effect: confidence. Confidence can only be built through repetition and experience.
COMDTINST 16114.2A, ch. 2, A.1.i
Productiveness — what does the handbook teach? (COMDTINST 16114.2A, ch. 2, A.1.j)
Keeping busy can also increase the chance of survival. Humans are social creatures, and teamed with loneliness and boredom can undermine the productive nature that is extremely important in a survival situation. Keeping the mind and body active will help to concentrate on the act of survival.
COMDTINST 16114.2A, ch. 2, A.1.j
Persistence — what does the handbook teach? (COMDTINST 16114.2A, ch. 2, A.1.k)
The will to survive is fundamentally based on persistence. Emotionally, the survivor needs to stay active in spite of the situation. Concentrate on those items left behind. Family, friends, and personal goals will once again be met and achieved.
COMDTINST 16114.2A, ch. 2, A.1.k
Certainty — what does the handbook teach? (COMDTINST 16114.2A, ch. 2, A.1.l)
The will to survive is inevitably dependent on the survivor’s ability to remain certain that they will once again return to family, friends and co-workers. Those who have survived in the past have not depended on luck or magic, they have depended on the mental skills presented above and on the equipment and procedures presented in the chapters that follow.
COMDTINST 16114.2A, ch. 2, A.1.l
Human Elements — what does the handbook teach? (COMDTINST 16114.2A, ch. 2, A.2)
Human Factors play an important role in survival situations. This Section provides detail on such areas of Human Factors as: (01) Strength and Endurance, (02) Skill Level, (03) Intelligence, (04) Age and Gender.
COMDTINST 16114.2A, ch. 2, A.2
Strength and Endurance — what does the handbook teach? (COMDTINST 16114.2A, ch. 2, A.2.a)
Physical fitness standards are required to ensure crew members have sufficient strength and endurance to safely perform duties during normal and adverse conditions. These standards will also have a positive impact if a crew member is exposed to cold, wet environments. The combination of rough seas, cold temperatures and wet conditions can quickly cause the crew to become less effective. Physical fitness increases the ability to maintain a higher degree of thermoregulation between the skin and vital organs. However, high levels of body fat can increase the potential for survival in cold, wet environments. Increased body fat acts similar to extra layers of clothing in that it adds more protection to vital organs. If the crew member is able to get out of the water and onto the overturned hull, a life raft, or some other floatation device, survival will be highly dependent on the air temperature and wind velocity as well as their ability to sustain shivering. However, this state will decrease the rate of heat loss considerably due to the conductivity of air being less than that of water.
COMDTINST 16114.2A, ch. 2, A.2.a
Skill Levels — what does the handbook teach? (COMDTINST 16114.2A, ch. 2, A.2.b)
All tasks require a certain skill level. The required skill level is a function of the situational demands and the experience of the operator. Exposure to a cold, wet environment also has an effect on a person’s skill level. As core temp
erature decreases to 93°F (34°C), cognitive and motor functions become
impaired. Skilled performance can be categorized into three levels: Knowledge-based level, Rule-based level, and Skill-based level. (01) Knowledge-based level behavior is evoked when entirely new, unstructured, or complex problems are encountered. At this level, the individual uses meaningful concepts or physical properties to make decisions. Decision-making involves the identification of options or alternatives, assessing their relative attractiveness, assessing the likelihood of being realized, and integration of considerations to identify what appears to be the best option. Knowledge-based level behavior is the first level of behavior that is affected by exposure to cold, wet environments. (02) At the Rule-based level an action is selected by activating in working memory a hierarchy of rules. Such rules may have been derived empirically during previous occasions, by instruction or by conscious problem solving and planning. Information from the environment is used to select or modify these rules. Rule-based level behavior is the second level of behavior that is affected by exposure to cold, wet environments. (03) Skill-based level is when highly automated sensory-motor and cognitive performances and takes place without conscious control. This level of behavior is the final level to be affected by exposure to cold, wet environments.
COMDTINST 16114.2A, ch. 2, A.2.b
Intelligence — what does the handbook teach? (COMDTINST 16114.2A, ch. 2, A.2.c)
Memory capacity plays an important role in open water survival situations. The rate at which we process cognitively (mental storage, retrieval, and manipulation) is not only a function of general intelligence but of individual aptitude as well. The better a survivor learns and acquires new information, the higher the probability of rescue.
COMDTINST 16114.2A, ch. 2, A.2.c
Age and Gender — what does the handbook teach? (COMDTINST 16114.2A, ch. 2, A.2.d)
Aging is widely thought to compromise body temperature defense during cold exposure. Controlled laboratory comparisons show that older men may be less able than younger men to defend core temperature during cold exposures. Heat production due to shivering may also be less in older than younger men due to the reduction of muscle mass. These aging effects begin to be apparent after about 45 years of age in men. Older women defend core temperature during cold exposure as well as, or better than younger women; this is due to body composition changes attributable to aging. Older women tend to have more body fat than younger women, which accounts for impaired, as well as improved, thermoregulatory responses to cold environments. Gender related differences in body size, body shape and composition contribute to a difference in cold tolerance between men and women, which is particularly apparent in cold water. Most women have greater body-fat content than men of comparable age. A thicker subcutaneous fat layer accounts for greater maximal tissue insulation and lower critical water temperature. Despite this difference, however, greater body-fat content may not provide women with a thermoregulatory advantage over men. When women and men of equivalent subcutaneous fat thickness are compared, the women have a greater surface area and smaller total body mass. Although insulation is equivalent, women’s total heat loss is greater due to the larger surface area. Because of their smaller body mass, body heat content is less in the women. Therefore body temperature falls more rapidly for any given thermal gradient and metabolic rate. Comparison of men and women with equivalent total body masses shows that women still seem to be at a disadvantage in the cold. In this case, women’s greater body-fat content enhances insulation, and surface area differences between genders are not as pronounced. Nevertheless, a smaller lean body mass limits a women’s capacity for heat production, compared to men of comparable total body mass. However, under colder conditions that stimulate shivering the limited thermogenic capacity of women will result in a more rapid decline in their core temperature than in men of equivalent total body mass.
COMDTINST 16114.2A, ch. 2, A.2.d
Sea State — what does the handbook teach? (COMDTINST 16114.2A, ch. 2, B.1)
Sea states can range from calm and mirror-like to driving sea spray with exceptionally high waves. Survivability depends not only on the sea state the survivor deals with, but with the sea state the rescue vessel must bear.
COMDTINST 16114.2A, ch. 2, B.1
Effects of Wind and Waves — what does the handbook teach? (COMDTINST 16114.2A, ch. 2, B.1.a)
There are several forces that create waves at sea, the most significant of which is wind. The factors which determine the characteristics of wind waves are: wind speed, wind duration, and fetch (the distance over open water which the wind has blown). As the wind begins to blow, it creates seas, which are typically steep, choppy, and have little pattern. As the wind continues, the seas begin to become more defined. In heavy weather, observing and measuring waves is important; if you can get a general sense of the waves in which you are operating, it will allow you and your crew to operate accordingly. Strong winds usually have the same effects as strong currents on wave behavior, but because of the infinite variables of wind speed, direction, and interaction with currents, it is often difficult to predict what effect the wind will have on waves. The survivor must be more vigilant during high sea states and be ready to signal rescuers at a moment’s notice. High seas contribute to severe motion sickness; feelings of frustration and water aspiration are major concerns.
NOTE
The sea anchor, supplied with life rafts provides the most stability in any wave pattern. To ensure proper positioning of the sea anchor, the sea anchor should rest in the trough of the wave as the bow of the craft is at the crest of the wave.
COMDTINST 16114.2A, ch. 2, B.1.a
Water Temperature — what does the handbook teach? (COMDTINST 16114.2A, ch. 2, B.2)
Like sea state, water temperature has a significant impact on chances of survival.
COMDTINST 16114.2A, ch. 2, B.2
Hypothermia — what does the handbook teach? (COMDTINST 16114.2A, ch. 2, B.2.a)
One of the greatest dangers in open water survival is hypothermia. When the human body is submerged in water, heat is lost approximately 26 times faster than it is on dry land. Hypothermia is described in the First Aid Handbook.
COMDTINST 16114.2A, ch. 2, B.2.a
Application — what does the handbook teach? (COMDTINST 16114.2A, ch. 2, B.2.b)
Regardless of the type, all clothing will prevent the skin from reaching the temperature of water. Cooling rates will vary depending upon the type of protection, whether wet or dry suits. Clothing provides extra thickness between the skin and water or wind. Since heat is generally conducted away from the body by the movement of water, adding extra layers keeps the skin further away from the moving water thus reducing heat loss to varying extents. Dry suits increase protection and decrease cooling rates in both rough and calm water. Dry suits are the most effective form of protection in both rough and calm water. However, the barrier must be maintained between the water and skin for the suit to remain effective. Cooling rates are slightly higher in rough water, though this is often linked to increased heart rate and exertion in an attempt to stay afloat. If water does penetrate a dry suit, they are not rendered useless; however, the effectiveness of the suit decreases and cooling rates may increase, especially if there is water exchange. A downside is that cold water causes diuresis, or increased urinary output. It is important to remember that dry suits provide protection only to an extent and in all cases, with the exception of heated suits, will eventually lead to heat loss with the potential for hypothermic problems. Regardless of the suit worn, individuals should egress from the water as quickly as possible. A life raft or other floatation device should be used if available. Survival time will increase significantly once out of the water.
COMDTINST 16114.2A, ch. 2, B.2.b
Symptoms of Lowered Body Core Temperatures — what does the handbook teach? (COMDTINST 16114.2A, ch. 2, B.2.c)
The body goes through noticeable symptoms when exposed to cold water as indicated in Table 3-2 Core Body Temperature.
| °F | °C | Symptoms |
| 98.6 to 96 | 37 | (01) Cold sensations (02) Skin vasoconstriction (03) Increased muscle tension (04) Increased oxygen consumption |
| 97 | 36 | (05) Sporadic shivering suppressed by voluntary movements (06) Gross shivering spells (07) Further increase in oxygen consumption (08) Uncontrollable shivering |
| 95 (Note 1) | 35 | (09) Mental confusion (10) Impairment of rational thought (11) Drowning possible (12) Decreased will to survive |
| 93 | 34 | (13) Loss of memory – speech impaired (14) Sensory function impaired (15) Motor performance impaired |
| 91 (Note 2) | 33 | (16) Hallucinations, delusions, clouding consciousness (17) Shivering stops |
| 90 | 32 | (18) Heart rhythm irregularities (19) Motor performance grossly impaired |
| 88 | 31 | (20) Shivering stopped |
| 86 | 30 | (21) Loss of consciousness (22) No response to pain |
| 80 | 27 | (23) Death |
| Note 1: Voluntary tolerance limit in laboratory experiments. | ||
| Note 2: 50% of those in survival situations do not survive at this body core temperature. |
Table 3-2 — Core Body Temperature
COMDTINST 16114.2A, ch. 2, B.2.c
Predicted Survival Time — what does the handbook teach? (COMDTINST 16114.2A, ch. 2, B.2.d)
Being prepared at the onset of a survival situation can help minimize heat loss. Table 3-3 below shows the predicted survival times of the average person in 50° Fahrenheit water for various situations. Contrary to popular belief, the survivor should not swim around in efforts to keep warm. This will only increase the rate of heat loss and speed the onset of hypothermia.
| Survival Floating | 1.5 Hours |
| Treading Water | 2.0 Hours |
| With Flotation | |
| Swimming | 2.0 Hours |
| Holding Still | 2.7 Hours |
| HELP Posture | 4.0 Hours |
| Huddle w/ Others | 4.0 Hours |
Table 3-3 — Predicted Survival Time
NOTE
When worn correctly, the appropriate anti-exposure coveralls or dry suit will protect the survivor and add layers of insulation. Thermal gloves, socks, underwear and neoprene hoods all add additional layers of protection. Inflatable raft floors will provide an additional layer of insulation.
COMDTINST 16114.2A, ch. 2, B.2.d
Air Temperature — what does the handbook teach? (COMDTINST 16114.2A, ch. 2, B.3)
Air Temperature is a prime contributor to hypothermia. The combination of cold air with cold water is a recipe for danger.
COMDTINST 16114.2A, ch. 2, B.3
Effects of Wind and Waves — what does the handbook teach? (COMDTINST 16114.2A, ch. 2, B.3.a)
When the wind is blowing, heat loss in the body increases exponentially due to the wind chill factor. Actions must be taken to protect against wind chill. In open water survival situations, actions taken to protect the survivor from wind effects (e.g., laying low in a raft, using neoprene hoods, etc) can greatly enhance survivability and lessen the effects of hypothermia.
COMDTINST 16114.2A, ch. 2, B.3.a
Wind/Wave Effects Mitigation — what does the handbook teach? (COMDTINST 16114.2A, ch. 2, B.3.b)
Survivors should be aware of the areas of the body that are most prone to heat loss. Figure 3-4 represents those areas of the human body most prone to cooling. The majority of heat loss occurs in and around the top of the head.
NOTE
When worn correctly, the appropriate anti-exposure assemblies will protect the survivor and add layers of insulation. Insulated boots, balaclavas, watch caps, thermal gloves, socks, underwear and neoprene hoods all add additional layers of protection.
Drawing Courtesy of U.S. Navy
COMDTINST 16114.2A, ch. 2, B.3.b
Weather and Time of Day — what does the handbook teach? (COMDTINST 16114.2A, ch. 2, B.4)
The weather and time of day play a major effect on any survival scenario.
COMDTINST 16114.2A, ch. 2, B.4
Effects of Weather on Survival — what does the handbook teach? (COMDTINST 16114.2A, ch. 2, B.4.a)
Survivors in open water must realize that rescue efforts may be hampered or even postponed because of inclement weather. Survivors must be prepared for a prolonged evolution—even after the weather improves. (01) Fog. Fog is composed of tiny water droplets hanging in the atmosphere, sufficiently dense to scatter light rays and reduce visibility. Fog makes locating anything more difficult, including survivors in the open water. (02) Waves. Waves, seas, and surf can present the greatest challenges to survival skills. By understanding how waves form and behave, survivors know what to expect and how to minimize danger and increase the chance of survivability. Of the two major types of waves, the broad, rounded waves are likely to be the type of wave an open water survivor will have to deal with. Breaking waves are the most dangerous kind of wave for open water survivors. How dangerous the wave is depends on the ratio of wave
height to length, and on wave frequency. Steep sloped waves are the most dangerous.
(03) Rain, Sleet, & Snow. As with fog, precipitation can limit the sight of the survivor as well as the rescue party. Precipitation can add to other complexities such as contributing to the onset of hypothermia.
COMDTINST 16114.2A, ch. 2, B.4.a
Time of Day — what does the handbook teach? (COMDTINST 16114.2A, ch. 2, B.4.b)
Statistically, rescues occur within a short time following a mishap. Wind and sea currents make pinpointing survivors more predictable when the mishap site is known. As time progresses, this predictability becomes more difficult. In hours of darkness, it becomes critical that the appropriate signaling devices are employed. Mentally, the first few moments an individual is in a survival situation are the most disorientating, however, the survivor must remember that rescue vessels may be nearby during this time. During hours of darkness, flares and lights are crucial when these vessels are near.
COMDTINST 16114.2A, ch. 2, B.4.b
Proximity to Land / Decision Factors — what does the handbook teach? (COMDTINST 16114.2A, ch. 2, B.5)
With land in sight, the survivor must make a decision whether to swim or row for land or to wait. Swimming or rowing away from a “last known position” has inherent risk and survivors from a capsized boat are often safer staying with the boat or other visable debris. Shorelines are dotted with various hazards including sharp rocks, strong current, and breaking waves. Unless land is close and conditions appear favorable, the survivor should not try to swim to shore. Considerations when making the decision to swim to shore include: (01) Distance. With no visible reference from sea, distance can be deceiving and create the illusion that land is closer than it actually is. Glare from the water surface can hinder the ability to gauge the distance to shore. (02) Water Current. Underlying current near the shoreline may hamper progress and severely rob the survivor of available energy. (03) Physical Condition. As mentioned above when dealing with water currents, the survivor’s physical condition can be the limiting factor in surviving a swim or row for shore. (04) Swimming Competency. Swimming skills must be considered in making the shoreline. A poor swimmer will expend more energy to make the shoreline than an accomplished swimmer. (05) Water Temperature. The colder the water temperature, the more energy will be required to swim the same distance in warmer waters. Also, cold water intrusion may occur and hasten hypothermia.
COMDTINST 16114.2A, ch. 2, B.5
Protection from Exposure — what does the handbook teach? (COMDTINST 16114.2A, ch. 2, B.6)
The most inhospitable location on our planet is the open water. The survivor must be prepared for hot, temperate, cool, or cold conditions. Survivors must be aware of the dangers of too much exposure to the sun and take preventive measures to guard against a decrease in performance.
COMDTINST 16114.2A, ch. 2, B.6
Hot Climates — what does the handbook teach? (COMDTINST 16114.2A, ch. 2, B.6.a)
Performance in open water can easily be affected by the heat and vibration of the boat, which can increase fatigue. This Section discusses the various sun and heat related factors that crew members may encounter during their activities. Clothing and equipment should be worn so that there is free circulation of air between clothing and the body surface. Clothing acts as a barrier that prevents evaporative cooling. Many synthetic fabrics reduce the absorption and dispersal of sweat needed to achieve optimum heat loss by evaporation. Impermeable clothing does not “breath” and thus greatly increases an individual's susceptibility to heat related illnesses. Impermeable clothing must be avoided. When using impermeable clothing, take precautions to avoid the rapid buildup of body heat. Heat illnesses may be manifested in minutes if impermeable clothing is worn. Survivors should shield themselves from the effects of sun and heat as best as possible. Sunshades should be fabricated from any means available. During the heat of the day, observe the following: The body may be cooled by getting into the water; however, check for marine life and be sure you are secured to the raft. This action will also aid in dehydration, as survivors have actually absorbed enough water to activate the kidneys after only a short time in the water. (01) Clothes can be kept wet by splashing water on them. (02) Keep physical activity to an absolute minimum in the water. (03) Use sun screen cream or similar ointment if available. (04) Wear sunglasses or improvise eye cover made from cloth or paper. Heat stroke can occur when the body’s cooling mechanism (sweating) fails to adequately cool the body. The major symptom of heat stroke is red, hot and dry skin. Mitigating the effects of heat stroke can easily be accomplished by keeping the body cooled by the measures outlined above. Keep incapacitated survivors lying down with the head elevated. Outer clothing should not be removed. Underclothes may be removed and used to cover exposed head, neck or to parts of the body which would otherwise be exposed.
NOTE
Personnel who are not accustomed to strenuous physical activity in hot and humid environments are particularly susceptible to heat injuries. Excess body weight also contributes to this susceptibility.
COMDTINST 16114.2A, ch. 2, B.6.a
Sunburn — what does the handbook teach? (COMDTINST 16114.2A, ch. 2, B.6.b)
Continuous exposure to the sun can cause sunburn and other complications such as heat stroke, dehydration, etc. Unprotected exposed skin will suffer from premature aging and an increased chance of skin cancer. The limit to surface heating, the point at whi
ch skin becomes painful, is 109°F (43°C) and higher.
At 113°F (45°C), pain is severe, and if that temperature is maintained burns will result. Symptoms of sunburn are: redness, swelling, or blistering of the skin. Other effects of overexposure to the sun are fever, gastrointestinal symptoms, malaise, and pigment changes in the skin.
COMDTINST 16114.2A, ch. 2, B.6.b
Dehydration — what does the handbook teach? (COMDTINST 16114.2A, ch. 2, B.6.c)
An adequate fluid intake is essential to remain healthy. Fluids are lost from the body in several ways. The most obvious loss is through the kidneys. The less obvious loss of body fluid occurs through perspiration from the skin and respiration through the lungs. As a result, an average, healthy adult requires two or three liters of fluid a day to replace these losses. Extremely warm weather significantly increases the loss of fluids. Try to stay away from liquids such as tea, alcohol, coffee, and soft drinks. These liquids speed up fluid loss. Healthy adults must satisfy their water and electrolyte requirements. When water and electrolytes are not replaced, the body experiences dehydration. Drinking alcohol and caffeine increases dehydration. At first there is thirst and general discomfort, followed by an inclination to slow physical movement, and a loss of appetite. As more water is lost, an individual becomes sleepy and experiences a rise in body temperature. By the time the body loses 5% of body weight in fluids, the individual begins to feel nauseated. When 6 to 10% of body fluids are lost, symptoms increase in this order: (01) Dry mouth, (02) Dizziness, (03) Headache, (04) Difficulty in breathing, (05) Tingling in the arms and legs, (06) Skin color turns bluish, (07) Indistinct speech, (08) Inability to walk, (09) Cramping legs and stomach.
COMDTINST 16114.2A, ch. 2, B.6.c
Effects of Cold Climates — what does the handbook teach? (COMDTINST 16114.2A, ch. 2, B.6.d)
In cold climates, the major problems range from hypothermia and frostbite, to immersion, or “Trench” foot. In cold climates, observe the following: (01) Keep as dry and warm as conditions will dictate. If possible, remove wet clothing and replace with dry clothing. (02) Clothing should be worn in loose fitting layers. (03) Don anti-exposure suit (if available). (04) Inflate raft floor or add available material for additional layers of insulation. (05) Huddle with other survivors. (06) Mild stretching and exercise improves circulation—this is key in preventing immersion foot. (07) Avoid sitting in cramped positions for long periods. Move arms, feet, and legs as much as possible. (08) Wiggle the toes inside boots. (09) Keep feet as warm and dry as possible. (10) Avoid the use of alcohol and tobacco.
COMDTINST 16114.2A, ch. 2, B.6.d
Cold Water Survivability — what does the handbook teach? (COMDTINST 16114.2A, ch. 2, C.1)
The length of time a person can stay alive in cold water depends on the temperature of the water, the physical condition of the survivor, and the action taken by the survivor. Figure 2-1 illustrates the relationship between water temperature and estimated time of useful consciousness. Swimming typically reduces a person’s chance of survival due to more rapid loss of body heat.
[Lettered on the illustration: 14 12 10 8 6 4 2 0 32 41 50 59 68 Water Temperature - Degrees Fahrenheit]
COMDTINST 16114.2A, ch. 2, C.1
Critical Factors — what does the handbook teach? (COMDTINST 16114.2A, ch. 2, C.2)
Time is critical when forced to enter cold water. The loss of body heat is one of the greatest dangers to survival. Critical factors that increase the threat of hypothermia and other cold-water injuries include: (01) Prolonged exposure to cold-water temperatures, (02) Sea spray, (03) Air temperature, (04) Wind chill.
COMDTINST 16114.2A, ch. 2, C.2
Survival Measures — what does the handbook teach? (COMDTINST 16114.2A, ch. 2, C.3)
Several preventive measures that can be used to increase the chances for successful cold water survival include: (01) Put on as much warm clothing as possible, making sure to cover head, neck, hands and feet. (02) If the hypothermia protective clothing does not have inherent flotation, put on a PFD. (03) Before entering the water, button up clothing, turn on signal lights (only at night), locate your survival whistle and make any other preparations for rescue. (04) Avoid entering the water if possible. If it is necessary to jump into the water, cover nose and mouth with one hand and place other hand on the PFD or area between wrist and elbow.
COMDTINST 16114.2A, ch. 2, C.3
Water Survival Skills — what does the handbook teach? (COMDTINST 16114.2A, ch. 2, C.4)
Water survival skills that should be utilized to increase the chances for surviving cold water immersion include: (01) Immediately upon entering the water, become oriented to the surrounding area. Try to locate sinking boat, floating objects, and other survivors. (02) Try to board a life raft, overturned boat (if floating), or other floating platform as soon as possible to shorten the immersion time. Body heat is lost many times faster in the water than in the air. Since the effectiveness of the insulation worn is seriously reduced by being water soaked, it is important to be shielded from wind to avoid a wind-chill effect. Huddling close to the other occupants in the craft will also conserve body heat. (03) While afloat in the water, do not attempt to swim unless it is necessary to reach a fellow survivor or a floating object which can be grasped or climbed onto. (04) Unnecessary swimming will pump out any warm water between the body and the layers of clothing and will increase the rate of body-heat loss. Also, unnecessary movements of arms and legs send warm blood from the inner core to the outer layer of the body resulting in a rapid heat loss.
(05) The body position assumed in the water is very important in
conserving heat. Float as still as possible with legs together, elbows close to your side and arms folded across the front of the PFD. This is called the Heat Escape Lessening Position (HELP) and minimizes exposure of the body surface to the cold water. Try to keep head and neck out of the water (see Figure 3-2). However, if wearing a Type III PFD, or if the HELP position turns the body face down, bring legs together tight and arms tight to sides and head back.
(06) Another heat conserving position is to huddle closely to others in the
water making as much body contact as possible. A PFD must be worn to be able to maintain these positions in the water (see Figure 3-3).
(07) Keep a positive attitude about survival and rescue. This will extend
survival time until rescue comes. A will to live does make a difference.
[Illustration in the handbook: Figure 3-2 — Single PIW]
[Illustration in the handbook: Figure 3-3 — Multiple PIW Huddling]
COMDTINST 16114.2A, ch. 2, C.4
Climbing onto an Overturned Boat Hull — what does the handbook teach? (COMDTINST 16114.2A, ch. 2, C.5)
Regardless of what factors or condition contributed to the capsizing of your vessel, after you safely egress, you are now faced with an open water survival situation. The ability to think clearly and proficiently can make the difference between life and death. Climbing onboard an overturned vessel will provide greater protection from the elements and hypothermia. Once onboard, your chances of being spotted by rescuers (Coast Guard or good Samaritans) greatly increases because it is a larger object that can be seen from greater distances. The majority of capsized vessels will inherently float and not sink for some time. The hull will float bow-up with the stern lying just beneath the surface of the water due to the vessel hull design and weight of the engines (see Figure 2-2). Although there is no standard procedure for climbing onto an overturned vessel, general procedures are listed below.
[Illustration in the handbook: Figure 2-2 — Capsized Vessel]
Use the following procedures when climbing onto an overturned boat hull: (01) Look for the easiest access point to climb aboard, this is often found towards the stern of the vessel since it will be lower in the water than the bow. (02) Use the natural design of the boats hull for hand holds eg. keel, chine, through hull drains.
CAUTION!
Be careful of sharp edges, burs, and protruding objects that may cause injury or tear PPE when climbing on board the overturned boat hull. (03) Be aware that some leverage points may be slightly below the surface, e.g. Rub rails, swim platforms, life lines. (04) Assist other survivors in climbing aboard. Once on board the overturned vessel, get as much as your body out of the water as possible to reduce your exposure to hypothermia. Apply training principles learned in the Open Water Survival Skills section and Post Capsize Procedures paragraph.
COMDTINST 16114.2A, ch. 2, C.5
Boarding a Boat from the Water — what does the handbook teach? (COMDTINST 16114.2A, ch. 2, C.6)
After a vessel capsizes or sinks survivors may find themselves floating, awaiting rescue. Assistance can range from minutes to hours. Rescuers (Coast Guard or good Samaritans) will arrive and begin recovering all persons from the water. There are many different types of vessels that may arrive on scene to assist. These will range from military, commercial, and/or recreationally operated vessels. Commercial and recreational vessel operators have limited experience with recovering persons from the water and their vessels are not specifically designed for rescue operations. For this reason, survivors need to become familiar with basic boat characteristics for boarding a boat from the water. Vessel characteristics for recovery consideration: (01) Swim platform or ladder, (02) Lowest point of freeboard, (03) Transom door, (04) Jacobs ladder, You may have to get creative and think about what specific characteristics are available on board the rescue vessel that can aid in your recovery. Depending on duration of exposure to the elements, survivors may have lost dexterity and have limited strength that will require additional assistance for recovery. Remember, you have the training, experience and may have to verbally communicate with the rescue vessel on the most prudent method for recovery. If capable after being rescued, commence overseeing the recovery of remaining survivors and administering first aid as necessary.
COMDTINST 16114.2A, ch. 2, C.6
Description — what does the handbook teach? (COMDTINST 16114.2A, ch. 3, A.1)
Despite the mildew inhibitor treatment that is required by manufacturers for PFDs, stowing them in moist locations will increase deterioration of the fabric. Heat, moisture, and sunlight will increase the deterioration of PFD parts.
COMDTINST 16114.2A, ch. 3, A.1
Storage Sterns Model I600 (Type I) PFD — what does the handbook teach? (COMDTINST 16114.2A, ch. 3, A.2)
PFDs should be stored in a climate-controlled environment in accordance with Reference (a). All PFDs should be kept away from oil, paint, and greasy substances. The Coast Guard does not consider any PFD “readily accessible” if it is kept in its original wrapper. Persons under stress may be unable to get them out promptly. Also, the wrapper can trap moisture leading to mildew and rot.
NOTE
Remember, even more important than PFD storage condition is that PFDs be readily accessible.
COMDTINST 16114.2A, ch. 3, A.2
Description — what does the handbook teach? (COMDTINST 16114.2A, ch. 3, A.3)
The Sterns Model I600, also known as a Type I (Figure 3-1), is a one-piece, PFD required for the J-Davit tender and during abandon ship operations. It is authorized for use by survivors, passengers on towed vessels, or prisoners aboard vessels. Sterns model I600 PFD provides an unconscious person the greatest chance of survival in the water. It is universally sized for adults (90 pounds and over) which provides at least 22 pounds of buoyancy. The PFD must be international orange in color.
[Illustration in the handbook: Figure 3-1 — Sterns Model I600]
COMDTINST 16114.2A, ch. 3, A.3
Advantages — what does the handbook teach? (COMDTINST 16114.2A, ch. 3, A.4)
Sterns model I600 PFD is effective for all waters, especially open, rough, or remote waters where rescue may be delayed. It is designed to turn most unconscious wearers in the water from a face-down position to a vertical or slightly backward position, allowing the wearer to maintain that position. It provides at least 22 pounds of buoyancy. This buoyancy will allow the wearer to relax and save energy while in the water, thus extending survival time.
COMDTINST 16114.2A, ch. 3, A.4
Disadvantages — what does the handbook teach? (COMDTINST 16114.2A, ch. 3, A.5)
There are three major disadvantages to this type of PFD:
(01) It is bulky and restricts movement. (02) Its buoyancy restricts the underwater swimming ability needed to escape from a capsized boat or to avoid burning oil or other hazards on the surface of the water. (03) It provides minimal protection against hypothermia.
COMDTINST 16114.2A, ch. 3, A.5
Donning — what does the handbook teach? (COMDTINST 16114.2A, ch. 3, A.6)
Before entering the water, don and adjust Sterns model I600 PFD using the following procedures:
WARNING
For safety, always tuck all loose straps into your pockets, shirt, or belt. Adjust straps on injured people before they are lowered into the water.
| Step Procedure 1 Don PFD as you would a vest. 2 Buckle upper chest strap and pull tight. 3 Secure lower chest strap snap hook to the ring on the left and pull strap tight. | Step | Procedure |
| 1 | Don PFD as you would a vest. | |
| 2 | Buckle upper chest strap and pull tight. | |
| 3 | Secure lower chest strap snap hook to the ring on the left and pull strap tight. |
COMDTINST 16114.2A, ch. 3, A.6
Entering the Water Survivors (Type I) PFD — what does the handbook teach? (COMDTINST 16114.2A, ch. 3, A.7)
Use the following procedures to enter the water: Follow these steps before entering the water wearing any type of PFD or combination of cold
NOTE
weather protective device (e.g., dry suit) and PFD.
| Step | Procedure |
| 1 | Ensure all straps on the PFD are securely fastened, tightened to a snug fit, and tucked in to prevent them from snagging. |
| 2 | Stand on the boat’s gunwale, on the windward side, at a point closest to the water. |
| 3 | Check surrounding area for debris and depth. |
| 4 | Hold elbows close to your sides and cover your face with one hand. |
| 5 | Grip PFD or area between wrist and elbow with the other hand. |
| 6 | Looking straight ahead, keep the body erect and legs held together and crossed when entering the water. It is better to gently slip in, if possible, rather than jumping. |
| 7 | Minize initial immersion by spreading arms and applying a scissor kick upon entry. |
If jumping into water is necessary with chemicals, oil, or burning oil on the surface, place one
NOTE
hand over mouth with palm under chin and split fingers tightly squeezing nostrils shut. Place other hand on the PFD collar to keep it in place.
COMDTINST 16114.2A, ch. 3, A.7
Description — what does the handbook teach? (COMDTINST 16114.2A, ch. 3, A.8)
The Survivors – PFD, is a Type I (Figure 3-2) PFD. A wearable device that will keep most unconscious wearers face-up in the water. It is intended for use by passengers, prisoners, and non-mission essential personnel. It comes in international orange with SOLAS reflective panels: (01) Adult (more than 90 pounds) which provides at least 22 pounds of buoyancy. (02) Child (less than 90 pounds) which provides at least 18 pounds of buoyancy.
[Illustration in the handbook: Figure 3-2 — Survivors Type I]
COMDTINST 16114.2A, ch. 3, A.8
Advantages — what does the handbook teach? (COMDTINST 16114.2A, ch. 3, A.9)
Lightweight and easy to don. Easily stacked for storage.
COMDTINST 16114.2A, ch. 3, A.9
Disadvantages — what does the handbook teach? (COMDTINST 16114.2A, ch. 3, A.10)
There are three major disadvantages to this type of PFD: (01) It restricts movement. (02) Its buoyancy restricts the underwater swimming ability needed to escape from a capsized boat or to avoid burning oil or other hazards on the surface of the water. (03) It provides minimal protection against hypothermia.
COMDTINST 16114.2A, ch. 3, A.10
Donning Type III PFD — what does the handbook teach? (COMDTINST 16114.2A, ch. 3, A.11)
Before entering the water, don and adjust a near-shore buoyant vest PFD using the following procedures:
| Step | Procedure | |
| 1 | Grasp the PFD at the lower part of head opening and pull outward to expand opening. | |
| 2 | Slip head through opening. | |
| 3 | Pass the body strap around the back and fasten at the front of the PFD, then adjust the strap for a snug fit. |
COMDTINST 16114.2A, ch. 3, A.11
Description — what does the handbook teach? (COMDTINST 16114.2A, ch. 3, A.12)
Type III PFD is routinely worn aboard boats or cutter crews during underway deck evolutions when freedom of movement is required and the risk of falling over the side is minimal. It is not designed to turn an unconscious wearer to a face-up position; the design is such that conscious wearers can place themselves in a vertical or slightly backward position. It has a minimum of 15.5 pounds of buoyancy and comes in many sizes and colors. (Figure 3-3) shows one style of Type III PFD that boat crews are authorized to wear. Most approved flotation jackets (“float coats”) are also Type III devices.
[Illustration in the handbook: Figure 3-3 — Type III Device PFD]
COMDTINST 16114.2A, ch. 3, A.12
Advantages — what does the handbook teach? (COMDTINST 16114.2A, ch. 3, A.13)
Type III PFDs offer boat crew members greater comfort and freedom of movement. The Type III PFD is designed so wearers can place themselves in a face-up position in the water. Type III PFD allows greater wearing comfort and is particularly useful when water-skiing, sailing, hunting from a boat, or engaging in other water activities. The Type III PFD provides adequate flotation when wearing a full complement of law
NOTE
enforcement gear. If unable to remain afloat, jettison easily accessible equipment.
COMDTINST 16114.2A, ch. 3, A.13
Disadvantages — what does the handbook teach? (COMDTINST 16114.2A, ch. 3, A.14)
The following are some disadvantages to the Type III PFD: (01) Flotation characteristics are marginal and not suitable for wear in heavy seas, (02) Tendency to ride-up on the wearer in the water, (03) Wearer may have to tilt head back to avoid a face-down posture in the water, (04) The distribution of the flotation material reduces or eliminates the turning ability when compared to the Survivors Type I PFD.
COMDTINST 16114.2A, ch. 3, A.14
Donning — what does the handbook teach? (COMDTINST 16114.2A, ch. 3, A.15)
Before entering the water, don and adjust a Type III PFD using the following procedures:
| Step | Procedure |
| 1 | Place your arms through the openings in the vest. |
| 2 | Close zipper, if provided. Close front slide fasteners. |
| 3 | Adjust waist straps for a snug fit. |
COMDTINST 16114.2A, ch. 3, A.15
Non-Coast Guard Approved Type III PFDs — what does the handbook teach? (COMDTINST 16114.2A, ch. 3, A.16)
Non-Coast Guard Approved Type III PFDs (Figure 3-4) are intended for specific activities and may be carried instead of a Coast Guard-approved Type III PFD only if used according to the approval condition on the label. Examples of Non-Coast Guard Approved Type III PFDs are: (01) Mustang Survival MD-3183 v22 with survival equipment pockets, (02) Lifesaving Systems Life Preserver Survival Vest. Non-Coast Guard Approved PFDs are not Coast Guard approved because they have beaded handles
NOTE
vice t-handles (which have been deemed a snag hazard). Reference (a) contains a list of all Non- Coast GuardApproved PFDs.
[Illustration in the handbook: Figure 3-4 — Non-Coast Guard Approved Type III PFD]
COMDTINST 16114.2A, ch. 3, A.16
Advantages — what does the handbook teach? (COMDTINST 16114.2A, ch. 3, A.17)
The Non-Coast Guard Approved Type III PFD offers boat crew members greater comfort and maneuverability compared to the typical Type III vest. Lightweight and not as bulky, the inflatable Non-Coast Guard Approved Type III device is especially beneficial to units in warmer climates. When fully inflated, the inflatable Non-Coast Guard Approved Type III provides more buoyancy. Some Non-Coast Guard Approved Type III inflatables provide storage pockets/pouches which, when properly outfitted, eliminate the need for wearing the Boat Crew Survival Vest mentioned later in this chapter.
COMDTINST 16114.2A, ch. 3, A.17
Disadvantages — what does the handbook teach? (COMDTINST 16114.2A, ch. 3, A.18)
The initial purchase price and preventive maintenance costs of Non-Coast Guard Approved Type III inflatable PFDs are greater than most Type III vests. It also requires more frequent and complicated preventive maintenance. As with any other automated feature, if the auto-inflate mechanism were inoperative, the PFD would have to be manually inflated. This could be a problem if the crew member is knocked unconscious while falling overboard. Automatically inflatable PFDs are also know to hinder egress from an enclosed cabin environment.
COMDTINST 16114.2A, ch. 3, A.18
Donning Ring Buoys/Throwable Devices — what does the handbook teach? (COMDTINST 16114.2A, ch. 3, A.19)
There are several different styles of Non-Coast Guard Approved Type III PFDs. Each has a specific method of donning, equipment storage, and activation. Prior to use, each crew member must complete the performance qualification standards for that specific style of Non-Coast Guard Approved Type III. PFD PQS can be found on the Office of Boat Forces Portal site.
COMDTINST 16114.2A, ch. 3, A.19
Description Ring Buoys/Throwable Devices are Coast Guard-approved devices that are — what does the handbook teach? (COMDTINST 16114.2A, ch. 3, A.20)
easily deployed to a person-in-the-water and are grasped by the user until rescued. Buoyant cushions come in many different colors. Ring buoys (see Figure 3-5) are usually international orange.
[Illustration in the handbook: Figure 3-5 — Ring Buoy/Throwable Device]
COMDTINST 16114.2A, ch. 3, A.20
Advantages — what does the handbook teach? (COMDTINST 16114.2A, ch. 3, A.21)
An advantage of Ring Buoys/Throwable Devices is that since they are not worn like other PFDs, there are no size restrictions. This type of device is designed to be stored on deck for easy deployment should someone fall overboard. If quickly deployed following a person in the water, Ring Buoys/Throwable Devices also act as markers assisting in returning to the area where the person originally fell overboard. See Reference (b) for more information on Person-in-the-Water Recovery.
COMDTINST 16114.2A, ch. 3, A.21
Disadvantages Non-Coast Guard Approved Cutter Specific PFDs — what does the handbook teach? (COMDTINST 16114.2A, ch. 3, A.22)
A disadvantage of Ring Buoys/Throwable Devices is that they are not worn, although some can be secured to the body once reached in the water.
COMDTINST 16114.2A, ch. 3, A.22
Description — what does the handbook teach? (COMDTINST 16114.2A, ch. 3, A.23)
Examples of Non-Coast Guard Approved Cutter Specific PFDs include the Standard Navy PFD with Collar (Figure 3-5) and the Abandon Ship Life Preserver.
COMDTINST 16114.2A, ch. 3, A.23
Standard Navy PFD with Collar — what does the handbook teach? (COMDTINST 16114.2A, ch. 3, A.24)
This preserver is one of the best devices for keeping a person afloat; however, its major drawback is that it requires training to become familiar with the many straps and fastenings used to don this device quickly and properly. Consequently, the Standard Navy Preserver is not Coast Guard-approved for civilian use. Auxiliarist or other government agency (OGA) going aboard a Coast Guard cutter as crew (or passenger) should be given instructions in donning this PFD.
[Illustration in the handbook: Figure 3-5 — Standard Navy Preserver]
COMDTINST 16114.2A, ch. 3, A.24
Donning — what does the handbook teach? (COMDTINST 16114.2A, ch. 3, A.24.a)
Use the following procedure to put on the standard Navy PFD with collar:
| Step | Procedure | |
| 1 | Don the PFD as you would a vest. | |
| 2 | Secure the chest-strap snap hook on the right side to the D-ring on the left and pull strap tight around the chest. | |
| 3 | Extend the leg straps hanging from the rear waist area and route through legs from the rear to the front. |
| 4 | Insert the right leg strap through the right double D- rings hanging from the side waist area and route the bitter end over the top D-ring and through the bottom. Pull all slack from the strap. Rig strap for quick release as shown in the figure (right). Repeat for the left leg strap. |
| 5 | Pull waist drawstrings tight and secure with a bowknot. |
| 6 | Tie upper front tapes together with a bowknot. |
| 7 | Secure collar tapes through collar D-rings and tie with a bowknot. |
COMDTINST 16114.2A, ch. 3, A.24.a
Abandon Ship Life Preserver — what does the handbook teach? (COMDTINST 16114.2A, ch. 3, A.25)
The Abandon Ship Life Preserver may be used as an option by cutter personnel in high heat areas and/or confined spaces during general emergency conditions or abandon-ship operations but is not a replacement for the Navy Type I PFD w/ Collar.
COMDTINST 16114.2A, ch. 3, A.25
Donning, Adjusting and Inflating — what does the handbook teach? (COMDTINST 16114.2A, ch. 3, A.25.a)
Use the following procedures to don, adjust, and inflate the Abandon Ship Life Preserver:
| Step | Procedure |
| 1 | Buckle the waist belt around the waist with the pouch to the rear. |
| 2 | Adjust the waist belt to allow rotation of the pouch to the stomach area. |
| 3 | When required, unsnap the pouch, unroll the inflatable chamber, and pass head through yoke opening. |
| 4 | Inflate the preserver by pulling the yellow inflation lanyard with a slow steady pull until the inflation assembly actuates. |
| 5 | If the CO2 inflation assembly fails, orally inflate preserver by unscrewing the knurled ring, depressing the mouthpiece, and blowing into the oral inflation tube. |
[Illustration in the handbook, page 3-12]
COMDTINST 16114.2A, ch. 3, A.25.a
Layered Clothing — what does the handbook teach? (COMDTINST 16114.2A, ch. 3, B.1)
The best way to avoid cold-related injuries is to wear proper clothing. When choosing clothing combinations, the best advice is to layer clothing.
COMDTINST 16114.2A, ch. 3, B.1
Maintaining Body Heat Anti-Exposure Coverall — what does the handbook teach? (COMDTINST 16114.2A, ch. 3, B.2)
Wet clothing robs the body of heat by breaking down the thermal protection of insulated clothing. It is extremely important to replace wet clothing as soon as possible to prevent cold-related injuries, particularly if the person is idle after a period of heavy perspiring. Many cold weather medical problems involve wet hands, feet and head. These areas should receive special care.
COMDTINST 16114.2A, ch. 3, B.2
Description — what does the handbook teach? (COMDTINST 16114.2A, ch. 3, B.3)
The anti-exposure coveralls are the primary Layer III garment worn when members are exposed to intermittent sea spray or rain and thermal protection is required (Figure 3-6). If properly worn with the straps appropriately adjusted, the water will not flush out of the suit and will delay the onset of hypothermia.
[Illustration in the handbook: Figure 3-6 — Anti-Exposure Coverall]
COMDTINST 16114.2A, ch. 3, B.3
Donning — what does the handbook teach? (COMDTINST 16114.2A, ch. 3, B.4)
Anti-exposure coveralls are designed to be worn over the uniform in the same manner as standard coveralls. Also, hoods, balaclava, goggles and gloves should be used to protect against the elements.
COMDTINST 16114.2A, ch. 3, B.4
Entering the Water Dry Suit — what does the handbook teach? (COMDTINST 16114.2A, ch. 3, B.5)
Before entering the water with anti-exposure coveralls, perform the following procedures:
| Step | Procedure |
| 1 | Ensure the zipper is completely closed. |
| 2 | Tighten straps at the waist, thigh, and ankle to reduce transfer of cold water inside the suit. This increases the degree of hypothermia protection. |
| 3 | Orally inflate the pillow behind the collar. This will provide support for the head. |
COMDTINST 16114.2A, ch. 3, B.5
Description — what does the handbook teach? (COMDTINST 16114.2A, ch. 3, B.6)
The dry suit, one part of a multilayered maritime cold-weather suit system (MCWSS), provides protection in areas where exposure to wind, spray, cold water, and hypothermia is likely (see Figure 3-7). The dry suit, with proper undergarments, provides the best protection for crew members in adverse weather and cold-water immersion. When the mission performed by the member is more likely to cause excess damage to a dry suit (AtoN maintenance, fisheries boardings), other Coast Guard authorized hypothermia protective clothing may be worn. Details on all authorized PFDs can be found in Reference (a).
[Illustration in the handbook: Figure 3-7 — Dry Suit]
WARNING
Dry suits provide no inherent buoyancy. A PFD must be worn over a dry suit at all times while underway.
COMDTINST 16114.2A, ch. 3, B.6
Use — what does the handbook teach? (COMDTINST 16114.2A, ch. 3, B.7)
When worn with a PFD and proper undergarments, a dry suit offers mobility and superior protection against the effects of wind, spray and cold-water immersion.
COMDTINST 16114.2A, ch. 3, B.7
Donning — what does the handbook teach? (COMDTINST 16114.2A, ch. 3, B.8)
Use the following procedure to put on the MCWSS. Follow the steps closely to ensure proper sealing of neck and wrist seals:
| Step | Procedure |
| 1 | Lubricate inside of the neck and wrist seals with unscented talc. |
| 2 | Don Layer I moisture wicking followed by Layer II fleece insulating undergarments. |
| 3 | Don the MCWSS in the same fashion as donning coveralls, entering it one leg at a time. |
| 4 | Pull the bottom section of the suit up to the waist and place arms into the sleeves. |
| 5 | Gently push one hand through the wrist seal at a time using the index finger of the opposite hand to stretch the seal as you push your hand through. Repeat for opposite hand. Make sure insulating undergarments are not sandwiched between seal and skin and flatten any folds or rolls of the seal flat against the skin. |
| 6 | Bring the upper portion of the suit over the head, aligning the neck opening with the top of the head. Reach inside the top of the neck seal with the fingers and gently pull the seal outward and down as you push your head through. Ensure insulating undergarments are not sandwiched between seal and skin, and flatten any folds or rolls of the seal flat against the skin. |
| 7 | Close the entry and relief slide fasteners. Have a fellow crew member double check all fasteners to ensure it is closed completely against the sealing plug. |
| 8 | Remove excess air from the suit by sliding fingers under the neck seal and squatting down, pull arms tight against the chest and release seal. |
| Use of comfort devices to stretch the neck or wrist seals away from the skin such as neck rings or O- ring comfort devices are not authorized. |
WARNING CAUTION!
Use extreme caution when donning the MCWSS. Prior to donning the MCWSS, remove all rings, watches, earrings, necklaces and eyeglasses that will cause damage to wrist and neck seals.
COMDTINST 16114.2A, ch. 3, B.8
Entering the Water — what does the handbook teach? (COMDTINST 16114.2A, ch. 3, B.9)
Before entering the water, perform the following procedures:
| Step | Procedure | |
| 1 | Slip on a neoprene hood. | |
| 2 | Close all zippers and fasten Velcro wrist and ankle straps. | |
| 3 | Put on gloves. |
COMDTINST 16114.2A, ch. 3, B.9
Doffing — what does the handbook teach? (COMDTINST 16114.2A, ch. 3, B.10)
Use the following procedure to take off the dry suit:
| Step | Procedure | |
| 1 | Remove all other equipment donned over the dry suit before removing the dry suit. | |
| 2 | Wash down the dry suit while wearing it paying particular attention to entry and relief slide fasteners. Remove all traces of salt. | |
| Failure to completely open slide fastener will damage the suit when it is removed. |
CAUTION!
| 3 Completely open the entry slide fastener. 4 Insert fingers between neck seal and neck. Gently stretch the seal outward and upward while pulling head from seal and shoulders and head out of the suit. 5 Insert two fingers under wrist seal and gently pull seal outward. Cup the hand, fingertips and thumb together, and gently pull hand from seal. Repeat for other hand. 6 Remove legs from suit. Insert a wide dry suit hanger out through the neck seal, close entry slide fastener half way and hang until dry. 7 Completely open the entry slide fastener. 8 Insert fingers between neck seal and neck. Gently stretch the seal outward and upward while pulling head from seal and shoulders and head out of the suit. 9 Insert two fingers under wrist seal and gently pull seal outward. Cup the hand, fingertips and thumb together, and gently pull hand from seal. Repeat for other hand. 10 Remove legs from suit. Insert a wide dry suit hanger out through the neck seal, close entry slide fastener half way and hang until dry. 11 Completely open the entry slide fastener. 12 Insert fingers between neck seal and neck. Gently stretch the seal outward and upward while pulling head from seal and shoulders and head out of the suit. 13 Insert two fingers under wrist seal and gently pull seal outward. Cup the hand, fingertips and thumb together, and gently pull hand from seal. Repeat for other hand. 14 Remove legs from suit. Insert a wide dry suit hanger out through the neck seal, close entry slide fastener half way and hang until dry. | 3 | Completely open the entry slide fastener. |
| 4 | Insert fingers between neck seal and neck. Gently stretch the seal outward and upward while pulling head from seal and shoulders and head out of the suit. | |
| 5 | Insert two fingers under wrist seal and gently pull seal outward. Cup the hand, fingertips and thumb together, and gently pull hand from seal. Repeat for other hand. | |
| 6 | Remove legs from suit. Insert a wide dry suit hanger out through the neck seal, close entry slide fastener half way and hang until dry. | |
| 7 | Completely open the entry slide fastener. | |
| 8 | Insert fingers between neck seal and neck. Gently stretch the seal outward and upward while pulling head from seal and shoulders and head out of the suit. | |
| 9 | Insert two fingers under wrist seal and gently pull seal outward. Cup the hand, fingertips and thumb together, and gently pull hand from seal. Repeat for other hand. | |
| 10 | Remove legs from suit. Insert a wide dry suit hanger out through the neck seal, close entry slide fastener half way and hang until dry. | |
| 11 | Completely open the entry slide fastener. | |
| 12 | Insert fingers between neck seal and neck. Gently stretch the seal outward and upward while pulling head from seal and shoulders and head out of the suit. | |
| 13 | Insert two fingers under wrist seal and gently pull seal outward. Cup the hand, fingertips and thumb together, and gently pull hand from seal. Repeat for other hand. | |
| 14 | Remove legs from suit. Insert a wide dry suit hanger out through the neck seal, close entry slide fastener half way and hang until dry. |
COMDTINST 16114.2A, ch. 3, B.10
Industrial Style Dry Suit — what does the handbook teach? (COMDTINST 16114.2A, ch. 3, B.11)
Coxswains, crew members, boarding officers and boarding team members may use the Industrial breathable marine survival system (MSD901) in lieu of the MCWSS when operating in conditions requiring dry suit use.
COMDTINST 16114.2A, ch. 3, B.11
MSD901 Donning Procedure — what does the handbook teach? (COMDTINST 16114.2A, ch. 3, A.11.a)
Use the following procedure to put on the MSD901. Follow the steps closely to ensure proper sealing of neck and wrist seals:
| Step | Procedure |
| 1 | Ensure the MSD901 is completely assembled in accordance with MPC. |
| 2 | Completely loosen the neck seal. |
| 3 | Ensure the wrist, thigh and ankle adjustments are loose. |
| 4 | Completely open the chest zipper. |
| 5 | Completely open the waterproof circumference zipper. |
| 6 | Don Layer I moisture wicking undergarment. |
| 7 | Fold the upper portion of the suit forward at the waist and slide one leg at a time into the suit until your toes reach the end of the socks. |
| 8 | Pull the bottom section of the suit up to the waist and place arms into the sleeves. |
| 9 | Gently push one hand through the wrist seal at a time using the index finger of the opposite hand to stretch the seal as you push your hand through. Repeat for opposite hand. Make sure insulating undergarments are not sandwiched between seal and skin and flatten any folds or rolls of the seal flat against the skin. |
| 10 | Bring the upper portion of the suit over the head, aligning the neck opening with the top of the head. Reach inside the top of the neck seal with the fingers and gently pull the seal outward and down as you push your head through. Make sure insulating undergarments are not sandwiched between seal and skin and flatten any folds or rolls of the seal flat against the skin. |
| 11 | Fold the waterproof zipper cover out of the way. |
| 12 Grasp the end of the waterproof zipper on your right side and the zipper pull with the opposite hand. 13 Pull the zipper closed completely around the waist circumference, ensuring the zipper is tight against the sealing plug. Failure to completely close the waterproof entrance and relief zippers to the sealing plug will allow water to leak into the suit resulting in drastic loss of survival time. | 12 | Grasp the end of the waterproof zipper on your right side and the zipper pull with the opposite hand. |
| 13 | Pull the zipper closed completely around the waist circumference, ensuring the zipper is tight against the sealing plug. | |
| Failure to completely close the waterproof entrance and relief zippers to the sealing plug will allow water to leak into the suit resulting in drastic loss of survival time. |
WARNING
| 14 | Pull relief zipper closed completely ensuring the zipper is tight against the sealing plug. |
| 15 | Fold the waterproof zipper cover closed over the zipper. |
| 16 | Buckle the waist belt and adjust to a comfortable fit. |
| 17 | Adjust and close the ankle and thigh adjustment straps. |
| 18 | Grasp and pull the neck seal drawstring to ensure a watertight and comfortable fit. |
| 19 | Secure the end of the neck seal drawstring to the tab under the outer collar. |
| 20 | Buddy-check all fasteners and zippers. |
WARNING
Use of comfort devices to stretch the neck or wrist seals away from the skin such as neck rings or O-ring comfort devices are not authorized and shall not be used.
WARNING
Per reference (a), the MSD901 shall be worn with all three modules completely assembled. Use extreme caution when donning the MSD901. Prior to donning the MSD901, remove all
CAUTION!
rings, watches, earrings, necklaces and eyeglasses that will cause damage to wrist and neck seals.
COMDTINST 16114.2A, ch. 3, A.11.a
Doffing Procedure — what does the handbook teach? (COMDTINST 16114.2A, ch. 3, A.11.b)
Use the following procedure to take off the MSD901:
| Step | Procedure | |
| 1 | Remove all other equipment donned over the MSD901 before proceeding. | |
| 2 | Wash down the MSD901 while wearing it paying particular attention to entry and relief slide fasteners. Remove all traces of salt. | |
| 3 | Unbuckle the waist belt and release the ankle, wrist and thigh adjustment straps. |
CAUTION! Failure to completely open slide fastener will damage the suit when it is removed.
| 4 | Fold the waterproof zipper cover out of the way. Completely open the waterproof zipper. |
| 5 | Completely loosen the neck seal drawstring and open the chest zipper. |
| 6 | Insert fingers between neck seal and neck. Gently stretch the seal outward and upward while pulling head from seal and shoulders and head out of the suit. |
| 7 | Insert two fingers under wrist seal and gently pull seal outward. Cup the hand, fingertips and thumb together, and gently pull hand from seal. Repeat for other hand. |
| 8 | Remove legs from suit. Hang the suit by the hanging loop, close waterproof zipper half way and hang until dry. |
COMDTINST 16114.2A, ch. 3, A.11.b
Ice Rescue Dry Suit — what does the handbook teach? (COMDTINST 16114.2A, ch. 3, B.12)
Two dry suits are approved specially for ice rescue operations only: (01) The MSD 640 dry suit, and (02) The MSD 630 dry suit. Per reference (a), all previously purchased dry suits that are still serviceable are authorized for use until the repair cost exceeds 50% of the purchase price of a new
NOTE
dry suit.
[Illustration in the handbook: Figure 3-8 — MSD640 Dry Suit]
COMDTINST 16114.2A, ch. 3, B.12
MSD640 Donning Procedure — what does the handbook teach? (COMDTINST 16114.2A, ch. 3, B.12.a)
Before
donning the MSD-640, ensure appropriate polypropylene
undergarments are worn.
CAUTION!
Always don the dry suit on a clean surface such as a towel or tarp to avoid attracting debris. Pebbles, sand, dirt and other debris on the ground can cause damage to dry suit sock and compromise the suit’s integrity.
CAUTION!
Use extreme care when donning the dry suit. Prior to donning, remove all rings, watches, earrings, necklaces and eyeglasses that will cause damage to the wrist and neck seals. Footwear other than thermal socks must not be worn inside the drysuit. Use the following procedures to put on the MSD640. Follow the steps closely to ensure proper sealing of the neck and wrist seals:
| Step | Procedure |
| 1 | Ensure that Velcro® wrist covers and ankle covers are unfastened. |
| 2 | Ensure waist adjusters are loosened. |
| 3 | Ensure that both the outer shell entry zipper and waterproof entry zipper are fully opened. |
| 4 | Ensure the suspenders are pulled out of the suit legs. |
| 5 | Slide your legs into the suit until your toes reach the ends of the socks. |
| 6 | Don the suspenders. Ensure they are crossed in the back but not twisted. |
| 7 | Apply unscented talcum powder to the inside of the wrist seals. |
| 8 | Place right arm into right sleeve. |
| 9 | Carefully place the right hand into the right cuff by pointing the fingers straight, tucking the thumb underneath and inserting the hand through the seal. Do not make a fist when putting your wrist through the seal. |
| 10 | Roll the Velcro® wrist covers back and refasten to a snug fit. |
| 11 | Repeat steps 7-10 for the left arm. |
| 12 | Bring the upper portion of the suit over your head, aligning the neck opening with the top of the head. Reach inside the top of the neck seal with fingers and gently pull the seal outward and down as you push your head through. Flatten any folds or rolls of the seal against the skin. |
| 13 | Close the waterproof entry zipper. Reach over your left shoulder with your right hand and grasp the zipper toggle. While holding the top of the zipper, pull the toggle down until the zipper is completely fastened. |
| 14 | Ensure the waterproof relief zipper is completely closed and the slider is fully engaged with the zipper stop. Stow the zipper toggle in the yellow loop located under the zipper cover |
| CAUTION! Per reference (a), dry suits alone provide inadequate insulation for hypothermia protection. Personnel shall wear thermal underwear beneath the dry suit to provide protection from cold temperature, wind, sea spray and rain. Dry suits are not inherently buoyant. The harness flotation vest shall be worn over the dry suit for all cutter swimmer deployments. | |
| 15 | Close the outer shell entry zipper. Reach over your left shoulder with your right hand and grasp the zipper toggle. While holding the top of the zipper, pull the zipper down until the zipper is completely fastened. |
| 16 | Tighten the ankle Velcro® covers to a snug fit. |
| 17 | Prior to water entry, cross arms in front and gently slide finger between neck seal and your neck, squat down and force excess air through the neck opening. |
COMDTINST 16114.2A, ch. 3, B.12.a
Doffing Procedure — what does the handbook teach? (COMDTINST 16114.2A, ch. 3, B.12.b)
Use the following procedure to take off the MSD640:
| Step | Procedure |
| 1 | Remove all equipment worn over the suit. |
| 2 | Thoroughly rinse down the exterior of the suit while wearing it, paying special attention to the seals and zippers. Remove all dirt, salt and debris. |
| 3 | Loosen Velcro® waist and ankle adjustment tabs. |
| 4 | Completely open the outer shell entry zipper and the inner immersion layer waterproof zipper. |
| CAUTION! Placing undue force on the zipper may damage the seal and harm the integrity of the suit. Never forcefully yank on the zipper. | |
| 5 | Insert fingers between neck seal and neck. Gently stretch the seal outward and upward while pulling neck seal over your head. |
| 6 | With an unclenched fist, slowly pull each hand through the wrist seals while holding the rubber seal open |
| CAUTION! NOTE Pulling on the wrist seal may damage the seal. If wearing suspenders, remove suspenders prior to proceeding. | |
| 7 | Pull suit down past hips and slide legs from the suit. |
COMDTINST 16114.2A, ch. 3, B.12.b
Cutter Surface Swimmer Dry Suit — what does the handbook teach? (COMDTINST 16114.2A, ch. 3, B.13)
The cutter surface swimmer dry suit is worn by cutter surface swimmer personnel when deployed into water that is 50 degrees Fahrenheit and below.
[Illustration in the handbook: Figure 3-9 — Cutter Surface Swimmer Dry Suit]
COMDTINST 16114.2A, ch. 3, B.13
Donning Procedures — what does the handbook teach? (COMDTINST 16114.2A, ch. 3, B.13.a)
Use the following steps to put on the cutter surface swimmer dry suit:
| Step | Procedure |
| 1 | Lubricate the inside of the neck and wrist seals with unscented talcum powder. |
| 2 | Don insulating undergarments as required. |
| 3 | Pull the bottom section of the suit up to the waist and place arms into the sleeves. |
| 4 | Gently push one hand through the wrist seal at a time using the index finger of the opposite hand to stretch the seal as the hand pushes through. Repeat for opposite hand. Make sure insulating undergarments are not sandwiched between seal and skin and flatten any folds or rolls of the seal flat against the skin. |
| 5 | Bring the upper portion of the suit over the head, aligning the neck opening with the top of the head. Reach inside the top of the neck seal with the fingers and gently pull the seal outward and down as the head pushes through. Make sure insulating undergarments are not sandwiched between seal and skin and flatten any folds or rolls of the seal flat against the skin. |
| NOTE Use only one or two fingers to pull the entry and relief slide fasteners closed. If more force is required, the slide fastener may not be properly aligned or lubricated. If difficulty is encountered when closing slide fasteners, stop immediately, back the slide up and check for the cause of the interference. Correct the problem before proceeding. The slide fastener must be snug tight against the sealing plug. Use paraffin to lubricate the slide fastener. | |
| 6 | Close the entry and relief slide fasteners. Have a fellow crew member double check slide fastener to ensure it is closed completely against the sealing plug. |
| 7 | Remove excess air from the suit by sliding fingers under the neck seal and squatting down, pull arms tight against the chest and release seal. |
COMDTINST 16114.2A, ch. 3, B.13.a
Doffing Procedures — what does the handbook teach? (COMDTINST 16114.2A, ch. 3, B.13.b)
Use this procedure to take off the cutter surface swimmer dry suit:
| Step | Procedure |
| 1 | Remove all other equipment before removing the dry suit. |
| 2 | Wash down the dry suit while wearing it; pay particular attention to entry and relief slide fasteners. Remove all traces of salt. |
| CAUTION! Failure to completely open slide fastener will damage the suit when it is removed. | |
| 3 | Completely open the entry slide fastener. |
| 4 | Insert fingers between neck seal and neck. Gently stretch the seal outward and upward while pulling head from seal and shoulders and head out of the suit. |
| 5 | Insert two fingers under wrist seal and gently pull seal outward. Cup the hand, fingertips and thumb together, and gently pull hand from seal. Repeat for other hand. |
| 6 | Remove legs from suit. |
COMDTINST 16114.2A, ch. 3, B.13.b
Description — what does the handbook teach? (COMDTINST 16114.2A, ch. 3, C.1)
Boat crew survival vests contain the equipment listed in Table 3-1 Boat Crew Survival Vest Contents, with their use, characteristics, and operation described later in this Section. Figure 3-10 shows the boat crew survival vest and the proper storage location for each item. In addition to the PFD, each crew member must also be outfitted with either a boat crew survival
WARNING
vest, or if wearing a Type III inflatable PFD, the same contents found in the survival vest stored in the PFD’s pocket/pouch. Reference applicable maintenance procedure cards.
[Illustration in the handbook: Figure 3-10 — Boat Crew Survival Vest]
| Item | Equipment | Quantity |
| 1 | Emergency Signaling Mirror | 1 |
| 2 | Strobe Light | 1 |
| 3 | MK 79 Personal Distress Signal Kit | 1 |
| 4 | Whistle | 1 |
| 5 | MK-124 Mod 0/1 Marine Smoke and Illumination Signal | 1 |
| 6 | Survival Knife | 1 |
| 7 | Personal Locator Beacon (PLB) | 1 |
COMDTINST 16114.2A, ch. 3, C.1
Contents — what does the handbook teach? (COMDTINST 16114.2A, ch. 3, C.2)
Table 3-1 — Boat Crew Survival Vest Contents
Emergency Signaling Mirror
COMDTINST 16114.2A, ch. 3, C.2
Description — what does the handbook teach? (COMDTINST 16114.2A, ch. 3, C.3)
The emergency signaling mirror is a pocket-sized mirror with a sighting hole in the center and a lanyard attached (see Figure 3-11). However, any common mirror is useful as an emergency signaling device.
[Illustration in the handbook: Figure 3-11 — Emergency Signaling Mirror]
COMDTINST 16114.2A, ch. 3, C.3
Use — what does the handbook teach? (COMDTINST 16114.2A, ch. 3, C.4)
The mirror is used to attract the attention of passing aircraft, boats, or ground rescue teams by reflecting light at them. Instructions for using the mirror are printed on its backside.
COMDTINST 16114.2A, ch. 3, C.4
Characteristics — what does the handbook teach? (COMDTINST 16114.2A, ch. 3, C.5)
Light reflected in this manner can be seen at a great distance from the point of origin. Practice is the key to effective use of a signal mirror.
COMDTINST 16114.2A, ch. 3, C.5
Operation Strobe Light — what does the handbook teach? (COMDTINST 16114.2A, ch. 3, C.6)
The following procedures describe how to properly use this accessory:
| Step | Procedure |
| 1 | Face a point about halfway between the sun and an object you wish to signal. |
| 2 | Reflect sunlight from the mirror onto a nearby surface such as the raft, your hand, etc. |
| 3 | Slowly bring the mirror up to eye-level and look through the sighting hole. You will see a bright light spot, this is the aim indicator. |
| 4 | Hold the mirror near your eye and slowly turn and manipulate it so the bright light spot is on target. |
COMDTINST 16114.2A, ch. 3, C.6
Description The strobe light is a lightweight, compact, battery-operated strobe light that — what does the handbook teach? (COMDTINST 16114.2A, ch. 3, C.7)
emits a high intensity white LED visual distress signal (Figure 3-12).
[Illustration in the handbook: Figure 3-12 — Strobe light]
COMDTINST 16114.2A, ch. 3, C.7
Use — what does the handbook teach? (COMDTINST 16114.2A, ch. 3, C.8)
The strobe light is used to attract the attention of aircraft, ships, or ground parties. One side is equipped with hook fasner tape so that it can be attached to the boat crew safety helmet, inflatable PFD, or survival vest. This eliminates the need to hold the strobe light, freeing up hands to operate other signaling equipment.
COMDTINST 16114.2A, ch. 3, C.8
Characteristics — what does the handbook teach? (COMDTINST 16114.2A, ch. 3, C.9)
The strobe lights emit approximately 50 to 70 flashes per minute. It will operate for a minimum of 8 hours continuous, but typically 18+ hours. Depending on atmospheric conditions, the strobe light has a visual range of 2 – 5 miles.
COMDTINST 16114.2A, ch. 3, C.9
Operation Illumination Signal Kit, MK-79 MOD 0 — what does the handbook teach? (COMDTINST 16114.2A, ch. 3, C.10)
The following are the procedures to operate the strobe light:
| Step | Procedure |
| 1 | Turn on: Slide the switch into the on position. Light should begin flashing within seconds. |
| 2 | Turn off: Slide the switch back into the off position. The light should stop flashing. |
| NOTE Coast Guard Deployable Specialized Forces units utilizing MILTAC stroble light will have different operating procedures. |
COMDTINST 16114.2A, ch. 3, C.10
Description — what does the handbook teach? (COMDTINST 16114.2A, ch. 3, C.11)
The MK-79 MOD 0 is a pyrotechnic illumination signal kit that contains seven screw-in cartridge flares (MK-80) and one pencil-type projector (MK-31). The projector in this kit is used to aim and fire a signal cartridge (Figure 3-13). Additional information can be found in reference (d).
[Illustration in the handbook: Figure 3-13 — Illumination Signal Kit, MK-79 MOD 0]
COMDTINST 16114.2A, ch. 3, C.11
Use — what does the handbook teach? (COMDTINST 16114.2A, ch. 3, C.12)
The MK-79 MOD 0 is used to attract vessels, aircraft, and ground rescue teams.
COMDTINST 16114.2A, ch. 3, C.12
Characteristics — what does the handbook teach? (COMDTINST 16114.2A, ch. 3, C.13)
These signals produce a single red star display at an altitude of 250-650 feet for a minimum time of 4.5 seconds. Their luminous intensity is about 12,000 candle power.
COMDTINST 16114.2A, ch. 3, C.13
Operation Signal Whistle — what does the handbook teach? (COMDTINST 16114.2A, ch. 3, C.14)
The following are procedures for operating the MK-79 MOD 0:
| Step | Procedure |
| 1 | Remove the bandolier and projector from the plastic envelope. |
| 2 | Cock the firing pin of the projector by moving the trigger screw to the bottom of the vertical slot and slipping it to the right so that it catches at the top of the angular (safety) slot. |
| WARNING Failing to cock the firing pin back may result in the cartridge firing prematurely when attaching to the projector. | |
| 3 | Bend protective plastic tab away from signal in bandolier to allow attachment to projector. |
| WARNING The plastic tabs over signals in the bandolier protect percussion primers on the cartridges from being struck accidentally. They should be kept intact until just before loading into the projector. |
WARNING Keep the projectile-end of the flare pointed in a safe direction while loading the flare in the projector. Ensure Step 2 is completed prior to “loading.” Accidental firing may occur if projector is not cocked.
| 4 | Attach a signal flare to the projector and rotate clockwise until the signal is seated. |
| 5 | Hold projector overhead with arm fully extended. The projector should be pointed at a slight angle away from the body. |
| 6 | While firmly gripping the projector, fire the signal by slipping the trigger screw to the left out of the safety slot and into the firing slot. |
| NOTE This action should be one continuous movement so that the thumb does not interfere with the upward motion of the trigger screw when it is brought into the firing slot. The trigger screw must "snap" upward. | |
| 7 | If the signal fails to fire, try again twice by depressing the trigger screw to the bottom of the firing slot with the thumb and releasing it quickly. If it still fails to fire, wait 30 seconds before unscrewing, to reduce the possibility of hang fire. |
| WARNING Do not aim at personnel, aircraft, or other objects. | |
| 8 | Unscrew (counterclockwise) the spent signal case or signal that has failed to fire. Discard by throwing overboard. |
| 9 | To fire another signal, repeat the procedures above. |
COMDTINST 16114.2A, ch. 3, C.14
Description — what does the handbook teach? (COMDTINST 16114.2A, ch. 3, C.15)
The whistle is a small, hand-held device (see Figure 3-14) that produces a loud sound when it is blown. The standard whistle is constructed of plastic and resembles a police officer’s whistle.
[Illustration in the handbook: Figure 3-14 — Signal Whistle]
COMDTINST 16114.2A, ch. 3, C.15
Use — what does the handbook teach? (COMDTINST 16114.2A, ch. 3, C.16)
The sound produced by a whistle will attract the attention of rescuers and guide them to the whistle’s origination. During periods of restricted visibility, fog, and darkness, rescuers may hear the sound it produces before they sight the strobe light.
COMDTINST 16114.2A, ch. 3, C.16
Characteristics Smoke and Illumination Signal, MK-124 MOD 0/1 — what does the handbook teach? (COMDTINST 16114.2A, ch. 3, C.17)
Depending on weather conditions, a whistle’s audible sound may be heard at a distance of up to 1,000 yards. Any wind has the effect of carrying the sound downwind.
COMDTINST 16114.2A, ch. 3, C.17
Description — what does the handbook teach? (COMDTINST 16114.2A, ch. 3, C.18)
The MK-124 Mod 0/1 is a pyrotechnic smoke and illumination signal used day or night as a distress signal at sea or on land (Figure 3-15). One end produces orange smoke as the day signal and the other end produces a red flare as the night signal. Additional information can be found in Reference (d).
NOTE
Auxiliary crew members may use commercially available Coast Guard approved survival equipment while operating an Auxiliary facility. See reference (c) for specific requirements.
[Illustration in the handbook: Figure 3-15 — Smoke and Illumination Signal, MK-124 MOD 0/1]
COMDTINST 16114.2A, ch. 3, C.18
Use — what does the handbook teach? (COMDTINST 16114.2A, ch. 3, C.19)
These signals are used to attract vessels, aircraft, and ground rescue teams day or night. The signal may also be used to indicate wind direction for helicopter hoists. It is labeled with the following operating instructions: (01) Do not dispose of the signal until both ends have been used. (02) Only when signals misfire should it be disposed of over the side. Misfires are a safety hazard if kept onboard a vessel. (03) When both ends of the signal have been discharged, properly dispose of it. In an actual distress situation, spent signals may be tossed over the side. Per reference (a), under no circumstances shall personnel ignite both
WARNING
ends simultaneously.
COMDTINST 16114.2A, ch. 3, C.19
Characteristics — what does the handbook teach? (COMDTINST 16114.2A, ch. 3, C.20)
As mentioned above, both ends of the device produce a signal and each end burns for about 20 seconds. The night end produces a red flare (similar to a road flare) and the day end produces orange smoke.
COMDTINST 16114.2A, ch. 3, C.20
Operation Survival Knife — what does the handbook teach? (COMDTINST 16114.2A, ch. 3, C.21)
The device has two raised bands around its circumference on its night end (flare). These bands positively identify the night end by sense of touch. Also, a label on the case identifies the day (smoke) and night (flare) ends and provides instructions for use. After choosing which end to use, perform the following procedures:
| Step | Procedure |
| WARNING After ignition, the outer case may overheat and burn the hand. Dropping the signal on land will not decrease its effectiveness. | |
| WARNING Do not look directly at the light of a night flare close up. The intensity of the lights could burn the eyes. | |
| WARNING Do not direct either end of a signal toward another person. | |
| 1 | Remove the protective cap from the end to be ignited. |
| 2 | Slide the plastic lever in the direction of the arrow until fully extended. |
| 3 Hold the signal downwind and overhead at a 45° angle from the horizon over the side of the raft or away from dry debris to prevent burns from hot drippings. WARNING 4 Using the thumb, pull down on the extended tab to ignite signal. 5 If the smoke signal end flames up, briefly immerse it in water or hold it against a solid object. 6 After using one end, douse in water to cool it, or if on land, place it on the ground to cool. Save the signal to use the other end when needed. Prior to pulling lever downward, position all fingers below top of signal. | 3 | Hold the signal downwind and overhead at a 45° angle from the horizon over the side of the raft or away from dry debris to prevent burns from hot drippings. |
| WARNING Prior to pulling lever downward, position all fingers below top of signal. | ||
| 4 | Using the thumb, pull down on the extended tab to ignite signal. | |
| 5 | If the smoke signal end flames up, briefly immerse it in water or hold it against a solid object. | |
| 6 | After using one end, douse in water to cool it, or if on land, place it on the ground to cool. Save the signal to use the other end when needed. |
COMDTINST 16114.2A, ch. 3, C.21
Description Personal Locator Beacon (PLB) — what does the handbook teach? (COMDTINST 16114.2A, ch. 3, C.22)
The survival knife (Figure 3-16) is a basic tool used to free the crew member from entangling lines. It is also used to cut material blocking a path in escaping a capsized or sinking boat. It should be a fixed blade design with a blunt tip made of corrosion-resistant material. The blade should be checked periodically for sharpness.
[Illustration in the handbook: Figure 3-16 — Survival Knife]
COMDTINST 16114.2A, ch. 3, C.22
Description — what does the handbook teach? (COMDTINST 16114.2A, ch. 3, C.23)
The PLB (Figure 3-17) is a smaller version of the common ship mounted 406 MHz EPIRB that is used on military, commercial, and recreational vessels. This personal transmitter is capable of broadcasting a distress signal that can be received and tracked world-wide guiding emergency response resources to the transmitting position for rescue.
COMDTINST 16114.2A, ch. 3, C.23
Use — what does the handbook teach? (COMDTINST 16114.2A, ch. 3, C.24)
The PLB is for emergency use only. This device is the primary distress signal and should be activated immediately to signal for help. Once activated, do not turn it off. Once search vessels or aircraft have reached the transmitting position area, use other signaling equipment (radio, signal mirror, flares, etc.) to vector them to the position.
COMDTINST 16114.2A, ch. 3, C.24
Characteristics — what does the handbook teach? (COMDTINST 16114.2A, ch. 3, C.25)
The PLB is a personal transmitter capable of broadcasting on both 406 MHz and 121.5 MHz. The international satellite based search and rescue system (COSPAS SARSAT) monitors 406 MHz and is able to provide a position accurate to within three nautical miles within 90 minutes. Once the rescue platform is in the vicinity, the 121.5 MHz transmitter provides a signal allowing the resource to home in on the vessel or individual in distress particularly if the individual is equipped with flares and a strobe light.
COMDTINST 16114.2A, ch. 3, C.25
Operation — what does the handbook teach? (COMDTINST 16114.2A, ch. 3, C.26)
Since PLB’s may vary in style and operation, as new models are produced, each crew member should read and understand the PLB owner’s handbook. Prior to getting underway with the PLB the first time, each crew member should demonstrate the test sequence and explain the activation procedure to a qualified member.
[Illustration in the handbook: Figure 3-17 — Personal Locator Beacon (PLB)]
COMDTINST 16114.2A, ch. 3, C.26
Parachute Illumination Signal, M127A1 — what does the handbook teach? (COMDTINST 16114.2A, ch. 3, D.1)
The parachute illumination signal, M127A1 is a night time illumination- signaling device. When fired, it climbs to an altitude of 650 to 700 feet before igniting. Upon ignition, it produces a parachute-suspended white star flare that burns for about 36 seconds with 125,000 candlepower. The signal descends at a rate of 10 to 15 feet per second (Figure 3-18).
[Illustration in the handbook: Figure 3-18 — Parachute Illumination Signal, M127A1]
COMDTINST 16114.2A, ch. 3, D.1
Safety Precautions — what does the handbook teach? (COMDTINST 16114.2A, ch. 3, E.3.a)
Per reference (a), the following safety precautions shall be strictly observed when firing the parachute illumination signal: (01) Do not remove a signal from its sealed container until just before use. (02) Do not attempt to use dented, cracked, or otherwise damaged or deteriorated signals. (03) While handling the illumination signal outside of its canister, be sure to avoid striking the primer.
COMDTINST 16114.2A, ch. 3, E.3.a
Firing Procedures — what does the handbook teach? (COMDTINST 16114.2A, ch. 3, E.3.b)
The following are procedures for firing the parachute illumination signal M127A1:
| Step | Procedure |
| 1 | Remove a signal from its container. |
| 2 | Hold the signal in left hand with the RED knurled band of the signal FACING UP. Align left thumb and forefinger along the red band. |
| 3 | Withdraw the firing cap from the lower end of the signal. |
| 4 | Point the ejection end of the signal (the end opposite the red knurled band) away from personnel, equipment, and materials. Slowly push the cap onto the primer (red band) end until the cap meets the edge of the knurled band. DO NOT PERMIT THE CAP TO GO BEYOND THE RED BAND. |
| CAUTION! Exercise due care to prevent the expended rocket body from falling on people, watercraft, and structures. |
| 5 | Hold the signal FIRMLY at arm’s length with the left hand, with the ejection end facing straight up. The signal should be held in a vertical position (90° elevation) when firing. |
| 6 | Strike the firing cap bottom sharply with the palm of the right hand, keeping the left arm rigid and pointing straight up. |
| 7 | If a misfire occurs while underway, toss it overboard. Or If a signal misfires while on land, place it in a secure position to prevent people from being hurt should the signal fire. The signal must not be approached for at least 30 minutes. |
WARNING
When conducting SAR operations with a helicopter, extreme caution and coordination must be used by surface units using pyrotechnics. Do not fire pyrotechnics without permission and instructions from the Aircraft Commander.
COMDTINST 16114.2A, ch. 3, E.3.b
Firing Angles — what does the handbook teach? (COMDTINST 16114.2A, ch. 3, E.3.c)
Firing a signal at angles other than a vertical position may be necessary under the following circumstances: (01) To compensate for high wind velocities. (02) To gain maximum illumination of the area.
NOTE
If a signal is fired at an angle less than 90° elevation (directly overhead), the altitude reached is reduced and the altitude of candle burnout is lessened. If the firing angle is 60° or less, the candle will, in almost all cases, still be burning when it strikes the surface.
COMDTINST 16114.2A, ch. 3, E.3.c
Potential Capsizing Forces and Factors — what does the handbook teach? (COMDTINST 16114.2A, ch. 4, A.1)
When a boat is in the water, two forces, buoyancy versus gravity work against each other. While buoyancy pushes up from the water to keep a boat afloat, gravity pushes the boat down into the water. Under normal circumstances the forces of buoyancy and gravity will offset each other, unless an external force acts upon a boat. Stability is of paramount importance – if a boat becomes unstable, small, normally minor outside forces can create a situation where capsizing can occur or perhaps be just one bad boat handling maneuver away. While stability loss itself can cause a boat to capsize, it is often a combination of loss of stability, environmental factors, and maneuvering decisions that lead to capsizing. A boat is less likely to capsize in deep, open water. The chances of capsizing are greatest while operating in or near the surf or breaking seas. The force needed to capsize is most likely to come from heavy seas directly astern (following seas), or large breakers striking abeam. If in doubt, a boat should stay at sea until conditions change. The safest point for most boats to take heavy seas is nearly bow-on. A boat should not operate or tow in conditions beyond the capability of the boat or crew. In such conditions, the Operational Commander should be advised so that the proper resource (e.g. MLB, cutter, or helicopter) can respond. While not necessarily contributing or causal factors, conditions present in many capsizings included: (01) Surf or breaking seas, (02) Shallow water depth (less than 20 feet), (03) High speed maneuvers, (04) Going against a strong tidal current and with steep following seas, (05) Escorting or towing another boat through an inlet, (06) Maneuvering a boat alongside another vessel while underway, (07) Restricted visibility due to darkness, rain, or fog, (08) Center of gravity changes (e.g. low fuel in the tank, execessive amounts of water in the bilges, icing of topsides, or overloading of cargo and/or people).
COMDTINST 16114.2A, ch. 4, A.1
Preparations for Egress — what does the handbook teach? (COMDTINST 16114.2A, ch. 4, A.2)
If the hull is intact after capsizing, it may not sink for some time, even in rough seas, but quick egress is the best option for survival. The crew will be able to escape if panic is avoided. Some preparations and good to know information ahead of time include: (01) Perform frequent visualization “what-if” scenarios (night time, seating locations, etc.). (02) Learn the boat’s interior. Initially the crew will be disoriented due to being upside down, water up your nose, and with a lack of lighting. (03) Stow all loose gear, and have all equipment and doors operating properly for ease in escaping. (04) Know the location and use of all survival equipment. Check them regularly to be sure that it is adequate, in good repair, and that all signalling devices work. (05) Be ready to grab a sturdy support to prevent being thrown about. (06) Cold water decreases the length of time most people can hold their breath underwater. Immersion in cold water may give a sensation of tightness in the chest and also causes a gasp reflex which may impact your ability to hold your breath. (07) Remember if you are wearing an inherently buoyant PFD or an inflatable PFD that has been activated, the PFD’s buoyancy will try to bring you to the surface of the water but the cabin will be in the way. In theory, if you remain upright, you will be able to walk out of the boat on the overhead which is now acting as the deck. In most cases it will be difficult to remain upright and therefore your PFD may “pin” you to the overhead (deck). Consider removing PFD if necessary.
COMDTINST 16114.2A, ch. 4, A.2
Know When Something is Wrong Escape — what does the handbook teach? (COMDTINST 16114.2A, ch. 4, A.3)
A boat doesn’t capsize without influencing forces. As mentioned in A.1. Potential Capsizing Forces and Factors of this Section there are certain conditions and factors that make capsizing more likely. Regardless of whether the above conditions are present or not, there comes a point where the operator feels a difference inhow the boat normally feels. For example, the time for action is as soon as the boat starts to roll beyond normal limits, heel, or feel different from normal.
COMDTINST 16114.2A, ch. 4, A.3
Escape Procedures – Initial Response — what does the handbook teach? (COMDTINST 16114.2A, ch. 4, A.4)
If the boat you are on capsizes make every effort to egress as quickly as possible. If you are not entrapped, GET OUT as quickly as possible! Your escape route is a common sense decision. Do not think of egress routes in terms of primary, secondary or tertiary egress routes where there are preferred exits. Instead consider where you are and your initial response given your position in the boat. Procedures for egress from a cabin boat are below: (01) Remain Calm, (02) Brace for impact/roll, (03) Wait until all violent motion has stopped, (04) Maintain reference point with one hand on armrest, handrail. etc. (05) Open window/door, (06) Release restraint (If applicable), (07) Continue to maintain reference points while exiting through door/window, (08) Exit through door/window by pulling your body using a hand-over- hand technique – DO NOT Kick as this can disorient or injure a crew member following you out the same exit, (09) If necessary, remove excess gear (PFD, LE belt, etc.), (10) Once on the surface – see A.6. Post Capsize Procedures.
COMDTINST 16114.2A, ch. 4, A.4
Escape Procedures – Secondary Response — what does the handbook teach? (COMDTINST 16114.2A, ch. 4, A.5)
If the boat you are on capsizes and your initial response to egress is blocked or unsuccessful, shift to your secondary response. This will be the next most logical exit available to you. Additional procedures are below: (01) Remain Calm. (02) If needed, seek air pocket prior to secondary attempt. (03) Maintain reference point and use hand-over-hand technique to the secondary response exit - DO NOT Kick as this can disorient or injure a crew member following you out the same exit. (04) Open Door/Window. (05) If necessary, remove excess gear (PFD, LE belt, etc.). (06) Once on the surface – see Post capsize procedures.
COMDTINST 16114.2A, ch. 4, A.5
Post Capsize Procedures — what does the handbook teach? (COMDTINST 16114.2A, ch. 4, A.6)
Survivors from a capsized boat should attempt to stay with the boat or other visible floating debris. This not only offers a larger target for search assets but also affords more protection against hypothermia as water robs your body of heat faster than air. (01) Climb onto hull of vessel (if possible). (02) Take personnel muster. (03) Activate PLB. (04) Visually scan for possible rescue vessels. If in range, personnel act as a team to signal using pyro, signal mirror, etc. (05) Inventory Survival gear. (06) Stay with the boat until rescued or boat sinks.
NOTE
If unable to board the overturned hull, survivors should huddle and tether themselves together and stay with the overturned vessel. Survivors should make every effort to stay with the overturned vessels without physically tying themselves to the vessel.
COMDTINST 16114.2A, ch. 4, A.6
Remaining Inside a Capsized Boat — what does the handbook teach? (COMDTINST 16114.2A, ch. 4, A.6.a)
Make every effort to egress from a capsized boat quickly, it is your best option to survive but if for some reason someone cannot exit the capsized boat: (01) Remain calm and stay within an air pocket. (02) Unless certain of rescue efforts on the surface, activate PLB. There is no guarantee that other crew were able to escape and initiate rescue. (03) When hearing rescuers, attempt to communicate to them by shouting or tapping on the hull. (04) Conserve oxygen by remaining calm and minimizing physical activity. If possible, get out of the water to reduce risk of hypothermia. (05) Remember that rescuers should arrive soon.
COMDTINST 16114.2A, ch. 4, A.6.a
Automatic Inflation and Deployment — what does the handbook teach? (COMDTINST 16114.2A, ch. 4, B.1)
When properly stowed, this life raft is designed to automatically float free from its storage rack and inflate in the event of capsizing or sinking. As the raft container is released and drifts away, the inflation cable, attached to the raft-end of the 50-foot painter line, is pulled tight. When this occurs, the CO2 cylinder will automatically discharge and inflate the life raft. The painter line will remain attached to the rack by a weak link, which requires 500 pounds of force to separate. Separation will also occur by heaving around on the painter line or by the stress exerted on it from the raft’s buoyancy if the boat/cutter sinks to a depth greater than 50 feet.
COMDTINST 16114.2A, ch. 4, B.1
Manual Inflation and Deployment — what does the handbook teach? (COMDTINST 16114.2A, ch. 4, B.2)
Because of increased functionality and capability of boats, the use of rescue rafts is dwindling in the Coast Guard. Depending on the situation, if time permits before sinking, manually deploy the life raft. If the life raft is not automatic, or if its automatic functions do not work, follow the procedures outlined in B.2.a. Manual Inflation Procedures of Boat-Installed Life Raft or B.2.b. Manual Inflation Procedures of Cutter Life Raft for manual deployment.
COMDTINST 16114.2A, ch. 4, B.2
Manual Inflation Procedures of Boat-Installed Life Raft — what does the handbook teach? (COMDTINST 16114.2A, ch. 4, B.2.a)
| Step | Procedure |
| 1 | Cut/untie painter line from hydrostatic release unit. |
| 2 | Secure painter line to a strong point on boats deck. |
| 3 | Lift container and toss overboard. |
| 4 | Pull painter line to actuate inflation cylinder, life raft will inflate. |
| NOTE In the event of a fire on your vessel, drop the raft into the water on the windward side of the vessel to stay upwind of harmful smoke, fumes and fire. | |
| 5 | Time permitting; place extra equipment and supplies aboard the raft such as signals, portable radios, water, and food. |
| 6 | If practical, pull raft alongside and board directly from the boat. |
| 7 | Deploy sea anchor. |
| 8 | Pull the canopy over the support tubes and secure. |
| 9 | If the boat begins to sink, cut the painter line to free the raft to drift. |
| 10 | Follow the “Immediate Actions” instruction booklet located inside equipment container. |
| CAUTION! In the event of upside-down inflation, right the raft from the end opposite of the inflation assembly and CO2 bottle. This end is marked “here to right.” |
[Illustration in the handbook: Figure 4-1 — Manual Deployment of Survival Raft]
COMDTINST 16114.2A, ch. 4, B.2.a
Manual Inflation Procedures of Cutter Life Raft Boarding a Life Raft from the Water — what does the handbook teach? (COMDTINST 16114.2A, ch. 4, B.2.b)
Use the following procedure to deploy the raft for use by the crew:
| Step | Procedure |
| 1 | Cut or untie the painter line from the weak link. |
| 2 | Trigger the hydrostatic release and remove the raft container from the stowage rack. |
| 3 | Secure the painter line to a cleat or bitt. |
| 4 | Drop the raft into the water on the leeward side of the cutter. |
| 5 | Pull the remaining painter line (approximately 50 feet) from the raft container to actuate the inflation assembly. As the raft inflates, tend the painter line to keep the raft close. Fend off the inflating raft to prevent damage to the raft from the cutter. |
| 6 | Time permitting; place extra equipment and supplies aboard the raft such as signals, portable radios, immersion suits, water and food |
| 7 | If practical, pull the raft alongside the embarkation net/Jacobs ladder and board the raft directly. |
| 8 | Set a watch on the cutter and painter line. If the cutter begins to sink, cut the painter line to free the raft to drift. |
COMDTINST 16114.2A, ch. 4, B.2.b
Boarding a Life Raft from the Water — what does the handbook teach? (COMDTINST 16114.2A, ch. 4, B.3)
With the life raft deployed and tied off alongside, the boat/cutter crew should try to remain onboard the platform for as long as possible. If the boat/cutter starts to sink rapidly, try and board the life raft directly, cutting the painter line once onboard. If unable to board the raft directly, you will need to enter the water. Once in the water get aboard the life raft. This is done by climbing on the boarding ladder or ramp depending on the type of raft and pulling yourself up using the straps attached to the raft for this purpose.
COMDTINST 16114.2A, ch. 4, B.3
Boarding a Life Raft from the Water Without Ramp On-Raft Conduct — what does the handbook teach? (COMDTINST 16114.2A, ch. 4, B.3.a)
Perform the following procedures:
| Step | Procedure |
| 1 | Facing entrance, use buoyancy of worn PPE to spring up. |
| 2 | Legs together, dolphin kick. |
| 3 | Grab top tube, then straps inside raft to pull in. |
| 4 | Get help from people inside the raft. |
WARNING
Due to the high risk of accidentally puncturing inflatable rafts, extreme care must be taken when boarding or assisting personnel out of the water and into the raft. This is especially important if such persons are wearing survival vests. Once in the life raft all persons should seat themselves on the floor and remain in that position if possible. All sharp objects should be collected and stored to prevent puncturing the raft fabric.
COMDTINST 16114.2A, ch. 4, B.3.a
Tasks Onboard a Raft — what does the handbook teach? (COMDTINST 16114.2A, ch. 4, B.4)
Upon boarding a raft, complete the following procedures as soon as possible:
CAUTION!
Be careful not to snag the raft with your shoes or with sharp objects.
| Step Procedure 1 Account for everyone and search for survivors. 2 If more than one raft is deployed, tie them together. 3 Check the physical condition of all people aboard. Give first aid as necessary. Weather permitting, wash any oil or gasoline from clothing and body. These substances will not only burn skin, but also pose a fire hazard. Additionally, they may be transferred from skin to the raft, deteriorating the rubber surfaces. 4 Salvage any floating equipment that may be useful. Inventory, stow, and secure all survival items. 5 If no longer attached to the vessel, deploy the sea anchor to reduce rate of drift and improve stability in heavy seas. 6 Check the raft for proper inflation and points of possible chafing (areas where equipment may wear a hole in the buoyancy tubes). 7 Bail out any water that may have entered the raft. 8 Inflate the floor immediately. 9 In cold water, put on hypothermia protective clothing, if available. Rig the entrance cover, close when necessary. 10 If other people are with you, huddle together for warmth. | Step | Procedure |
| 1 | Account for everyone and search for survivors. | |
| 2 | If more than one raft is deployed, tie them together. | |
| 3 | Check the physical condition of all people aboard. Give first aid as necessary. Weather permitting, wash any oil or gasoline from clothing and body. These substances will not only burn skin, but also pose a fire hazard. Additionally, they may be transferred from skin to the raft, deteriorating the rubber surfaces. | |
| 4 | Salvage any floating equipment that may be useful. Inventory, stow, and secure all survival items. | |
| 5 | If no longer attached to the vessel, deploy the sea anchor to reduce rate of drift and improve stability in heavy seas. | |
| 6 | Check the raft for proper inflation and points of possible chafing (areas where equipment may wear a hole in the buoyancy tubes). | |
| 7 | Bail out any water that may have entered the raft. | |
| 8 | Inflate the floor immediately. | |
| 9 | In cold water, put on hypothermia protective clothing, if available. Rig the entrance cover, close when necessary. | |
| 10 | If other people are with you, huddle together for warmth. |
COMDTINST 16114.2A, ch. 4, B.4
Conduct in a Raft — what does the handbook teach? (COMDTINST 16114.2A, ch. 4, B.5)
The safety and survival of everyone in a raft depends on clear thinking and common sense. To protect those aboard and increase survival time, perform the following procedures:
| Step | Procedure |
| 1 | Maintain a positive attitude. |
| 2 | Inventory all equipment. Ration water and food. Assign lookout and other necessary duties to crew members. |
| 3 | Do not rely on memory. If materials are available, keep a written log. Record the following: (01) Time of entry into the water, (02) Names and physical condition of survivors, (03) Ration schedule, (04) Winds, (05) Weather, (06) Direction of swells, (07) Times of sunrise and sunset, (08) Other navigation data. |
COMDTINST 16114.2A, ch. 4, B.5
Using a Raft to Rescue Others Introduction In this Appendix Introduction In this Appendix — what does the handbook teach? (COMDTINST 16114.2A, ch. 4, B.6)
When it is impossible or too dangerous to maneuver close to a distressed vessel, the life raft may be used to ferry survivors to the boat. It may also be used to recover people from the water if a boat cannot get close enough to them.
WARNING
Although the raft is ballasted and very stable in most sea states, it may capsize in large breaking waves. For this reason, consider other methods for rescue of people in breaking surf or seas. (e.g., helicopter rescue).
[Illustration in the handbook: Figure 4-2 — Life Raft as Rescue Ferry]
Use the following procedures when deploying a life raft during a rescue attempt (see Figure 4-2):
| Step Procedure 1 Remove the raft container from its storage rack. 2 Do not manually or automatically inflate the life raft while removing the tape sealing the life raft case (half shells) together. 3 Roll the life raft out of the case and place it in the water on the leeward side of the boat. 4 Pull the painter line from the raft container, manually inflate the raft, and hold it alongside your boat. 5 Attach two lines, each of a length longer than the maximum distance between your boat and the people in distress. 6 Use one line to tend the life raft from your boat during the evolution (NEVER LET GO OF THIS LINE). 7 Pass the other line to the people in distress with a heaving line or let the current float it down to them. 8 Tell the persons being assisted to haul the life raft to their position. WARNING 9 Once the life raft is alongside, direct the persons to board the life raft, one person at a time. 10 If the number of people being assisted is more than the carrying capacity of the raft, direct the people remaining to tend the line attached to the life raft from their location; haul back the maximum number of survivors and repeat the procedure. 11 After recovering all people, deflate the raft and bring it aboard the rescue boat. The raft may have taken on water during the rescue evolution. De-ballast the raft before bringing it aboard. Use the handles located on the ballast bags and slowly lift one side of the raft until all the water has run out. 12 Once the raft is aboard, do not repack the raft. Wash the raft and have it repacked at a certified packing station before returning it to service. Ensure each person is wearing a PFD. Do not permit more people to enter the raft than are allowed by the raft’s specifications. | Step | Procedure |
| 1 | Remove the raft container from its storage rack. | |
| 2 | Do not manually or automatically inflate the life raft while removing the tape sealing the life raft case (half shells) together. | |
| 3 | Roll the life raft out of the case and place it in the water on the leeward side of the boat. | |
| 4 | Pull the painter line from the raft container, manually inflate the raft, and hold it alongside your boat. | |
| 5 | Attach two lines, each of a length longer than the maximum distance between your boat and the people in distress. | |
| 6 | Use one line to tend the life raft from your boat during the evolution (NEVER LET GO OF THIS LINE). | |
| 7 | Pass the other line to the people in distress with a heaving line or let the current float it down to them. | |
| 8 | Tell the persons being assisted to haul the life raft to their position. | |
| WARNING Ensure each person is wearing a PFD. Do not permit more people to enter the raft than are allowed by the raft’s specifications. | ||
| 9 | Once the life raft is alongside, direct the persons to board the life raft, one person at a time. | |
| 10 | If the number of people being assisted is more than the carrying capacity of the raft, direct the people remaining to tend the line attached to the life raft from their location; haul back the maximum number of survivors and repeat the procedure. | |
| 11 | After recovering all people, deflate the raft and bring it aboard the rescue boat. The raft may have taken on water during the rescue evolution. De-ballast the raft before bringing it aboard. Use the handles located on the ballast bags and slowly lift one side of the raft until all the water has run out. | |
| 12 | Once the raft is aboard, do not repack the raft. Wash the raft and have it repacked at a certified packing station before returning it to service. |
APPENDIX A Glossary
This appendix contains a list of terms that may be useful when reading this Manual. This appendix contains the following information:
| Topic | See Page |
| Glossary | A-1 |
| TERM | DEFINITION |
| Abeam | To one side of a vessel, at a right angle to the fore-and-aft centerline. |
| Aft | Near or toward the stern. |
| Astern | The direction toward or beyond the back of a vessel. |
| Attitude | A vessel’s position relative to the wind, sea, hazard, or other vessel. |
| Beam | The widest point of a vessel on a line perpendicular to the keel, the fore-and-aft centerline. |
| Below | The space or spaces that are underneath a vessel’s main deck. |
| Bilge | The lowest point of a vessel’s inner hull, which is underwater. |
| Bitt | A strong post of wood or metal, on deck in the bow or stern, to which anchor, mooring, or towing lines may be fastened. |
| Bow | The forward end of the vessel. |
| Breaker | A wave cresting with the top breaking down over its face. |
| Buoyancy | The tendency or capacity of a vessel to remain afloat. |
| Capsize | To turn a vessel bottom side up. |
| Center of Gravity | Point in a ship where the sum of all moments of weight is zero. With the ship at rest, the center of gravity and the center of buoyancy are always in a direct vertical line. For surface ships, center of buoyancy is usually below center of gravity, and the ship is prevented from capsizing by the additional displacement on the low side during a roll. Thus the point at which the deck edge enters the water is critical because from here onward, increased roll will not produce corresponding increased righting force. |
| Characteristic | The audible, visual, or electronic signal displayed by an aid to navigation to assist in the identification of an aid to navigation. Characteristic refers to lights, sound signals, racons, radiobeacons, and daybeacons. |
| TERM | DEFINITION |
| Chine | The intersection of the bottom and the sides of a flat bottom or “V” hull boat. |
| Chop | Short steep waves usually generated by local winds and/or tidal changes. Change of operational control. The date and time at which the responsibility for operational control of a ship or convoy passes from one operational control authority to another. |
| Cleat | An anvil-shaped deck fitting for securing or belaying lines. Wedge cleats are used in yachting to hold sheets ready for instant release. |
| Coast Guard- Approved | Label denoting compliance with Coast Guard specifications and regulations relating to performance, construction, and materials. |
| Course (C) | The horizontal direction in which a vessel is steered or intended to be steered, expressed as angular distance from north, usually from 000° at north, clockwise through 360°. |
| Coxswain | Person in charge of a boat, pronounced “COX-un.” |
| Craft | Any air or sea-surface vehicle, or submersible of any kind or size. |
| Crest | The top of a wave, breaker, or swell. |
| Current (Ocean) | Continuous movement of the sea, sometimes caused by prevailing winds, as well as large constant forces, such as the rotation of the earth, or the apparent rotation of the sun and moon. Example is the Gulf Stream. |
| Datum | In SAR, refers to the probable location of a distressed vessel, downed aircraft, or PIW, which is corrected for drift at any moment in time. Depending on the information received this may be represented as a point, a line or an area. |
| Deck | The horizontal plating or planking on a ship or boat. |
| Distress | As used in the Coast Guard, when a craft or person is threatened by grave or imminent danger requiring immediate assistance. |
| Draft | The point on a vessel’s underwater body, measured from the waterline, that reaches the greatest depth. |
| Drift | The rate/speed at which a vessel moves due to the effects of wind, wave, current, or the accumulative effects of each. Usually expressed in knots. |
| Drogue | A device used to slow rate of movement. Commonly rigged off the stern of a boat while under tow to reduce the effects of following seas. May prevent yawing and/or broaching. (see sea anchor). |
| Dry Suit | A coverall type garment made of waterproof material having a rubber or neoprene seal around the neck and wrist cuffs. Allows the wearer to work in the water or in a marine environment without getting wet. |
| Emergency Position-Indicating | A device, usually carried aboard a maritime craft, that transmits a signal that alerts search and rescue authorities and enables rescue units to locate the scene of the distress. |
| TERM | DEFINITION |
| Radio Beacon (EPIRB) | |
| Emergency Signal Mirror | A mirror used to attract attention of passing aircraft or boats by reflecting light at them. Such reflected light may be seen up to five miles or more from the point of origin. |
| Eye | The permanently fixed loop at the end of a line. |
| Eye Splice | The splice needed to make a permanently fixed loop at the end of a line. |
| Fatigue | Physical or mental weariness due to exertion. Exhausting effort or activity. Weakness in material, such as metal or wood, resulting from prolonged stress. |
| Ferry | To transport a boat, people or goods across a body of water. |
| Fetch | The unobstructed distance over which the wind blows across the surface of the water. |
| Fitting | Generic term for any part or piece of machinery or installed equipment. |
| Flash | A relatively brief appearance of light, in comparison with the longest interval of darkness in the same character. |
| Freeboard | Distance from the weather deck to the waterline on a vessel. |
| Gunwale | The upper edge of a boat’s side. Pronounced “gun-ul.” |
| Heaving Line | Light, weighted line thrown across to a ship or pier when coming along side to act as a messenger for a mooring line. The weight is called a monkey fist. |
| Heel | Temporary leaning of a vessel to port or starboard caused by the wind and sea or by a high speed turn. |
| High Seas | That body of water extending seaward of a country’s territorial sea to the territorial sea of another country. |
| Hoist | To lift. Display of signal flags at yardarm. The vertical portion of a flag alongside its staff. |
| Hull | The body or shell of a ship or seaplane. |
| Hull Integrity | The hull’s soundness. |
| Hypothermia | A lowering of the core body temperature due to exposure of cold (water or air) resulting in a subnormal body temperature that can be dangerous or fatal. The word literally means “under heated.” |
| Inboard | Toward the center of a ship or a group of ships, as opposed to outboard. |
| Inlet | A recess, as a bay or cove, along a coastline. A stream or bay leading inland, as from the ocean. A narrow passage of water, as between two islands. |
| TERM | DEFINITION |
| Keel | The central, longitudinal beam or timber of a ship from which the frames and hull plating rise. |
| Kicker Hook | See skiff hook. |
| Knot (kn or kt) | A unit of speed equivalent to one nautical mile (6,080 feet) per hour. A measurement of a ship’s speed through water. A collective term for hitches and bends. |
| Leeward | The side or direction away from the wind, the lee side. |
| Life Jacket | See personal flotation device. |
| Life Ring (Ring Buoy) | A buoyant device, usually fitted with a light and smoke marker, for throwing to a person-in- the-water. |
| Lifeline | Line secured along the deck to lay hold of in heavy weather; any line used to assist personnel; knotted line secured to the span of lifeboat davits(manropes or monkey lines) for the use of the crew when hoisting and lowering. The lines between stanchions along the outboard edges of a ship’s weather decks are all loosely referred to as lifelines, but specifically the top line is the lifeline, middle is the housing line, and bottom is the footline. Any line attached to a lifeboat or life raft to assist people in the water. Also called a grab rope. |
| Light | The signal emitted by a lighted aid to navigation. The illuminating apparatus used to emit the light signal. A lighted aid to navigation on a fixed structure. |
| List | The static, fixed inclination or leaning of a ship to port or starboard due to an unbalance of weight. |
| Log | A device for measuring a ship’s speed and distance traveled through the water. To record something is to log it. Short for logbook. |
| Logbook | Any chronological record of events, as an engineering watch log. |
| Lookout | A person stationed as a visual watch. |
| Maritime | Located on or close to the sea; of or concerned with shipping or navigation. |
| Mayday | The spoken international distress signal, repeated three times. Derived from the French M’aider (help me). |
| Mooring | A chain or synthetic line that attaches a floating object to a stationary object. (e.g., dock, sinker). |
| Nautical Mile (NM) | 2000 yards; Length of one minute of arc of the great circle of the earth; 6,076 feet compared to 5,280 feet per a statute (land) mile. |
| Navigation | The art and science of locating the position and plotting the course of a ship or aircraft. |
| On Scene | The search area or the actual distress site. |
| TERM | DEFINITION |
| Overdue | When a vessel or person has not arrived at the time and place expected. |
| Overload | Exceeding the designed load limits of a vessel; exceeding the recommended work load of line or wire rope. |
| Painter Line (Painter) | A line at the bow or stern of a boat which is used for making fast; a single line used to take a vessel in tow alongside, commonly used with ships and their boats when placing the boat into use over the side. |
| Personal Flotation Device (PFD) | A general name for various types of devices designed to keep a person afloat in water (e.g., life preserver, vest, cushion, ring, and other throwable items). |
| Port | The left side of the vessel looking forward toward the bow. |
| Range | A measurement of distance usually given in yards. Also, a line formed by the extension of a line connecting two charted points. |
| Rig | To devise, set up, arrange. An arrangement or contrivance. General description of a ship’s upper works; to set up spars or to fit out. A distinctive arrangement of sails (rigging), as in a schooner rig. An arrangement of equipment and machinery, as an oil rig. |
| Roll | Vessel motion caused by a wave lifting up one side of the vessel, rolling under the vessel and dropping that side, then lifting the other side and dropping it in turn. |
| Rubrail | A permanent fixture, often running the length of a boat, made of rubber that provides protection much as a fender would. |
| SARSAT | Search and rescue satellite aided tracking. See Cospas-Sarsat System. |
| Sea Anchor | A device, usually of wood and/or canvas, streamed by a vessel in heavy weather to hold the bow up to the sea. Its effect is similar to a drogue in that it slows the vessel’s rate of drift. However, it is usually made off to the bow opposed to the stern as in the use of a drogue. |
| Sea Current | Movement of water in the open sea. |
| Sea Drogue | See sea anchor. |
| Set (of a Current) | The direction toward which the water is flowing. A ship is set by the current. A southerly current and a north wind are going in the same direction. Measured in degrees (usually true). |
| Ship | Any vessel of considerable size navigating deepwater, especially one powered by engines and larger than a boat. Also, to set up, to secure in place. To take something aboard. |
| Signal Kit/MK-79 | A signal kit used to attract vessels, aircraft, and ground rescue teams. Each cartridge flare burns red, has a minimum duration of 4.5 seconds, and reaches a altitude of 250’ to 650’. |
| TERM | DEFINITION |
| Smoke and Illumination Signal | A signal used to attract vessels and aircraft. It has a night end and a day end. The night end produces a red flame, the day end has an orange smoke. |
| Sound Signal | A device that transmits sound, intended to provide information to mariners during periods of restricted visibility and foul weather; a signal used to communicate a maneuver between vessels in sight of each other. |
| Standard Navy Preserver (Vest Type with Collar) | A Navy PFD vest used by the Coast Guard onboard cutters. Allows user to relax, save energy, increase survival time and will keep users head out of water, even if user is unconscious. Not found as part of a boat outfit. |
| Starboard | The right side of the vessel looking forward toward the bow. |
| Stern | The extreme after end of a vessel. |
| Strobe Light | A device that emits a high intensity flashing light visible for great distances. Used to attract the attention of aircraft, ships, or ground parties, it flashes white light at 50 plus or minus 10 times per minute. |
| Surface Swimmer | In the Coast Guard, a specially trained individual that is deployed from floating units, piers, or the shore to help people in the water. |
| Swell | Wind-generated waves which have advanced into a calmer area and are decreased in height and gaining a more rounded form. The heave of the sea. See roller. |
| Swimmer’s Harness | A harness used to tether and retrieve surface swimmers during rescue/recovery operations. |
| Tide | The periodic vertical rise and fall of the water resulting from the gravitational interactions between the sun, moon, and earth. |
| Trough | The valley between waves. |
| Vessel | By U.S. statutes, includes every description of craft, ship or other contrivance used as a means of transportation on water. “Any vehicle in which man or goods are carried on water.” (see ship). |
| Wave | A periodic disturbance of the sea surface, caused by wind (and sometimes by earthquakes). |
| Wave Frequency | The number of crests passing a fixed point in a given time. |
| Wedge | Used as temporary repair in event of damage aboard vessel. Made of soft wood, they are forced into holes or damaged areas to stop leaking, to plug damaged structures, or to reinforce shoving. Part of a damage control kit. |
| TERM | DEFINITION |
| Wet Suit | A tight-fitting rubber suit worn by a skin diver in order to retain body heat. Designed to protect wearer from exposure to cold, wind, and spray. Constructed of foam neoprene, a durable and elastic material with excellent flotation characteristics. These buoyancy characteristics, which affect the entire body, will cause floating horizontally, either face up or face down. |
| Whistle | A piece of survival equipment used to produce a shrill sound by blowing on or through it. To summon, signal or direct by whistling. A device for making whistling sounds by means of forced air or steam. A whistling sound used to summon or command. It is attached to some PFDs and is an optional item for the personal signal kit. It has proven very useful in locating survivors in inclement weather and can be heard up to 1,000 yards. |
| Wind-Chill Factor | An estimated measurement of the cooling effect of a combination of air temperature and wind speed in relation to the loss of body heat from exposed skin. |
| Windward | Towards the wind. |
APPENDIX B List of Acronyms This Appendix contains a list of acronyms that may be useful when reading this and other Coast Guard manuals. This appendix contains the following information:
| Topic | See Page |
| List of Acronyms | B-1 |
| ACRONYM | DEFINITION |
| A/C | Air Conditioning |
| AAR | After Action Report |
| ACFT | Aircraft |
| ACIP | Aviation Incentive Pay |
| ACMS | Aviation Computerized Maintenance System |
| ACP | Area Contingency Plan |
| ACP | Alternate Compliance Program |
| ACTSUS | Active Suspension |
| ADF | Automatic Radio Direction Finder |
| ADSW-AC | Active Duty Special Work in Support of Active Component |
| A/C | Air Conditioning |
| ADT | Active Duty for Training |
| ADT-AT | Active Duty Training for Annual Training |
| AEO | Assistant Engineering Officer |
| AEPO | Assistant Engineering Petty Officer |
| AFC | Allowance Fund Control |
| AFFF | Aqueous Film – Forming Foam |
| AIDS | Acquired Immunodeficiency Syndrome |
| AIM | Administrative Investigations Manual |
| AIS | Automatic Identification System |
| AH | Amplitude Modulation |
| AMIO | Alien/Migrant Interdiction Operation |
| AMS | Automated Manifest System |
| ACRONYM | DEFINITION |
| AMVER | Automated Mutual-Assistance Vessel Rescue |
| ANB | Aids to Navigation Boat |
| ANS | Aquatic Nuisance Species |
| ANSI | American National Standards Institute |
| ANT | Aids to Navigation Team |
| AOPS | Abstract of Operations |
| AOR | Area of Responsibility |
| API | American Petroleum Institute |
| APPS | Act to Prevent Pollution from Ships |
| APR | Aid Positioning Report |
| ASB | Arctic Survey Boat |
| ATB | Aviation Training Boat |
| AtoN | Aids to Navigation |
| AtoNIS | Aids to Navigation Information System |
| ATR | Ammunition Transaction Report |
| AUXCOM | Auxiliary Boat Commander |
| AUX DATA | Auxiliary Data |
| AUXPATCOM | Auxiliary Patrol Commander |
| AV | Aid Verifier |
| BA | Bridge Administration |
| BAC | Blood Alcohol Content |
| BAS | Basic Allowance for Subsistence |
| BCEB | Boat Crew Examination Boards |
| BCM | Boat Crew member |
| BCMP | Boat Class Maintenance Plan |
| BDCM | Buoy Deck Crew member |
| BDS | Buoy Deck Supervisor |
| BECCE | Basic Engineering Casualty Control Exercises |
| BEQ | Bachelor Enlisted Quarters |
| BM | Boatswain’s Mate |
| BNTM | Broadcast Notice to Mariners |
| BO | Boarding Officer |
| BO/BTM PQS | Boarding Officer / Boarding Team Member Personnel Qualification Standard |
| ACRONYM | DEFINITION |
| BOSN | Boatswain |
| BS | Breaking Strength |
| BSC | Boating Safety Circular |
| BTM | Boarding Team Member |
| BUSL | Buoy Utility Stern Loading |
| BWI | Boating While Intoxicated |
| BWM | Ballast Water Management |
| C2 | Command and Control |
| C2PC | Command/Control Personal Computer |
| CABs | Compressions, Airway, and Breathing |
| CAC | Crisis Action Center |
| CASCOR | Casualty Correct |
| CASREP | Casualty Report |
| CBL | Commercial Bill of Lading |
| CB-L | Cutter Boat – Large |
| CB-M | Cutter Boat – Medium |
| CB-OTH | Cutter Boat – Over the Horizon |
| CBRN | Chemical, Biological, Radiological, Nuclear |
| CB-S | Cutter Boat – Small |
| CDAR | Collateral Duty Addictions Representative |
| CDI | Course Deviation Indicator |
| CDO | Command Duty Officer |
| CDR | Commander |
| CDV | Course Deviation Variance |
| CEM | Crew Endurance Management |
| CERCLA | Comprehensive Environment Compensation and Liability Act |
| CEU | Civil Engineering Unit |
| CF | Comparison Factors |
| CFC | Combined Federal Campaign |
| CFR | Code of Federal Regulations |
| CFVS | Commercial Fishing Vessel Safety |
| CGADD | Coast Guard Addendum |
| CGDF | Coast Guard Dining Facility |
| ACRONYM | DEFINITION |
| CGIS | Coast Guard Investigative Service |
| CGPC | Coast Guard Personnel Command |
| CIC | Combat Information Center |
| CIO | Command Intelligence Officer |
| CISM | Critical Incident Stress Management |
| CM | Configuration Management |
| CMAA | Chief Master at Arms |
| CMCO | Classified Material Control Officer |
| CMG | Course Made Good |
| CMS | COMSEC (Communication Security) Material System |
| CO | Commanding Officer or Carbon Monoxide |
| CO/OIC | Commanding Officer/Officer-in-Charge |
| COCO | Chief of Contracting Officer |
| COFR | Certificate of Financial Responsibility |
| COG | Course Over Ground |
| COI | Certificate of Inspection |
| COLREG | International Regulations for Preventing Collisions at Sea |
| COMCEN | Communications Center |
| COMDTINST | Commandant Instruction |
| COMINT | Communications Intelligence |
| COMMS | Communications |
| CONOPS | Concept of Operations |
| COR | Certificate of Registry |
| COTP | Captain-of-the-Port |
| COTR | Contracting Officer’s Technical Representative |
| CPC | Commandant’s Performance Challenge |
| CPO | Chief Petty Officer |
| CPR | Cardiopulmonary Resuscitation |
| CPU | Central Processing Unit |
| CQA | Commandant’s Quality Award |
| CRT | Cathode Ray Tube |
| CS | Creeping Line Search |
| CSIM | Control Station Interface Module |
| ACRONYM | DEFINITION |
| CSMP | Current Ship’s Maintenance Project |
| CSP | Commence Search Point |
| CSP | Career Sea Pay |
| CVE | Control Verification Examination |
| CVS | Commercial Vessel Safety |
| CWO | Chief Warrant Officer |
| DAMA | Demand Assigned Multiple Access |
| DAN | Driver’s Alert Network |
| DANTES | Defense Activity for Non-Traditional Education Support |
| DAPA | Drug and Alcohol Program Administration |
| DDEC | Detroit Diesel Electronically Controlled |
| DEER | Defense Enrollment and Eligibility Reporting System |
| DEMPs | Diesel Engine Maintenance Programs |
| DF | Direction Finding |
| DGPS | Differential Global Positioning System |
| DICP | Drop-In Communications Package |
| DISREP | Discrepancy Report |
| DISREPS | Discrepancy Report |
| DIW | Dead-in-the-Water |
| DMA | Defense Mapping Agency |
| DMB | Data Marker Buoy |
| DMOA | Designated Medical Officer Advisor |
| DMS | Docket Management System |
| DO | Defense Operations |
| DoD | Department of Defense |
| DONCAF | Department of the Navy Central Adjudication Facility |
| DOT | Department of Transportation |
| DPB | Deployable Pursuit Boat |
| DR | Dead Reckoning |
| DSC | Digital Selective Calling |
| DVL | Digital Voice Logger |
| DWO | Deck Watch Officer |
| DWONR | Deck Watch Officer Navigation Rules |
| ACRONYM | DEFINITION |
| EAP | Employee Assistance Program |
| EAPC | Employee Assistance Program Coordinator |
| EBL | Electronic Bearing Line |
| EC | Electronic Control |
| EC | Engineering Change |
| ECM | Electronic Control Module |
| ECR | Engineering Change Request |
| ECS | Electronic Chart System |
| EDF | Enlisted Drug Facilities |
| EDM | Electronic Display Module |
| EEZ | Exclusive Economic Zone |
| EGIM | Electronic Gear Interface Module |
| ELC | Engineering Logistics Center |
| ELINT | Electronics Intelligence |
| ELT | Emergency Locator Transmitter |
| ELT | Enforcement of Laws and Treaties |
| EMI | Extra Military Instruction |
| EMS | Emergency Medical Services |
| EMT | Emergency Medical Technician |
| EO | Engineering Officer |
| EOCT | End-of-Course Test |
| EP | Estimated Position |
| EPA | Environmental Protection Agency |
| EPES | Enlisted Personnel Evaluation System |
| EPIRB | Emergency Position Indicating Radio Beacon |
| EPO | Engineering Petty Officer |
| EPO/EO | Engineering Petty Officer/Engineering Officer |
| EPS | Environmental Protection Specialist |
| ERIM | Engine Room Interface Module |
| ESA | Endangered Species Act |
| ESD | Electronics Support Detachment |
| ESU/D | Electronics Support Unit/detachment |
| ET | Electronics Technician |
| ACRONYM | DEFINITION |
| ETA | Electronic Transportation Acquisition |
| ETA | Estimated Time of Arrival |
| EXCOM | Extended Communications |
| FAA | Federal Aviation Agency |
| FAR | Family Advocacy Representative |
| FAR | Federal Acquisition Regulations |
| FAST | Facial Drooping, Arm Weakness, Speech Difficulty, and Time is Critical |
| FBIS | Foreign Broadcast Information Service |
| FEDEX | Federal Express |
| FEEF | Federal Energy Efficiency Funding |
| FFCS | Full Function Crew Station |
| FID | Field Information Document |
| FINCEN | Finance Center |
| FIR | Field Intelligence Report |
| FL | Fitness Leader |
| FLOCS | Fast Lubricating Oil Change System |
| FLS | Fleet Logistics Supply |
| FM | Frequency Modulation |
| FMP | Fisheries Management Plan |
| FOIA | Freedom of Information Act |
| FOSC | Federal On-Scene Coordinator |
| FOUO | For Official Use Only |
| FPCON | Force Protection Conditions |
| FPM | Feet Per Minute |
| FRP | Fiberglass Reinforced Plastic |
| FS | Food Service Specialist |
| FSC | Federal Supply Classification |
| FSI | Field Sobriety Test |
| FSIC | Fiscal, Sanitation, Immigration or Customs |
| FSO | Food Services Officer |
| FWPCA | Federal Water Pollution Control Act |
| FWS | Fish and Wildlife Service |
| GAR | Green-Amber-Red |
| ACRONYM | DEFINITION |
| GFM | Global Freight Management |
| GMDSS | Global Maritime Distress and Safety System |
| G-OCS | Office of Boat Forces |
| G-OI | Office of Intelligence |
| GPH | Gallons Per Hour |
| GPS | Global Positioning System |
| GRUCOM | Group Commander |
| GSA | Government Service Administration |
| GTA | Government Transportation Account |
| GV | Government Vehicle |
| HAZCOM | Hazardous Communication |
| HAZMAT | Hazardous Material |
| HAZWASTE | Hazardous Waste |
| HCPV/HIV | High Capacity Passenger Vessel/High Interest Vessel |
| HDOP | Horizontal Dilution of Precision |
| HEA | Harbor Entrance and Approach |
| HELP | Heat Escape Lessening Position |
| HF | High Frequency |
| HIN | Hull Identification Number |
| HIV | Human Immunodeficiency Virus |
| HS | Homeland Security |
| HPU | Hydraulic Power Unit |
| HRSIC | Human Resources Services and Information Center |
| HSC | Harbor Safety Committee |
| HUMINT | Human Intelligence |
| HVAC | Heating, Ventilation, and Air Conditioning |
| IACS | International Association of Classification Societies |
| IALA | International Association of Lighthouse Authorities |
| IAMSAR | International Aeronautical and Maritime Search and Rescue |
| I-AtoNIS | Integrated Aids to Navigation Information Systems |
| ICA | Individual Credit Accounts |
| ACRONYM | DEFINITION |
| ICAO | International Civil Aviation Organization |
| ICC | Intelligence Coordination Center |
| ICLL | International Convention on Load Lines |
| ICMTS | Interagency Committee of the Marine Transportation System |
| ICS | Incident Command System |
| ICV | Intercommunicating Fill Valve |
| ICW | Intracoastal Waterway |
| IDT | Inactive Duty for Training |
| IEC | International Electrotechnical Commission |
| IIP | International Ice Patrol |
| IIR | Intelligence Information Report |
| IIRAIRA | Illegal Immigration Reform and Immigrant Responsibility Act |
| ILO | International Labor Organization |
| IMARV | Independent Maritime Response Vessel |
| IMO | International Maritime Organization |
| IMPAC | International Merchant Purchase Authorization Card |
| INA | Immigration and Nationality Act |
| INS | Immigration and Naturalization Service |
| IPIECA | International Petroleum Industry Environmental Conservation Association |
| IPS | International Pipe Standard |
| IRIS | Incident Reporting Information System |
| ISC | Integrated Support Command |
| ISM | International Ship Management |
| ISO | International Standards Organization |
| IT | Information Systems Technician |
| IUU | Illegal, Unreported, and Unregulated |
| JOOD | Junior Officer of the Day |
| JQR | Job Qualification Requirement |
| KO | Contracting Officer |
| LC | Load Center |
| LCD | Liquid Crystal Display |
| ACRONYM | DEFINITION |
| LCVP | Landing Craft, Vehicle, Personnel |
| LE | Law Enforcement |
| LEISII | Law Enforcement Information System II |
| LEMAN | Law Enforcement Manual |
| LEO | Law Enforcement Officer |
| LEQB | Law Enforcement Qualification Board |
| LEU | Law Enforcement Unit |
| LHA | Local Housing Authority |
| LHI | Local Housing Inspector |
| LIR | Letter Incident Report |
| LKP | Last Known Position |
| LLNR | Light List Number |
| LMR | Living Marine Resource |
| LNB | Large Navigation Buoy |
| LNG | Liquid Natural Gas |
| LOA | Length Overall |
| LOB | Line-of-Bearing |
| LOC | Letter of Commendation or Level of Consciousness |
| LOGREQ | Logistics Requirements |
| LOP | Line of Position |
| LORAN-C | Long-Range Aid to Navigation |
| LORSTA | LORAN Station |
| LOS | Line-of-Sight |
| LUFS | Large Unit Financial System |
| LUT | Local User Terminal |
| LWL | Length on Waterline |
| MAA | Master at Arms |
| MARB | Maritime Assistance Request Broadcast |
| MARPOL | International Convention for the Prevention of Pollution from Ships |
| MARSEC | Marine Security Conditions |
| MASINT | Measurement and Signature Intelligence |
| ACRONYM | DEFINITION |
| MAW | Maximum Allowable Weight |
| MBR INT | Member’s Initials |
| MCB | Motor Cargo Boat |
| MCM | Manual for Courts-Martial |
| MCS | Master Control Station |
| MDA | Maritime Domain Awareness |
| MDV | Marine Dealer Visit |
| MDZ | Maritime Defense Zone |
| MEDICO | Medical Advice |
| MEDEVAC | Medical Evacuation |
| MEP | Marine Environmental Protection |
| MEPC | Marine Environment Protection Committee |
| MER | Marine Environmental Response |
| MF | Medium Frequency |
| MFPU | Maritime Force Protection Unit |
| MHS | Maritime Homeland Security |
| MI | Marine Information |
| MI | Maintenance Inspection |
| MI & R | Maintenance, Improvement and Repair |
| MIC | Manufacturer Identification Code |
| MICA | Management Information for Configuration and Allowances |
| MICA | Machinery Information Catalog Allowance |
| MIM | Marine Interface Module |
| MISLE | Marine Information for Safety and Law Enforcement |
| MJM | Military Justice Manual |
| MLB | Motor Lifeboat |
| MLC | Maintenance and Logistics Command |
| MLCPAC | Maintenance and Logistics Command Pacific |
| MMD | Merchant Mariner Document |
| MMPA | Marine Mammal Protection Act |
| MMS | Minerals Management Services |
| MMSI | Maritime Mobile Service Identity |
| ACRONYM | DEFINITION |
| MOA | Memorandum of Agreement |
| MOB | Man Overboard |
| MOU | Memorandum of Understanding |
| MPR | Multiple Persons-in-the-Water |
| MPS | Marine Protected Species |
| MRE | Military Rule of Evidence |
| MRR | Medium-Range Recovery |
| MSAP | Maritime SAR Assistance Policy |
| MSB | Motor Surf Boat |
| MSC | Marine Safety Center |
| MSFCMA | Magnuson-Stevens Fisheries Conservation and Management Act |
| MSO | Maintenance Support Outline |
| MSO | Marine Safety Office |
| MSS | Marine Safety and Security |
| MSST | Maritime Safety and Security Team |
| MTL | Master Training List |
| MTS | Marine Transportation System |
| MTSNAC | Marine Transportation System National Advisory Council |
| MWR | Moral, Welfare and Recreation |
| NAFA | Non-Appropriated Fund Activity |
| NAVAIDS | Navigational Aids |
| NAVRULS | Navigation Rules |
| NCP | National Contingency Plan |
| NCW | Naval Coastal Warfare |
| NDRS | National Distress Response System |
| NDRSMP | National Distress Response System Modernization Project |
| NDS | National Distress System |
| NESU | Naval Engineering Support Unit |
| NJP | Non-Judicial Punishment |
| NLB | Nearshore Life Boat |
| NLT | No Later Than |
| NM | Nautical Miles |
| NMEA | National Marine Electronics Association |
| ACRONYM | DEFINITION |
| NMFS | National Marine Fisheries Service |
| NMLBS | National Motor Lifeboat School |
| NOS | National Ocean Survey |
| NOAA | National Oceanic and Atmospheric Administration |
| NRC | National Response Center |
| NRT | National Response Team |
| NSARC | National Search and Rescue Committee |
| NSB | Non-Standard Boat |
| NSF | National Strike Force |
| NSFCC | National Strike Force Coordination Center |
| NSN | National Stock Number |
| NSP | National Search and Rescue Plan |
| NSS | National Search and Rescue Supplement |
| NTP | Naval Training Publication |
| NVDC | National Vessel Documentation Center |
| NVIC | Navigation and Vessel Inspection Circular |
| NWP | Naval Warfare Publication |
| OBA | Oxygen Breathing Apparatus |
| O/S WX | On-Scene Weather |
| OCMI | Officer-in-Charge Marine Inspection |
| OER | Officer Evaluation Report |
| OIC | Officer-in-Charge |
| OIC INT | Officer in Charge’s Initials |
| OJT | On-the-Job Training |
| OM & S | Operating Materials and Supplies |
| OMMP | Occupational Medical Monitoring Program |
| OOD | Officer of the Deck (Day) |
| OPA | Oil Pollution Act |
| OPAREA | Operational Area |
| OPCEN | Operations Center |
| OPCON | Operational Control |
| OPFAC | Operating Facility |
| OPLAN | Operations Plan |
| ACRONYM | DEFINITION |
| OPORD | Operations Order |
| OPORDER | Operations Order |
| OQB | Operations Qualification Board |
| ORM | Operational Risk Management |
| OS | Operations Specialist |
| OSB | Operations Standards Board |
| OSC | Operations Systems Center |
| OSC | On-Scene Commander |
| OSHA | Occupational Safety and Health Administration |
| OTC | Officer in Tactical Command |
| PA | Privacy Act |
| PAL | Personnel Allowance List |
| PALMS | Patrol Order Management System |
| PAO | Public Affairs Officer |
| PATCOM | Patrol Commander |
| PAWSS | Ports and Waterways Safety System |
| PCS | Permanent Change of Station |
| PDD | Presidential Decision Directive |
| PDR | Personnel Data Record |
| PDS | Personnel Data System |
| PERSRU | Personnel Reporting Unit |
| PES | Port and Environmental Safety |
| PFD | Personal Flotation Device |
| PI | Personnel Inspection |
| PIAT | Public Information Assistance Team |
| PIE | Partnership in Education |
| PIW | Person-in-the-Water |
| PLB | Personal Locator Beacon |
| PMIS/JUMPS | Personnel Management Information System/Joint Uniform Military Pay System |
| PMLV | Personnel Marker Light |
| PMS | Preventative/Planned Maintenance System |
| PO | Petty Officer |
| POB | Persons Onboard |
| ACRONYM | DEFINITION |
| POD | Probability of Detection |
| POP | Planned Obligation Priority |
| POS | Probability of Success |
| POPFAC | Parent Operating Facility |
| POW | Plan of the Week |
| PPE | Personal Protective Equipment |
| PPI | Plan Position Indicator |
| PPS | Precise Positioning Service |
| PQS | Personnel Qualification Standard |
| PR | Position Report |
| PRECOM | Preliminary Communications |
| PREP | Preparedness for Response Exercise Program |
| PS | Parallel Search |
| PSCO | Port State Control Officer |
| PSU | Port Security Unit |
| PTO | Power Take-Off |
| PWB | Port and Waterways Boat |
| PWSA | Ports and Waterway Safety Act |
| QAWTD | Quick-Acting Watertight Door |
| QEB | Qualification Examining Board |
| QRC | Quick Response Card |
| RACON | Radar Beacon |
| RB-HS | Response Boat-Homeland Security |
| RB-M | Response Boat-Medium |
| RBS | Recreational Boating Safety |
| RB-S | Response Boat-Small |
| RCC | Rescue Coordination Center |
| RDF | Radio Direction Finder |
| RFMC | Regional Fisheries Management Council |
| RFMO | Regional Fisheries Management Organization |
| RFO | Ready for Operations |
| RIK | Rations-In-Kind |
| RMS | Readiness Management System |
| ACRONYM | DEFINITION |
| RNAV | Radio Aids to Navigation |
| ROC/POE | Required Operational Capability/Projected Operational Environment |
| RP | Responsible Party |
| RPAL | Reserve Personnel Allowance List |
| RS | Rescue Swimmer |
| RSC | Rescue Sub-Center |
| RT | Receiver/Transmitter |
| SAFE | Substance Abuse Free Environment |
| SAI | Small Arms Instructor |
| SAP | Simplified Acquisition Procedures |
| SAR | Search and Rescue |
| SAREX | SAR Exercise |
| SARMIS | Search and Rescue Mission Information System |
| SARSAT | Search and Rescue Satellite Aided Tracking |
| SAT | Subsistence Advisory Team |
| SATCOM | Satellite Communication |
| SB | Sailboat |
| SC | SAR Coordinator |
| SCUBA | Self-Contained Underwater Breathing Apparatus |
| SDB | Service Dress Blue |
| SDO | Sector Duty Officer |
| SEAOP | Special and Emergency Operations Procedure |
| SEPRATS | Separate Rations |
| SF | Safety Factor |
| SIGINT | Signals Intelligence |
| SIPRNET | Secret Internet Protocol Routing Network |
| SITREP | Situation Report |
| SKF | Skiff |
| SLDMB | Self Locating Datum Marker Buoy |
| SMC | SAR Mission Coordinator |
| SMS | Safety Management System |
| SMTJ | Special Maritime and Territorial Jurisdiction |
| SNO | Statement of No Objection |
| ACRONYM | DEFINITION |
| SOA | Speed of Advance |
| SOG | Speed Over Ground |
| SOLAS | Safety of Life at Sea |
| SO-OP | Auxiliary Division Operations Officer |
| SOP | Standard Operating Procedure |
| SOPA | Senior Officer Present Afloat |
| SOPEP | Shipboard Oil Pollution Emergency Plan |
| SOQ | Sailor of the Quarter |
| SOS | Save Our Ship |
| SPC | Special Purpose Craft |
| SPC (HWX) | Heavy Weather Special Purpose Craft |
| SPC (LE) | Special Purpose Craft (Law Enforcement) |
| SPE | Severity-Probability-Exposure |
| SPF | Sun Protection Factor |
| SPOC | SAR Point of Contact |
| SPS | Standard Positioning Service |
| SRA | Short-Range Aids to Navigation |
| SROE | Standing Rules of Engagement |
| SRR | Search and Rescue Region |
| SRR | Short-Range Recovery |
| SRS | Synchronous Reference Sensor |
| SRU | Search and Rescue Unit |
| SS | Square Search |
| SSB | Single Side Band |
| SSB-HF | Single Side Band - High Frequency |
| SSL | Standard Support Level |
| SSM | Support and Special Mission |
| SSMR | Shore Station Maintenance Record |
| SSPO | Station Support Petty Officer |
| STA OPS | Station Operations |
| STAN & RFO | Readiness and Standardization Program |
| STANT | Station Aids to Navigation Team |
| STAR | Standard Automated Requisitioning |
| ACRONYM | DEFINITION |
| STCW | Standards of Training, Certification and Watchkeeping for Seafarers |
| STTR | Short Term Resident Training Request |
| STU III | Secure Telephone Unit |
| SURPIC | Surface Picture |
| SWE | Service-wide Exam |
| SWL | Safe Working Load |
| TACON | Tactical Control |
| TAD | Temporary Assigned Duty |
| TAIT | Temporary Access Inventory Tool |
| TANB | Trailerable Aids to Navigation Boat |
| TB | Tuberculosis |
| TBSA | Total Body Surface Area |
| TC | Technical Committee |
| TCM | Telecommunications Manual |
| TCOW | Telecommunications Watchstander |
| TCT | Team Coordination Training |
| TD | Temporary Duty |
| TD | Time Difference |
| TFC | Total Fuel Consumption |
| THREATCON | Threat Conditions |
| TMT | Training Management Tool |
| TOI | Target of Interest |
| TPSB | Transportable Port Security Boat |
| TQC | Training Quota Management Center |
| TRACEN | Training Center |
| TRATEAM | Training Team |
| TRS | Timing Reference Sensor |
| TSN | Track Line Non-Return Search |
| TSR | Track Line Return Search |
| U/W | Underway |
| UCMJ | Uniform Code of Military Justice |
| UEG | Unit Environmental Guide |
| UEPH | Unaccompanied Enlisted Personnel Housing |
| ACRONYM | DEFINITION |
| UHF | Ultra High Frequency |
| UMI | Universal Marine Interface |
| UMIB | Urgent Marine Information Broadcast |
| UOF | Use of Force |
| UPF | Unit Performance Factor |
| UPH | Unaccompanied Personnel Housing |
| UPS | United Parcel Service |
| USBP | United States Border Patrol |
| USC | United States Code |
| USFWS | U.S. Fish and Wildlife Service |
| USPS | U.S. Power Squadron |
| USWMS | Uniform State Waterway Marking System |
| UTB | Utility Boat |
| UTBSC | Utility Boat Systems Center |
| UTC | Coordinated Universal Time |
| UTL | Utility Boat Light |
| UTM | Utility Boat Medium |
| UTS | Unit Travel System |
| UV | Ultraviolet |
| VHA | Variable Housing Allowance |
| VHF | Very High Frequency |
| VRM | Variable Range Marker |
| VRO | Variable Ratio Oiler |
| VRP | Vessel Response Plan |
| VS | Sector Search |
| VSC | Vessel Safety Check |
| VTS | Vessel Traffic Services |
| WP | Working Punt |
| WAAS | Wide Area Augmentation System |
| WAMS | Waterways Analysis and Management System |
| WC | Wellness Coordinator |
| WLIC | Construction Tender |
| WLL | Working Load Limit |
| ACRONYM | DEFINITION |
| WPB | Patrol Boat |
| WR | Wellness Representative |
| WWM | Waterways Management |
| XO | Executive Officer |
| XPO | Executive Petty Officer |
| XTE | Cross Track Error |
COMDTINST 16114.2A, ch. 4, B.6
Practice questions
When a ship is abandoned and there are several liferafts in the water, which task must be done to aid in your rescue?
- Transfer all the injured to one raft
- Transfer all supplies to one raft and post a guard
- Separate the rafts by drifting away to increase chances of detection
- Secure the rafts together to keep them from drifting apart
Study the material on Lifesaving and Survival →
Real examination question — Q170, Q170 #32
Life jackets should be marked with which item?
- The vessel's name
- The vessel's home port
- The maximum weight allowed
- The stowage space assigned
Study the material on Lifesaving and Survival →
Real examination question — Q170, Q170 #48
Which is TRUE concerning the stowage of life jackets?
- They must be stowed in readily accessible locations
- They are required to be stowed in messrooms
- They are required to be stowed in a central location
- They are always locked in watertight containers
Study the material on Lifesaving and Survival →
Real examination question — Q170, Q170 #49
If you are required to jump from any height from your vessel when should the external flotation bladder of an immersion suit be inflated?
- After entry into the water
- Only after four hours in the water
- Only after two hours in the water
- Before entry into the water
Study the material on Lifesaving and Survival →
Real examination question — Q170, Q170 #50
Which type of EPIRB must each ocean-going ship carry?
- Class A
- Class B
- Class C
- Category 1
Why: § 180.205 Survival craft—vessels operating on limited coastwise routes. →
Coast Guard examination bank question, answer checked against — 46 CFR 180, § 180.205
The vessel's Emergency Position Indicating Radio beacon (EPIRB) must be tested __________.
- weekly
- monthly
- every 2 months
- every 3 months
Why: § 185.728 Testing and servicing of Emergency Position Indicating Radiobeacons (EPIRB). →
Coast Guard examination bank question, answer checked against — 46 CFR 185, § 185.728
The Master shall insure that the Emergency Position Indicating Radio beacon (EPIRB) is __________.
- secured inside the wheelhouse
- tested annually
- tested monthly
- secured in the emergency locker
Why: § 185.728 Testing and servicing of Emergency Position Indicating Radiobeacons (EPIRB). →
Coast Guard examination bank question, answer checked against — 46 CFR 185, § 185.728
On small passenger vessels if an item of lifesaving equipment is carried but not required __________.
- the equipment must be approved by the Commandant
- it must be removed from the vessel as excess equipment
- it may remain aboard the vessel as excess equipment regardless of its condition
- it must be destroyed in the presence of a marine inspector
Why: § 180.25 Additional requirements. →
Coast Guard examination bank question, answer checked against — 46 CFR 180, § 180.25
For the purposes of distress signaling, small passenger vessels that operate on runs of more than 30 minutes duration on lakes, bays and sounds, and river routes must carry __________.
- A radiotelephone
- Three hand red flare distress signals, and three hand orange smoke distress signals
- A "Very" pistol and flare kit
- An approved noise- making device
Why: § 180.68 Distress flares and smoke signals. →
Coast Guard examination bank question, answer checked against — 46 CFR 180, § 180.68
Ring life buoys used aboard a small passenger vessels on oceans or coastwise routes are required to be what color?
- White
- White or international orange
- Orange
- Any highly visible color easily seen from the air
Why: § 180.70 Ring life buoys. →
Coast Guard examination bank question, answer checked against — 46 CFR 180, § 180.70
The color of rockets, shells, or rocket parachute flares used to indicate that the vessel is in distress and requires immediate assistance is __________.
- white
- green
- red
- yellow
Why: § 180.68 Distress flares and smoke signals. →
Coast Guard examination bank question, answer checked against — 46 CFR 180, § 180.68
Life preservers must be marked with the __________.
- stowage space assigned
- vessel's name
- vessel's home port
- maximum weight allowed
Why: § 185.604 Lifesaving equipment markings. →
Coast Guard examination bank question, answer checked against — 46 CFR 185, § 185.604
The life jackets on all vessels shall be __________.
- inspected weekly
- worn at all times
- readily available
- tested yearly
Why: § 180.78 Stowage of life jackets. →
Coast Guard examination bank question, answer checked against — 46 CFR 180, § 180.78
Required lifesaving equipment on existing vessels may be continued in use on the vessel if __________.
- kept on board no more than 2 years
- inspected and serviced every 6 months
- destroyed if more than 5 years old
- maintained in good and serviceable condition
Why: § 180.15 Applicability to existing vessels. →
Coast Guard examination bank question, answer checked against — 46 CFR 180, § 180.15
The operating cord on an inflatable liferaft should be renewed by __________.
- removing the top half of the shell, cutting the line at its source, and renewing completely
- cutting the line where it enters the case and replacing that portion
- leaving the original line and tying another one to it so the two lines will take the strain
- an approved servicing facility ashore
Coast Guard examination bank question, answer checked against — 46 CFR 185, § 185.730
According to the "T-Boat" regulations, the permanent marks placed on each side of a vessel forward, aft, and amidships to indicate the maximum allowable draft and trim are called __________.
- loading marks
- the air draft
- depth marks
- Plimsoll marks
Why: § 185.602 Hull markings. →
Coast Guard examination bank question, answer checked against — 46 CFR 185, § 185.602
On vessels subject to the provisions of 46 CFR Subchapter T, life jackets shall be __________.
- kept locked up at all times when underway
- stored in convenient places throughout the accommodation spaces
- inaccessible to passengers
- on the topmost deck of the vessel at all times
Why: § 180.78 Stowage of life jackets. →
Coast Guard examination bank question, answer checked against — 46 CFR 180, § 180.78
On vessels on an international voyage, each inflatable liferaft shall have a carrying capacity of not less than __________.
- 50 percent of all persons on board
- 75 percent of all persons on board
- 6 persons
- 10 persons
Why: § 180.200 Survival craft—general. →
Coast Guard examination bank question, answer checked against — 46 CFR 180, § 180.200
Which approved lifesaving device is required for each person on board a motor vessel carrying passengers?
- Buoyant cushion
- Buoyant vest
- Life jacket
- Ring life buoy
Coast Guard examination bank question, answer checked against — 46 CFR 180, § 180.71
Which lifesaving equipment must be tested monthly?
- Inflatable PFD's
- EPIRB
- Hydrostatic releases
- Dated batteries
Why: § 185.728 Testing and servicing of Emergency Position Indicating Radiobeacons (EPIRB). →
Coast Guard examination bank question, answer checked against — 46 CFR 185, § 185.728
Distress flares and smoke signals are not required on vessels operating on short runs. A "short run" is limited to __________. (small passenger vessel regulation)
- water of less than 20 feet in depth
- where land is always in sight
- no more than 5 miles
- about 30 minutes away from the dock
Why: § 180.68 Distress flares and smoke signals. →
Coast Guard examination bank question, answer checked against — 46 CFR 180, § 180.68
Life jackets should be marked with the __________.
- maximum weight allowed
- stowage space assigned
- vessel's home port
- vessel's name
Why: § 185.604 Lifesaving equipment markings. →
Coast Guard examination bank question, answer checked against — 46 CFR 185, § 185.604
What equipment must be on a life float? (small passenger vessel regulations)
- Two paddles, a light, painter, lifeline and pendants
- Water-light, painter, and signal mirror
- Water-light and painter only
- Two paddles, painter, and six red flares
Why: § 180.175 Survival craft equipment. →
Coast Guard examination bank question, answer checked against — 46 CFR 180, § 180.175
Aboard small passenger vessels the number of childrens' life jackets carried must be at least what percentage of the total number of persons aboard?
- 4%
- 7.5%
- 10%
- 15%
Coast Guard examination bank question, answer checked against — 46 CFR 180, § 180.71
Which equipment is not required for a life float? (small passenger vessel regulations)
- Paddles
- Light
- Painter
- Compass
Why: § 180.175 Survival craft equipment. →
Coast Guard examination bank question, answer checked against — 46 CFR 180, § 180.175
Life floats and buoyant apparatus may be stowed in tiers, one above the other, to a height of not more than __________. (small passenger vessel regulations)
- 3 feet
- 4 feet
- 5 feet
- 6 feet
Why: § 180.137 Stowage of life floats and buoyant apparatus. →
Coast Guard examination bank question, answer checked against — 46 CFR 180, § 180.137
All life jackets carried on board small passenger vessels are required to be marked __________. (small passenger vessel regulations)
- with the vessel's name
- with the vessel's official number
- with the maximum weight to be held by the life preserver
- with the maximum serviceable life of the life preserver
Why: § 185.604 Lifesaving equipment markings. →
Coast Guard examination bank question, answer checked against — 46 CFR 185, § 185.604
Which of the devices listed will prevent an inflated liferaft from being pulled under by a vessel which sinks in water over 100 feet deep?
- The hydrostatic release
- A shear pin
- A rottmer release
- A weak link in the painter
Why: § 180.130 Stowage of survival craft. →
Coast Guard examination bank question, answer checked against — 46 CFR 180, § 180.130
A vessel carrying passengers for hire shall have on board an approved life jacket __________. (small passenger vessel regulations)
- for every passenger on board
- for every person on board, plus 10% childrens' life jackets
- for every person on board, plus 10% additional on upper deck in box
- or buoyant cushion for every person on board plus 10% for children
Coast Guard examination bank question, answer checked against — 46 CFR 180, § 180.71
If your vessel is certificated to carry 10 persons, including both adults and children, how many life jackets are you required to carry on board? (small passenger vessel regulations)
- 11 adult
- 10 adult and 1 child
- 10 adult and 5 child
- 10 adult
Coast Guard examination bank question, answer checked against — 46 CFR 180, § 180.71
Non-required lifesaving equipment carried as additional equipment aboard small passenger vessels __________.
- must be removed when carrying passengers
- must be approved by the Commandant
- may be substituted for not more than 5% of the required lifejackets
- may be carried regardless of approval or condition, if in excess of required lifesaving equipment
Why: § 180.25 Additional requirements. →
Coast Guard examination bank question, answer checked against — 46 CFR 180, § 180.25
The painter of the inflatable liferaft has a length of __________.
- 25 feet
- 100 feet
- 200 feet
- 400 feet
Why: § 180.175 Survival craft equipment. →
Coast Guard examination bank question, answer checked against — 46 CFR 180, § 180.175
Inflatable liferafts on vessels on an international voyage must be able to carry at least __________.
- 2 persons
- 4 persons
- 6 persons
- 8 persons
Why: § 180.200 Survival craft—general. →
Coast Guard examination bank question, answer checked against — 46 CFR 180, § 180.200
Which vessel is required to carry a Category I, 406 MHz EPIRB installed to automatically float free and activate? (small passenger vessel regulations)
- A vessel operating within 3 miles from the coastline in the Gulf of Mexico.
- A vessel operating on the ocean within 5 miles from the coastline.
- A vessel operating beyond 3 miles from the coastline of the Great Lakes.
- A vessel operating exclusively on inland waters.
Why: § 180.64 Emergency Position Indicating Radiobeacons (EPIRB). →
Coast Guard examination bank question, answer checked against — 46 CFR 180, § 180.64
Where must the draft marks be placed on a small passenger vessel?
- On each side of the stem
- Near the stern post or rudder post
- At each end of the vessel
- On each side, amidships
Why: § 185.602 Hull markings. →
Coast Guard examination bank question, answer checked against — 46 CFR 185, § 185.602
The EPIRB on board your vessel is required to be tested __________.
- weekly
- monthly
- quarterly
- yearly
Why: § 185.728 Testing and servicing of Emergency Position Indicating Radiobeacons (EPIRB). →
Coast Guard examination bank question, answer checked against — 46 CFR 185, § 185.728
Life floats must be equipped with __________. (small passenger vessel regulations)
- a sea anchor
- a signal mirror
- an EPIRB
- paddles
Why: § 180.175 Survival craft equipment. →
Coast Guard examination bank question, answer checked against — 46 CFR 180, § 180.175
Where this comes from
- 46 CFR 180 — Lifesaving Equipment and Arrangements (small passenger vessels) — 46 CFR 180, current. Read the original.
- 46 CFR 185 — Operations (small passenger vessels) — 46 CFR 185, current. Read the original.
- Boat Crew Handbook — Rescue and Survival Procedures — COMDTINST 16114.2A, Feb 2021. Read the original.
Study aid only — it certifies nothing. Text shown as quoted is reproduced word for word from the document named beside it; anything marked as our explanation is ours and does not bind anyone. Where the two differ, the source document governs.